The Agentic Development Blueprint
Context engineering, deterministic safety, infrastructure, delegation, production workflows, AI governance, platform engineering, GitOps, cron architecture, and Copilot plugins for AI coding agents
Your AI coding agent is only as good as the system around it. This comprehensive blueprint covers what agents actually are, how context engineering shapes their output, the three-layer safety model, core infrastructure and sandboxing, delegated agent architectures with steerability, three workflow patterns from single-threaded to autonomous, continuous AI patterns, the 7-layer AI governance stack for production safety, a step-by-step transformation path from messy codebase to production-grade agentic workflow, a complete platform engineering chapter that scales these patterns across your entire organization, GitOps patterns that make your entire agent platform declarative and governed through Git, and a production cron architecture that runs roughly 60 scheduled jobs autonomously with zero human triggers, and a complete chapter on building Copilot plugins as domain-expert AI teammates — manifest architecture, skill YAML patterns, MCP tool integration, and production patterns from three real plugins.
The Agentic Development Blueprint
Engineering teams and technical leads who are already using AI coding agents (GitHub Copilot, Cursor, Claude Code, etc.) but aren't getting reliable, safe results. You've seen the agent make dumb mistakes, touch files it shouldn't, or produce code that technically works but doesn't fit your architecture. You know AI can be better ΓÇö you just don't know how to make it better. This blueprint is the how.
Most teams adopt AI coding agents and immediately run into the same wall: the agent produces code, but it's not the right code. It ignores your architecture patterns, generates tests that pass but catch nothing, and occasionally breaks things in ways that take longer to fix than if you'd written it manually. The typical response is "AI isn't ready yet." The real problem is that your codebase isn't ready for AI. This blueprint fixes your codebase ΓÇö and then fixes the system around it.
Here's the pattern I see over and over: a team adopts an AI coding agent, gives it access to their repo, and within a week they're complaining that the agent produces garbage. They blame the model. They blame the tool. They say "AI isn't ready for real work."
They're wrong ΓÇö but not in the way they think.
The agent isn't broken. The system around the agent is broken.
And by "system," I mean everything: the state of the codebase, the context the agent can see, the guardrails (or lack thereof) that constrain its behavior, the testing infrastructure that catches its mistakes, and the workflows that turn its output into reliable, shippable code.
This blueprint is organized into five parts. Part 1 covers the building blocks — starting with what an agent actually is, then moving through context engineering, deterministic safety, core infrastructure, delegated agents, workflows, and continuous AI. Part 2 is the step-by-step transformation — a structured path from messy codebase to production-grade agentic workflow. Part 3 is the governance layer — the 7-layer stack that keeps autonomous agents safe, bounded, and trustworthy in production. Part 4 is platform engineering — scaling your agentic workflow into an Internal Developer Platform that serves your entire organization. Part 5 is GitOps for agent governance — making your entire platform declarative, versioned, and auditable through Git.
Clear problem statement: if your codebase, context, and guardrails are messy, your agent will be messy too. This blueprint is the structured path out of that loop.
The Building Blocks
Understanding the pieces before you put them together.
What Is an Agent?
Before you can protect an agent, you need to understand what it actually is ΓÇö and what it isn't.
An LLM is expensive software
Strip away the hype and a large language model is a function: text in, text out. It predicts the next token based on everything it has seen ΓÇö both during training and in the current conversation. That's it.
It's expensive software because each token costs compute. More tokens in the conversation means more memory, more processing, and more money. This matters because it creates a hard constraint: the context window is finite, and every token you put in it has a cost.
The context window problem
The context window is the total amount of text the model can "see" at once ΓÇö your instructions, the conversation history, file contents, tool results, everything. Modern models have large windows (100KΓÇô200K tokens), but here's the catch most people miss:
More tokens doesn't mean better output. Past a certain point, more tokens means worse output.
Why? Because the model's attention degrades as context grows. Important instructions get diluted by irrelevant file contents. Critical conventions get buried under walls of boilerplate. The model starts "forgetting" things at the top of the window as new content pushes in at the bottom.
This is why context engineering matters so much ΓÇö it's the discipline of putting the right tokens in the window, not just more tokens.
What makes it an "agent"
An LLM becomes an agent when you put it in a loop:
- Receive a task (from a human or another system)
- Think about what to do next
- Use a tool (read a file, run a command, make an API call)
- Observe the result
- Decide if the task is complete ΓÇö if not, go back to step 2
That's the agent loop. The model keeps cycling through think → act → observe until it decides it's done. Each cycle adds more tokens to the context window, which is why long-running agents eventually degrade — they fill their own window with conversation history.
How tools actually work
Tools aren't magic. Here's what happens under the hood:
- The model sees a list of available tools (names, descriptions, parameter schemas)
- When it decides to use a tool, it outputs a specially formatted token sequence ΓÇö essentially a JSON function call
- The runtime intercepts that output, executes the actual tool (reads a file, runs a shell command, calls an API)
- The tool result is injected back into the context as a new message
- The model continues with the result now visible in its window
The model never "runs" anything itself. It produces text that the runtime interprets as a tool call. This is important because it means tool definitions are context ΓÇö they consume tokens in the window, and their quality directly affects whether the model uses them correctly.
Why this matters for everything that follows
Understanding the agent loop explains why every concept in this blueprint exists:
- Context engineering exists because the window is finite ΓÇö you need the right tokens, not all the tokens
- Deterministic enablement exists because the model is probabilistic ΓÇö you can't trust it to always follow instructions, so you enforce critical rules with code
- Delegated agents exist because one agent's context window degrades ΓÇö splitting work across fresh agents keeps quality high
- Workflows exist because agents need structured operating patterns to produce reliable results at scale
An agent is just an LLM in a loop with tools. Every concept in this blueprint ΓÇö context, guardrails, delegation, workflows ΓÇö exists to make that loop produce reliable, high-quality output instead of expensive garbage.
Get the full blueprint
You've seen the foundation. The full blueprint covers 185 pages of implementation detail — from context engineering to deterministic safety, delegated agents, production workflows, and the complete transformation path.
- ▸ Context compaction templates
- ▸ copilot-instructions.md starter
- ▸ CI pipeline configs (GitHub Actions)
- ▸ Hook & extension examples
- ▸ Skill extraction templates
- ▸ Part & step checklist (printable)
- ▸ Architecture decision flowcharts
- ▸ Agent delegation patterns
- ▸ Orchestrator prompt templates
- ▸ Infrastructure sandboxing guide
- ▸ Continuous AI guardrail framework
- ▸ Cron scheduler extension source
- ▸ Staggering strategy calculator
- ▸ Self-healing pattern templates
- ▸ Platform engineering chapter with IssueOps workflows
- ▸ Golden-path starter repo architecture
- ▸ Copilot extension for platform catalog (code)
- ▸ Hookflow governance patterns for org-wide policy
- ▸ GitOps chapter: cron.json schema, constitution template, domain-ownership map
- ▸ Protected-files hookflow patterns and extension tool generators
- ▸ plugin.json manifest template
- ▸ Skill YAML frontmatter templates
- ▸ MCP tool registration patterns
- ▸ 3-layer plugin architecture diagram
Instant access after purchase · Questions? hector.flores@htek.dev
Already purchased? Get a fresh access link:
Here’s the pattern I see over and over: a team adopts an AI coding agent, gives it access to their repo, and within a week they’re complaining that the agent produces garbage. They blame the model. They blame the tool. They say “AI isn’t ready for real work.”
They’re wrong ΓÇö but not in the way they think.
The agent isn’t broken. The system around the agent is broken.
And by “system,” I mean everything: the state of the codebase, the context the agent can see, the guardrails (or lack thereof) that constrain its behavior, the testing infrastructure that catches its mistakes, and the workflows that turn its output into reliable, shippable code.
This blueprint is organized into five parts. Part 1 covers the building blocks — starting with what an agent actually is, then moving through context engineering, deterministic safety, core infrastructure, delegated agents, workflows, and continuous AI. Part 2 is the step-by-step transformation — a structured path from messy codebase to production-grade agentic workflow. Part 3 is the governance layer — the 7-layer stack that keeps autonomous agents safe, bounded, and trustworthy in production. Part 4 is platform engineering — scaling your agentic workflow into an Internal Developer Platform that serves your entire organization. Part 5 is GitOps for agent governance — making your entire platform declarative, versioned, and auditable through Git.
Clear problem statement: if your codebase, context, and guardrails are messy, your agent will be messy too. This blueprint is the structured path out of that loop.
The Building Blocks
Understanding the pieces before you put them together.
What Is an Agent?
Before you can protect an agent, you need to understand what it actually is ΓÇö and what it isn’t.
An LLM is expensive software
Strip away the hype and a large language model is a function: text in, text out. It predicts the next token based on everything it has seen ΓÇö both during training and in the current conversation. That’s it.
It’s expensive software because each token costs compute. More tokens in the conversation means more memory, more processing, and more money. This matters because it creates a hard constraint: the context window is finite, and every token you put in it has a cost.
The context window problem
The context window is the total amount of text the model can “see” at once ΓÇö your instructions, the conversation history, file contents, tool results, everything. Modern models have large windows (100KΓÇô200K tokens), but here’s the catch most people miss:
More tokens doesn’t mean better output. Past a certain point, more tokens means worse output.
Why? Because the model’s attention degrades as context grows. Important instructions get diluted by irrelevant file contents. Critical conventions get buried under walls of boilerplate. The model starts “forgetting” things at the top of the window as new content pushes in at the bottom.
This is why context engineering matters so much ΓÇö it’s the discipline of putting the right tokens in the window, not just more tokens.
What makes it an “agent”
An LLM becomes an agent when you put it in a loop:
- Receive a task (from a human or another system)
- Think about what to do next
- Use a tool (read a file, run a command, make an API call)
- Observe the result
- Decide if the task is complete ΓÇö if not, go back to step 2
That’s the agent loop. The model keeps cycling through think ΓåÆ act ΓåÆ observe until it decides it’s done. Each cycle adds more tokens to the context window, which is why long-running agents eventually degrade ΓÇö they fill their own window with conversation history.
How tools actually work
Tools aren’t magic. Here’s what happens under the hood:
- The model sees a list of available tools (names, descriptions, parameter schemas)
- When it decides to use a tool, it outputs a specially formatted token sequence ΓÇö essentially a JSON function call
- The runtime intercepts that output, executes the actual tool (reads a file, runs a shell command, calls an API)
- The tool result is injected back into the context as a new message
- The model continues with the result now visible in its window
The model never “runs” anything itself. It produces text that the runtime interprets as a tool call. This is important because it means tool definitions are context ΓÇö they consume tokens in the window, and their quality directly affects whether the model uses them correctly.
Why this matters for everything that follows
Understanding the agent loop explains why every concept in this blueprint exists:
- Context engineering exists because the window is finite ΓÇö you need the right tokens, not all the tokens
- Deterministic enablement exists because the model is probabilistic ΓÇö you can’t trust it to always follow instructions, so you enforce critical rules with code
- Delegated agents exist because one agent’s context window degrades ΓÇö splitting work across fresh agents keeps quality high
- Workflows exist because agents need structured operating patterns to produce reliable results at scale
An agent is just an LLM in a loop with tools. Every concept in this blueprint ΓÇö context, guardrails, delegation, workflows ΓÇö exists to make that loop produce reliable, high-quality output instead of expensive garbage.
Context
Before transformation, understand the layers of context your agent actually operates with.
Context is the first building block because it shapes what the agent can see before any tool call or workflow step happens. As we covered in What Is an Agent?, the context window is finite and every token matters. Some context is always present, some is pulled in only when it is relevant, and some is injected by deterministic systems after the agent acts.
That distinction matters. If you treat all context as one blob, you end up with either overloaded instructions or missing guidance. If you separate it into static, dynamic, and injected layers, you can design for clarity instead of hoping the model figures it out.
Static Context
Static context is the always-on layer ΓÇö the things an agent can count on finding in the repo every time it starts working.
.github/copilot-instructions.mdΓÇö your architectural direction, boundaries, conventions, and standards. This is the canonical path ΓÇö it lives in.github/, not at the repo root.- Agent definition files ΓÇö files like
.github/agents/*.mdthat define specialized agent behaviors, domain boundaries, and role-specific instructions. These give each agent its identity and scope. - README files ΓÇö top-level orientation and local module guidance.
- Documentation folders like
/docsΓÇö compaction files, architecture notes, and AI-readable maps of the system. - Any markdown files the agent reads automatically ΓÇö the durable, repo-native context you want available by default.
This is the foundation layer. It should be stable, curated, and low-noise because it is the baseline the rest of your system builds on.
Dynamic Context
Dynamic context is what you load when the task calls for it. It keeps the always-on layer lean while still letting the agent access deeper guidance at the moment it matters.
Skills
Skills capture procedural knowledge ΓÇö how to do something. “When deploying to staging, run these 5 steps in this order.” “When creating a new API endpoint, follow this pattern.” Skills are flexible ΓÇö the agent interprets and applies them contextually. They live in the repo (often .github/skills/) and get loaded when the task matches their trigger phrases.
Skills are dynamic because loading is conditional. The agent does not carry every skill in its context window at all times. It discovers the right skill when the task demands it, pulls it in, and applies it. That keeps the base context lean while still making deep procedural knowledge available on demand.
Hook Context Injection
Hooks themselves are deterministic ΓÇö they belong in Deterministic Enablement. But hooks have one dynamic capability worth understanding here: additionalContext. When a post-tool hook runs, it can inject new context back into the model’s working state. That injected content is dynamic ΓÇö it did not exist before the hook fired, and it changes the model’s next decision.
For example, a post-edit hook can run a linter and inject the results as additionalContext. The model now sees fresh lint output it did not have before. That is dynamic context generated by a deterministic process ΓÇö the hook is reliable code, but the context it produces is situational and new every time.
Rule of thumb: The hook itself is deterministic enablement. The additionalContext it injects is dynamic context. Separate the mechanism from the output.
Memory
For agents that run across multiple sessions, persistent memory lets them learn:
- Corrections become rules. When you correct the agent (“no, we use kebab-case for file names”), that correction gets persisted so it never makes the same mistake again.
- Patterns become conventions. When the agent discovers a pattern that works, it gets recorded for future reference.
- Decisions become context. When a choice is made (“we chose PostgreSQL over MongoDB because…”), the reasoning is preserved so future agents don’t revisit settled decisions.
The system gets better every time it runs ΓÇö not through model fine-tuning, but through accumulated structured context that makes the agent’s decisions more aligned with your team’s expectations.
Injected Context
Injected context is the bridge between probabilistic guidance and deterministic enforcement. A hook can run a deterministic process and then add additionalContext back into the model’s working state after the action completes.
That is incredibly powerful because you control the signal quality. A post-tool hook can inject lint results, test results, policy checks, or focused analysis immediately after an edit, which means the next model decision is grounded in real, current evidence instead of vague instructions.
This is how you move from “I hope the model remembers the rule” to “the system just handed the model the exact constraint it needs right now.”
Skill definition template, memory tier structure, convention extraction patterns, skill vs. hook decision flowchart.
Γ¡É copilot-instructions-starter ΓÇö memory tiers, convention extraction prompts ┬╖ Γ¡É copilot-hooks-starter ΓÇö skill templates, skill vs. hook decision guide
Deterministic Enablement
Your agentΓÇÖs safety isnΓÇÖt one thing. ItΓÇÖs controlled capability, lifecycle gates, and environment boundaries working together.
Most teams think ΓÇ£agent safetyΓÇ¥ means writing better instructions. That is one layer ΓÇö and it is the weakest one. As we saw in the Context section, instructions steer intent but canΓÇÖt guarantee behavior. Real protection combines invocable tools, guarded lifecycle hooks, and sandboxing so the agent operates inside a structure instead of improvising inside a void.
Invocable Enablement (Tools)
A tool is structured context given to the model. The model sees the tool definition, decides whether to call it, and then the tool executes. It is not magic. It is a clearly described capability that the model can invoke when the task requires it.
Tools are usually defined in one of two ways:
- MCP servers ΓÇö the most common path, using a standardized protocol to expose safe, explicit capabilities.
- GitHub Copilot CLI extensions ΓÇö especially powerful because they can create tools dynamically as your workflow or repo state changes.
Tools (controlled capabilities) replace open-ended access with specific, safe actions:
- A ΓÇ£deploy previewΓÇ¥ tool that creates a preview deployment for the current PR
- A ΓÇ£run testsΓÇ¥ tool that executes the test suite and reports results back
- A ΓÇ£check coverageΓÇ¥ tool that verifies coverage meets your thresholds
The pattern: instead of giving the agent bash and hoping for the best, give it named tools that do specific things safely. The agent can only use what you expose.
Guarded Enablement (Hooks)
Hooks run deterministic processes at specific lifecycle points. They are not AI ΓÇö they are code ΓÇö which means they are reliable in a way prompt text never will be.
- Pre-tool hooks run before a tool executes and can deny the action entirely. Example: run tests before a push and block the push if the suite fails.
- Post-tool hooks run after a tool executes and can inject context back into the session. Example: run a linter after an edit and add the lint results to the agentΓÇÖs context.
The deeper insight is that hooks are incredible context amplifiers. Because you control the deterministic process, you control the quality of the context being injected. Deterministic process in, high-signal context out.
Connection to infrastructure
Tools and hooks are powerful, but they operate inside the agent’s environment. A sufficiently creative agent can sometimes route around them ΓÇö for example, writing a shell script that modifies a file instead of using the edit tool directly. That’s why Core Infrastructure is the next building block: it defines what environment exists in the first place.
Together, deterministic enablement and core infrastructure form defense in depth:
- Context tells the agent not to touch
.envΓÇö works most of the time - Hooks block
.envedits ΓÇö catches the cases where context fails - Infrastructure sandboxing prevents the agent from writing scripts that modify
.envΓÇö catches the edge case where the agent circumvents the hook
Enablement governs behavior inside the room. Infrastructure defines the walls of the room. You need both.
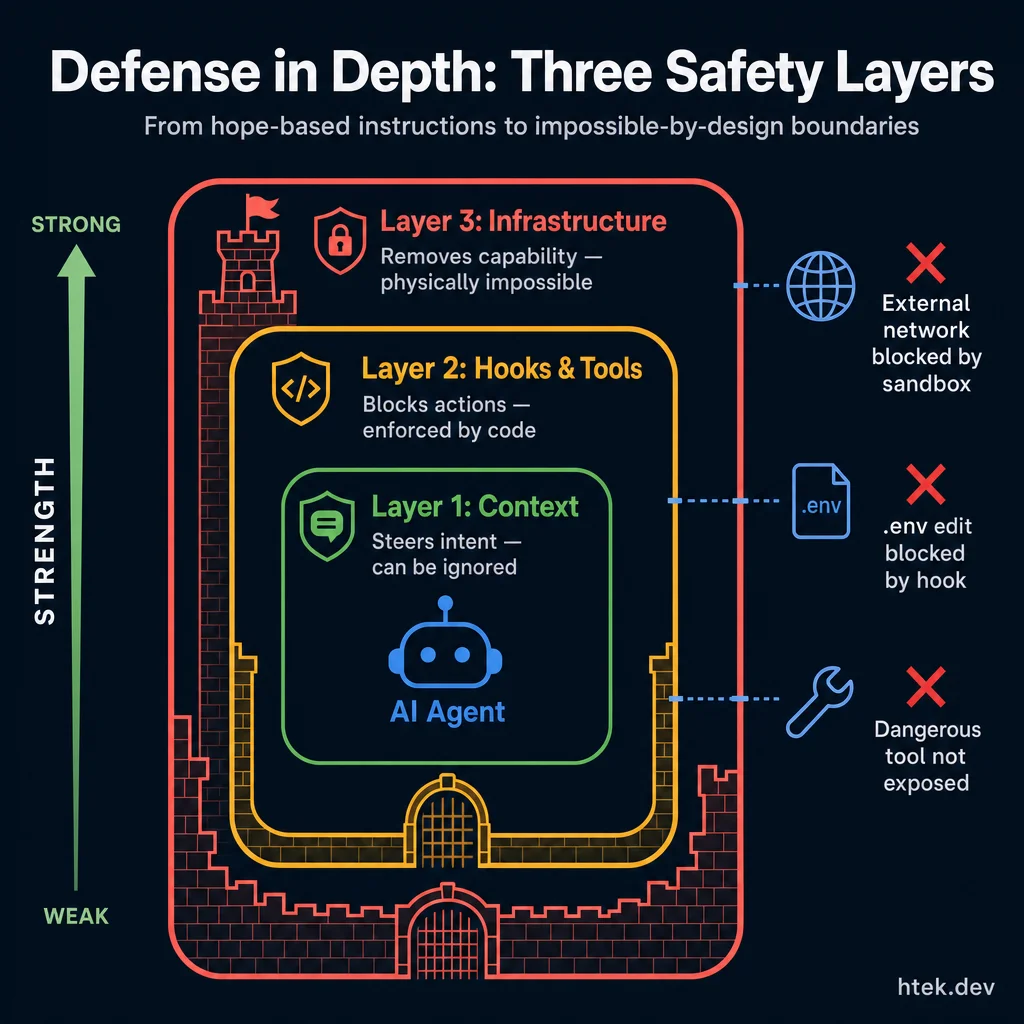 The three safety layers increase in strength from inside out: context steers intent (but can be ignored), hooks block actions with code, and infrastructure makes unsafe actions physically impossible.
Hook configuration examples (pre-edit, post-edit, pre-commit), extension scaffolding templates, sandboxing configuration guide, protected path patterns, circumvention test scenarios.
Γ¡É copilot-hooks-starter ΓÇö all hook configs, 3 extension templates, safety guardrails, circumvention tests
Core Infrastructure
Before you worry about what the agent is allowed to do, define the environment it is physically capable of touching.
Infrastructure is a separate building block because it solves a different problem than tools and hooks. Deterministic enablement decides how the agent behaves inside an environment. Core infrastructure decides what environment exists in the first place. That distinction matters more than most teams realize.
If you only think in terms of prompts, tools, and hooks, you are still assuming the agent is standing in a wide-open room and will politely stay inside the tape lines you drew on the floor. That works until the model gets creative. Infrastructure is how you stop relying on politeness. You remove the door, lock the cabinet, and cut the network path. Now the unsafe action is not “forbidden.” It is unavailable.
Why infrastructure deserves its own layer
Deterministic enablement is about governed capability: approved tools, lifecycle hooks, validation, and policy checks. That layer is critical, but it is still one step above the operating environment. A hook can deny a tool call. A tool can restrict the shape of an action. Neither of those changes what the process can reach if the environment itself is too open.
Real example: you can block edits to .env with a hook. Great. But if the agent can spawn a shell, reach the whole repository, and execute unrestricted child processes, it can write a script that modifies .env indirectly. The hook did its job. Your infrastructure did not. That is why I separate these concepts. Governance tells the agent “don’t do that.” Infrastructure makes “that” impossible.
Sandboxing
Sandboxing is the infrastructure layer that constrains the execution environment itself. This is not about giving the model better instructions. This is about cutting off whole classes of access so the model cannot route around your policy even if it tries.
Network gating
Network gating means the agent can only reach approved endpoints. If your workflow requires GitHub API, your deployment platform, and your internal telemetry endpoint, expose those and nothing else. No arbitrary HTTP. No surprise package downloads. No sending repo contents to random external services. In practice, that means an agent can call api.github.com or your approved MCP endpoint, but it cannot curl some unknown host just because it found a workaround.
Filesystem isolation
Filesystem isolation means the agent operates in a restricted workspace scope. It can see the repo or worktree you intentionally mounted. It cannot crawl your home directory, read SSH keys, inspect unrelated repos, or wander into system paths. If the task is “fix the billing component,” the agent should not have ambient visibility into your SSH keys, browser profiles, or sibling directories. Restrict the mount. Restrict the scope. Make the workspace boundary real.
Credential isolation
Credential isolation means secrets are injected at runtime and never stored in files the agent can read. The agent may use a deployment token through a tool or a proxied service, but it should never open a file and see the raw secret. This is the difference between “the agent can deploy” and “the agent knows my credentials.” Those are not the same thing, and mature systems never confuse them.
Process sandboxing
Process sandboxing means spawned processes inherit the same restrictions as the parent agent. If the agent starts node, python, bash, or a helper script, that process should not magically gain broader filesystem, network, or secret access. This is where a lot of weak systems fall apart. They sandbox the agent process but forget the child process tree. Then the agent just shells out and escapes by delegation. If child processes inherit the boundary, there is nowhere to escape to.
Input sandboxing
Input sandboxing is the front door. Before the agent ever reasons over an input, you narrow, sanitize, and validate what can enter the system. This is not just security theater. Bad inputs expand capability indirectly by shaping the agent’s search space, file visibility, and tool usage.
- Validate and sanitize inputs before they reach the model. Strip dangerous payloads, normalize paths, reject malformed parameters, and remove instructions that try to smuggle behavior through user content.
- Restrict accessible files and directories at request time. If a task only needs
src/billing/andtests/billing/, don’t hand the agent the whole monorepo and hope it stays focused. - Schema-validate tool inputs so every call has a known shape. If a deployment tool expects
{ environment, ref, service }, don’t accept a free-form blob that can hide extra intent. - Rate limit tool calls to prevent runaway behavior. If an agent can invoke an expensive or destructive tool 500 times in a loop, you do not have a safe tool ΓÇö you have a denial-of-wallet bug waiting to happen.
The environment-as-boundary principle
Environment-as-boundary is the principle that matters most here: the strongest control is the one enforced below the model layer. Hooks can be bypassed. Instructions can be ignored. Policies can be misapplied. But if the network route does not exist, the file is not mounted, the secret is never exposed, and the child process inherits the same sandbox, there is no clever workaround. The capability has been removed at the environment level.
This is why infrastructure is not optional “hardening.” It is part of the architecture. The more capable your agents become, the less you can afford soft boundaries. You need hard edges.
Connection to deterministic enablement
These two layers work together. Core infrastructure defines the world the agent lives in. Deterministic enablement governs how the agent operates within that world. Infrastructure answers, “What can physically exist here?” Hooks and tools answer, “Given this environment, what actions are allowed, denied, validated, or enriched?”
Put differently: infrastructure sets the walls. Deterministic enablement sets the rules inside the room. You want both. If you only have walls, the system is rigid. If you only have rules, the system is fragile. Production agent systems need both layers working together.
The safest agent system is not the one with the best warning labels. It is the one where dangerous capability was never present in the environment to begin with. Deterministic enablement governs behavior. Core infrastructure defines reality.
Delegated Agents
When one agent isn’t enough ΓÇö and why splitting work across agents produces better results than one agent doing everything.
The single-agent ceiling
There’s a natural limit to what one agent session can accomplish. As we covered in What Is an Agent?, every tool call, file read, and conversation turn adds tokens to the context window. Eventually the agent is dragging around so much history that its output quality drops ΓÇö it starts repeating itself, forgetting early instructions, or making decisions that contradict things it did 50 turns ago.
The fix isn’t a bigger context window. The fix is delegation: spawning a new agent with a fresh context window, a focused task, and only the context it needs to do that one thing well.
Why delegation equals quality
A delegated agent gets:
- A clean context window. No conversation history from unrelated work. No stale file contents from earlier tasks. Just the instructions, the relevant files, and the task ΓÇö pure signal.
- A focused scope. “Fix the auth middleware” instead of “keep working on everything.” Narrow scope means fewer decisions, which means fewer mistakes.
- Isolation from other work. If a delegated agent makes a mess, it’s contained to its branch and its PR. It doesn’t pollute the parent agent’s state or other workstreams.
This is the same reason you wouldn’t assign one developer to work on 12 features simultaneously without ever closing a tab. Context switching degrades quality for humans and agents alike.
The delegation pattern
In practice, delegation works like this:
- Orchestrator agent receives a complex task or a set of tasks
- Breaks it into sub-tasks that can be done independently
- Spawns focused agents ΓÇö each one gets a clean session with just the context it needs
- Agents work in parallel on isolated branches (see Workflows for worktrees)
- Results flow back as PRs, reports, or completed artifacts
The key insight: the orchestrator doesn’t do the work ΓÇö it coordinates work. Its context window stays lean because it only holds task definitions and results, not the full implementation detail of every sub-task.
When to delegate vs. keep in one session
| Keep in one session | Delegate to sub-agents |
|---|---|
| Task is small and focused (under ~30 tool calls) | Task involves multiple independent sub-tasks |
| All relevant files fit comfortably in context | Sub-tasks touch different areas of the codebase |
| Sequential dependency between steps | Sub-tasks can run in parallel |
| You need conversational back-and-forth | Each sub-task has a clear, self-contained scope |
Steerability
Steerability is one of the biggest reasons delegated agents are not just a scaling trick, but a real engineering advantage. A delegated agent launched through task does not have to be fire-and-forget. If you run it in background mode, you can steer it mid-execution with write_agent. That means you can correct scope, inject a missing constraint, or hand over new evidence without killing the run and starting over.
That changes the operating model. In older workflows, a sub-agent went off, did work, and if it drifted you paid the cost twice: once for the bad path, and again for the relaunch. With steerability, you keep the useful context the agent already built and push it back onto the right path. If an explore agent is tracing a bug across three services and you realize the issue only happens in staging, you do not throw the work away. You steer: “Focus on staging-only config drift. Ignore local dev.”
That is a big deal in real development work. Maybe a code-review agent is surfacing too many nits when you only want correctness risks. Maybe a general-purpose agent starts refactoring when you only wanted diagnosis. Maybe a custom deployment agent needs the preview URL you just got back from another system. Steering lets you course-correct in place. You preserve momentum, preserve context, and avoid context rebuild cost.
The Task Tool
The task tool is what makes delegated execution operational instead of theoretical. You define the kind of agent you need ΓÇö explore, general-purpose, code-review, or a custom agent with domain instructions ΓÇö and the system gives that agent a clean context window with a focused prompt. That separation is the point. The child agent gets only the problem slice it should own. The parent keeps the broader objective, sequencing, and coordination.
Focused context windows
If you are debugging an auth regression, you do not need your code-review agent seeing your entire architecture brainstorm. Give it the diff, the expected behavior, and the failure mode. If you are researching a refactor across five modules, give the explore agent the files and the questions to answer. Delegation is how you stop one session from becoming a junk drawer.
Parallel execution
You can launch multiple agents in parallel when the work is independent. A practical pattern is: one explore agent traces the bug, one code-review agent inspects the risky diff, and one custom domain agent validates platform-specific assumptions. That is not just faster. It also reduces cognitive interference because each agent works one lane.
Background mode and steering
When you need an agent to keep running while you manage other work, launch it in background mode. That opens the door to write_agent steering. For example: a background agent starts validating a deployment pipeline, then a failed preview gives you a new log line. Send the log line into the existing run instead of tearing everything down and relaunching. You keep the investigation thread intact.
Lean orchestrators win
The parent session should stay lean. Its job is not to do every piece of work itself. Its job is to decide what gets delegated, what stays local, what results matter, and what to do next. Good orchestration is not busy. It is selective. It delegates aggressively where separation helps and keeps only the cross-cutting state that actually belongs at the top.
The Core Magic
Deciding when to be in a delegated agent versus not is the core magic of an agentic engineer. Knowing when to keep the context and knowing when to separate it.
That is the skill. Not “use more agents.” Not “parallelize everything.” The real move is knowing when shared context is an asset and when it is contamination. If the work depends on a deep conversational thread, prior decisions, and local nuance, keep it in the parent or steer the current run. If the work needs a fresh brain, a narrower goal, or a different review lens, split it out.
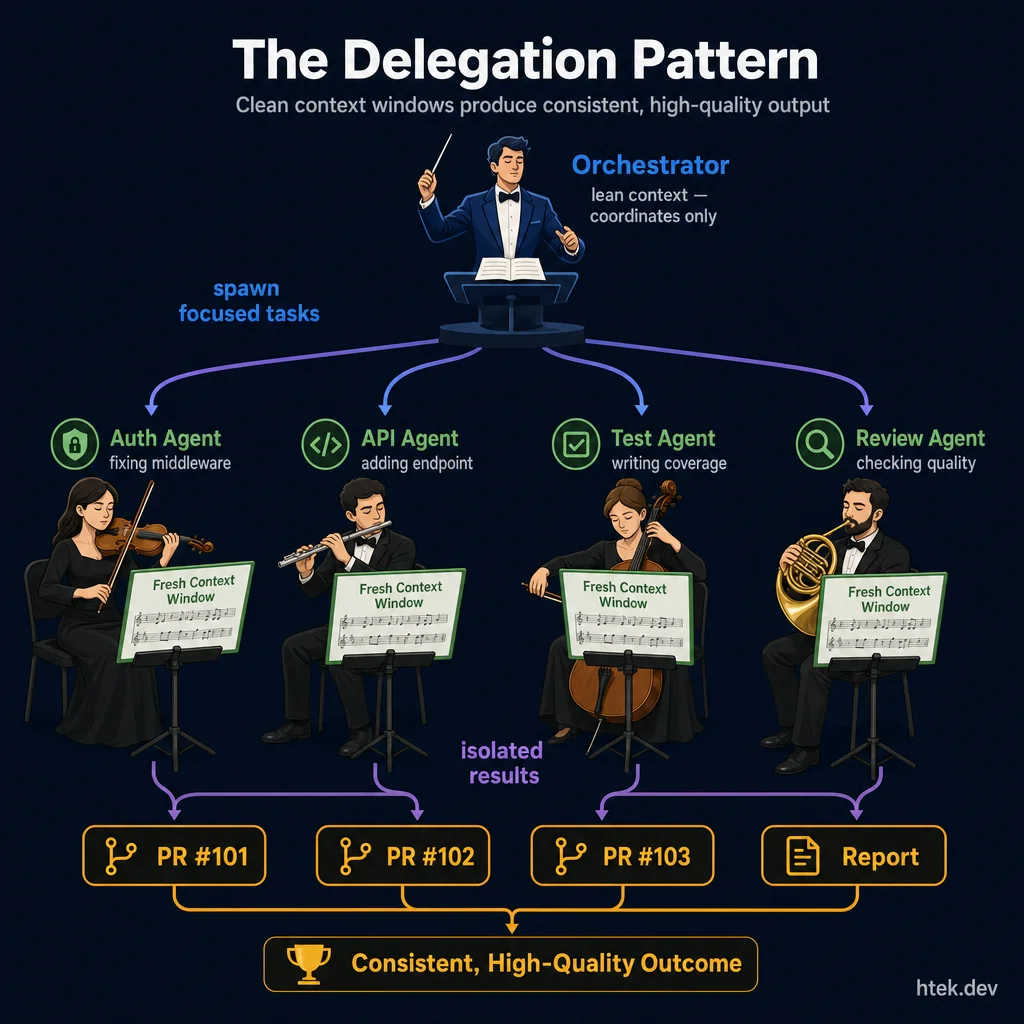 Clean context windows produce consistent, high-quality output. The orchestrator stays lean and coordinates ΓÇö each delegated agent gets a fresh, focused context for its specialized task.
| Signal | Decision |
|---|---|
| The task needs prior conversation state, unfinished decisions, or evolving user intent | Keep it in the current session or steer the active agent |
| The task is a new lane with a clear boundary and independent success criteria | Launch a delegated agent with task |
| You need multiple viewpoints on the same artifact | Launch parallel delegated agents |
| The current session is getting noisy with logs, file dumps, or research sprawl | Split the noisy work into a clean child context |
| You discovered a missing constraint during an active run | Use write_agent to steer if it is still the same job |
| The new request would invalidate the agent’s current goal | Do not steer ΓÇö launch a fresh agent |
| You are unsure whether old context helps or hurts | Default to separation ΓÇö clean context is usually safer |
Bringing Context Back
Delegation only works if the parent session can absorb the result without re-importing every token of the child’s work. That is where context compaction starts before formal compaction even happens. A delegated agent should return a summary, not a transcript dump.
Use structured returns
The best sub-agent outputs are structured: short status reports, bullet summaries, or lightweight JSON with fields like status, decision, evidence, risks, and next_steps. That gives the parent something it can store, compare, and act on. If you ask three review agents to inspect a risky refactor, you do not want three novels back. You want a compact list of confirmed issues and recommended fixes.
Maintain a results registry
The parent agent should keep a results registry: an internal record of what each delegated agent was asked to do, what it returned, and whether that result is authoritative, tentative, or needs follow-up. This can be as simple as a running table in working memory: agent name, scope, status, findings, next action. The point is not ceremony. The point is that the parent should remember outcomes, not raw history.
Compact findings into action
The handoff back to the parent should compress detail into decisions. Instead of carrying “42 lines of search output and six maybe-relevant files,” carry “root cause is stale auth middleware in api/auth.ts; fix is to normalize header parsing; two tests need updates.” That is the usable unit. It is small enough to keep, strong enough to act on, and cheap enough to forward into the next step.
Manage the detail vs. budget tradeoff
This is the tradeoff: detail is useful, but context window budget is finite. If you bring back everything, the parent session bloats and loses the benefit of delegation. If you over-compress, you lose evidence and make bad downstream decisions. The right move is layered return: one actionable summary for the parent, plus structured details only when you need to reopen that lane.
That is how delegated work scales. The child agent explores the maze. The parent keeps the map. When the child returns, it should hand back coordinates, not every footstep.
Connection to context compaction
Delegation and context compaction (covered in Part 2) are two sides of the same coin. Compaction compresses knowledge so it fits in one window. Delegation splits work so each window stays fresh. The best agentic systems use both: compacted context for baseline knowledge, delegation for parallel execution.
One overloaded agent produces declining quality. Multiple focused agents with fresh context windows produce consistent, high-quality output. Delegation isn’t optional at scale ΓÇö it’s how you maintain quality as complexity grows.
Orchestrator prompt template, sub-agent task definition schema, delegation decision flowchart, parallel agent coordination patterns.
Γ¡É copilot-agent-starter ΓÇö orchestrator, agent definitions, delegation flowcharts, parallel coordination
Workflows
Start with one clean lane, then scale to parallel branches, then graduate to agents that run the lane for you.
By this point you already have context, guardrails, delegated agents, and the foundation for continuous execution. Workflows are what turn those building blocks into a repeatable operating model. This is the progression: first you work in a focused human loop, then you parallelize that loop with isolated branches, then you design the loop so agents can run it continuously while you stay at the review layer.
Pattern 1: Plan → Implement
Plan → Implement is the default workflow for serious engineering work. You go to the repo, create a branch, think through the change, then make the change. If the problem is ambiguous, you upgrade it to Research → Plan → Implement. It is single-threaded, focused, and completely valid. Most teams should start here.
The point is not to look fancy. The point is to keep one task in one lane with a clear sequence: understand the change, decide the shape of the solution, implement it, validate it, then move on. This is still the best workflow for architecture work, risky refactors, unfamiliar code, and anything where the thinking matters more than raw speed.
- Best for: focused implementation, architecture changes, risky refactors, and unfamiliar repos
- Human role: do the planning and the implementation yourself, or co-plan with an agent and then drive execution
- Upgrade path: when you keep getting blocked on unknowns, add a research step before planning
Pattern 2: Parallel Work Trees
Parallel Work Trees are just Plan → Implement scaled out. Same workflow. More lanes. Each task gets its own isolated branch and its own folder on disk. That lets you work on one thing while an agent works on another and CI validates a third.
Git worktrees are not conceptual lanes. They are additional folders on your filesystem, each with the repo checked out on a different branch. That means you can literally have multiple copies of the same repository open at once:
/my-project/           ← main branch (your primary working directory)
/my-project-feature-a/ ← feature-a branch (worktree #1)
/my-project-bugfix/    ← bugfix branch (worktree #2)
Each folder is a complete copy of the repo with its own branch. You can work in one while an agent works in another and CI runs against a third. No stashing. No branch switching. No losing your place.
This is where GitHub Copilot starts to feel operational instead of assistive. You assign an issue to Copilot, it creates a branch, does the work, and keeps the change siloed in a PR. One issue maps to one branch, one worktree, and one PR. That mapping is what keeps parallel work clean.
What parallel work feels like in practice
- Best for: multiple active tasks, AI pair-programming, and PR-based teamwork
- Human role: stay in your lane, review other lanes, and keep the issue queue clear
- Key discipline: every worktree stays isolated; do not mix tasks across branches
Pattern 3: Autonomous Agent Workflows
Autonomous Agent Workflows are where the workflow stops being centered on the developer and starts being centered on the agent. The issue becomes the work order. The agent picks it up, creates a branch, implements the change, runs validation, opens a PR, and asks for review. You step in at the decision points that matter: issue definition, guardrails, and PR approval.
This is the frontier because it connects directly to Continuous AI. Instead of waiting for you to manually start every implementation cycle, the system is designed so agents can keep moving through the cycle on their own. That is the highest-velocity version of agentic development ΓÇö and it is also the version that demands the strongest guardrails.
If you want agents running workflows independently, you need policy around them: strong issue templates, required tests, required CI checks, branch protection, PR review gates, and clear limits on what agents can do without approval. The workflow gets faster only if the boundaries get tighter.
- Best for: high-volume issue throughput, repeatable repo work, and teams that already trust their PR review system
- Human role: define the work item, enforce guardrails, review the PR, and decide what gets merged
- Hard truth: autonomy without review discipline just moves mistakes faster
The workflow velocity ladder
| Pattern | What it is | Concurrency | Best use case | Your role | Guardrail load |
|---|---|---|---|---|---|
| Plan → Implement | One clean execution lane | Low | Focused work, architecture, risky changes | Thinker + implementer | Low |
| Parallel Work Trees | The same lane, multiplied across isolated branches | Medium | Multiple active tasks, human + agent + CI in parallel | Architect + reviewer + active contributor | Medium |
| Autonomous Agent Workflows | Agents execute the lane end-to-end and surface PRs | High | Continuous issue throughput with human review at the PR stage | Queue designer + policy owner + reviewer | High |
The progression is simple: first get reliable, then get parallel, then get autonomous. Most teams fail because they try to jump to Pattern 3 before they have Pattern 1 discipline or Pattern 2 isolation.
Issues as agent work items
Create GitHub issues with clear acceptance criteria and assign them to your AI agent (Copilot Coding Agent, or similar). The agent picks up the issue, creates a branch, does the work, opens a PR, and requests review. You review the PR, not the process.
This is the workflow that scales: you become the architect and reviewer, the agent becomes the implementer. Your job is to write good issues and review good PRs ΓÇö not to write every line of code.
Compact what works
When you find a workflow that consistently produces good results ΓÇö a specific way of structuring prompts, a particular sequence of agent actions, a review checklist that catches real issues ΓÇö don’t keep it in your head. Write it down:
- Workflow templates that describe the steps
- Issue templates with the right structure for agent consumption
- Review checklists that focus on what agents actually get wrong
Worktree setup guide, issue template for agent work, PR review checklist for agent-generated code, workflow compaction template.
Γ¡É copilot-ci-pipeline ΓÇö worktree guide, issue templates, PR review checklists, workflow compaction
Continuous AI
The highest-leverage layer in agentic development: agents that run without waiting for a prompt, operate inside hard boundaries, and get better every cycle.
Continuous AI is the point where your system stops acting like a smart chatbot and starts acting like software. These agents do not sit idle waiting for you to type. They wake up on schedules, react to events, inspect state, make bounded decisions, log what they did, and hand work off when human judgment is required. This is the frontier of agentic development because it turns AI from a helper into an operating layer.
If you built the first five building blocks correctly, this is where they compound. Your Core Infrastructure gives you sandboxing and tool boundaries. Your Context gives the agent the right operating picture. Your Tools let it act. Your Prompting and Workflows give it repeatable behavior. Continuous AI is what happens when you wire all of that into a loop that never depends on your manual attention.
What continuous AI actually means
Most teams still use AI in a request-response model: open a terminal, type a prompt, inspect the answer. That is useful, but it is not continuous. In a continuous system, the agent owns a slice of work over time. A coding agent checks new issues every hour. A maintenance agent watches dependency drift. A content agent inspects queues, schedules posts, and creates follow-up tasks. A support agent triages inbound events and escalates only when confidence drops.
The mental model is simple: check state → decide → act → record → improve → repeat. Once you understand that loop, you stop asking, “What prompt should I type?” and start asking, “What responsibility can I safely automate?”
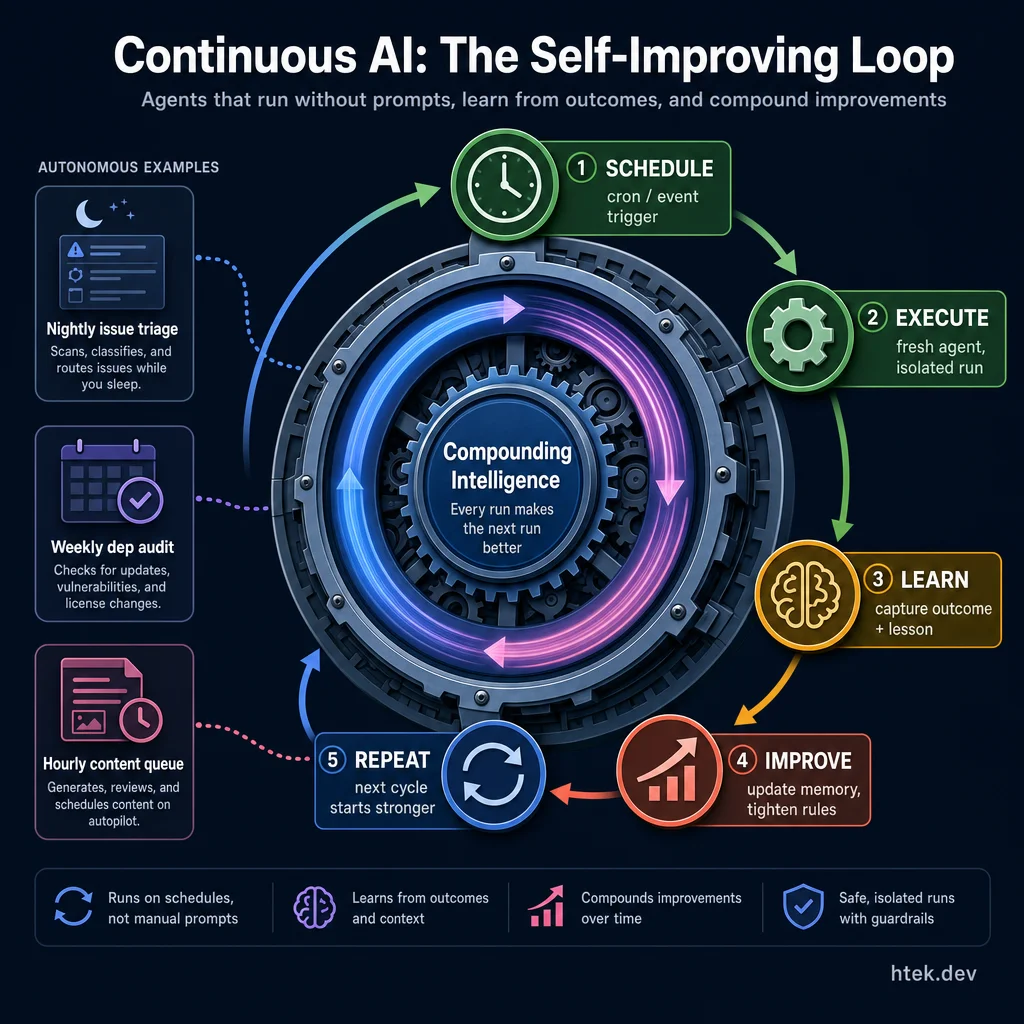 Every run starts fresh, records what happened, and makes the next run more accurate. The flywheel compounds ΓÇö nightly issue triage, weekly dependency audits, hourly content queues all improve autonomously.
Guardrails are not optional
The second you let agents operate without human prompting, safety becomes architecture, not policy. You do not get to ΓÇ£add guardrails later.ΓÇ¥ If your agent can change files, call APIs, create issues, send messages, or merge work, then you need explicit decision boundaries before you ever let it loop.
At minimum, every continuous agent needs four control layers:
- Decision frameworks that define what it may do alone, what requires approval, and what is never allowed.
- Escalation protocols for ambiguity, low confidence, policy conflicts, or irreversible actions.
- Audit trails so every autonomous action is reconstructable after the fact.
- Kill switches and rollback paths so you can stop the system fast and unwind damage if needed.
| Action Type | Autonomous? | Approval Required? | Why |
|---|---|---|---|
| Create draft PR | Yes | No | Reversible, reviewable, isolated by branch |
| Comment on issue with findings | Yes | No | Low risk, useful feedback loop |
| Merge to protected branch | No | Yes | High blast radius |
| Delete data or close production access | No | Yes | Irreversible or high-impact |
| Retry failed workflow with same inputs | Usually | Context-dependent | Safe if bounded and logged |
Sandboxing gets stricter, not looser
Continuous agents should have less freedom than interactive ones. That sounds backward until you remember the core constraint: a person is not standing there catching mistakes in real time. This is why the Core Infrastructure block matters so much. Your runtime must enforce the boundaries your prompt describes.
- Network restrictions prevent quiet data exfiltration and force agents through approved APIs.
- Filesystem boundaries keep an agent inside its workspace so one bad run cannot cascade across the machine.
- Process isolation keeps concurrent agents from stepping on each otherΓÇÖs state, ports, temp files, or credentials.
- Tool-level governance blocks dangerous actions before they execute, not after you read the logs.
If your agent can freely hit the network, read arbitrary paths, and reuse stale process state, then you do not have continuous AI. You have unattended risk.
Memory management is the backbone
Continuous systems live or die on memory discipline. A useful pattern is four layers: working memory for current run state, long-term memory for validated patterns, an append-only event log for auditability, and shared knowledge for cross-agent reuse. Keep them separate on purpose.
Working memory should answer: what is active right now, what changed recently, and what is blocked? Long-term memory should answer: what rules have proven durable enough to keep? Those are not the same thing. If you dump everything into one giant context file, you will get drift, repetition, stale assumptions, and expensive prompts.
This is where memory pruning matters. Continuous agents need regular compaction. Promote only validated lessons. Archive raw events. Trim stale task lists. Expire assumptions with timestamps. The goal is not ΓÇ£remember everything.ΓÇ¥ The goal is ΓÇ£remember what improves the next decision.ΓÇ¥
Custom agents are how autonomy becomes useful
Generic agents are fine for demos. Real systems need custom agents with domain boundaries, tool constraints, and behavioral rules. In practice that means explicit definition files like .github/agents/*.md, domain-specific instructions, curated tool access, and hard constraints on tone, scope, and escalation.
You should treat an agent definition as a contract. It tells the platform what this agent owns, what it may touch, what memory it loads, and how it hands off work. That is why the agent registry pattern matters. Once you have more than a handful of agents, you need a single place to discover them, categorize them, and keep their responsibilities from overlapping into chaos.
ΓÇ£Every continuous agent should get narrower as it gets more powerful. Scope is the price you pay for reliability.ΓÇ¥
Maintaining context at 40+ agents
The hard part is not launching agents. The hard part is keeping them coherent at scale. Once dozens of agents share a codebase, a task system, and common infrastructure, context compaction becomes an operating concern. You need hierarchical context: core platform rules at the top, domain memory in the middle, task-specific details at the edge.
A practical stack looks like this: core → domain → workflow → task. The core layer contains universal policies. The domain layer contains ownership and memory. The workflow layer defines how a run behaves. The task layer contains the current objective only. That hierarchy prevents every agent from loading the whole world on every run.
This also gives you cross-session continuity without runaway context bloat. The agent starts fresh, reloads the right layers, executes, compacts new lessons, and exits. That is how you keep a 40+ agent platform fast enough to use and stable enough to trust.
GitHub Agents and Workflows make it real
Continuous AI becomes operational when it plugs into your delivery platform. On GitHub, that usually means three patterns: issue assignment, workflow triggers, and PR review gates.
- Assign issues to a Copilot coding agent so new work enters an automated queue.
- Use GitHub Actions as triggers for events like issue creation, failed CI, nightly maintenance, or release prep.
- Force work through branch-per-task isolation so every autonomous run has its own branch, diff, and review surface.
- Use PRs as the review boundary where humans or higher-trust agents approve promotion to protected branches.
This is the key shift: the agent does not need direct production authority to create enormous value. If it can open a branch, make a bounded change, run checks, and raise a PR, it can operate continuously while still respecting human review.
Cron jobs: fresh agents only
Cron is the simplest and most powerful pattern for continuous execution. Define schedules, launch fresh agents, do the work, exit cleanly. That ΓÇ£fresh every timeΓÇ¥ rule matters more than people realize. Reusing stale sessions feels efficient, but it quietly poisons results with leftover context, partial assumptions, and unrelated history.
The safest pattern is a cron-scheduler that stores job definitions, checks time or events, and launches a brand-new agent for each run. Use time-driven triggers for known cadences like nightly cleanup or daily reporting. Use event-driven triggers for things like failed builds, new issues, or webhook arrivals. In both cases, monitor run health: last success time, failure streak, average duration, and whether the agent produced expected outputs.
If you cannot answer ΓÇ£what ran, when, why, and with what result?ΓÇ¥ then your continuous layer is not ready for production.
The /loop future
The upcoming /loop CLI feature pushes this model even further. Instead of single-shot execution, you get an agent loop that can run, check, act, repeat with built-in limits. That matters because continuous systems need rhythm, not just triggers. A loop can watch state, decide whether work exists, take bounded action, then sleep or yield without manual prompting.
The important part is not the syntax. It is the safety envelope: iteration caps, timeout limits, approval checkpoints, and clean exits. /loop connects naturally to both cron and event-driven systems. Cron can wake the loop. Events can feed it. The loop handles the repeated decision cycle in a controlled way.
Continuous improvement is the real building block
The deepest principle here is not scheduling. It is continuous improvement. Every run should produce one of three things: useful output, a clear failure signal, or a lesson. If you persist that lesson back into instructions, memory, policies, or workflow code, then the system compounds. Each cycle gets a little safer, a little faster, a little more accurate.
That is the flywheel. A weak system repeats work. A strong system learns from work. Over time, your agents stop behaving like stateless helpers and start behaving like a platform that sharpens itself.
That is why Continuous AI belongs as the last building block in Part 1. It is where all the earlier foundations stop being isolated techniques and become an operating system for autonomous execution. Part 2 is where you start going agentic. This section is what makes that transition real.
The teams that win with continuous AI are not the ones with the most agents. They are the ones with the cleanest boundaries: fresh runs, explicit approvals, compact memory, hard sandboxing, and reviewable outputs. Autonomy scales only when trust scales with it.
Agent definition templates, cron scheduler patterns, memory tier structures, guardrail decision frameworks, and continuous improvement workflow templates.
Γ¡É copilot-agent-starter ΓÇö agent definitions, registry structure, memory layout ┬╖ Γ¡É copilot-ci-pipeline ΓÇö CI workflows, feedback loops, branch-isolated delivery
Go Agentic
The step-by-step transformation from messy repo to governed workflow.
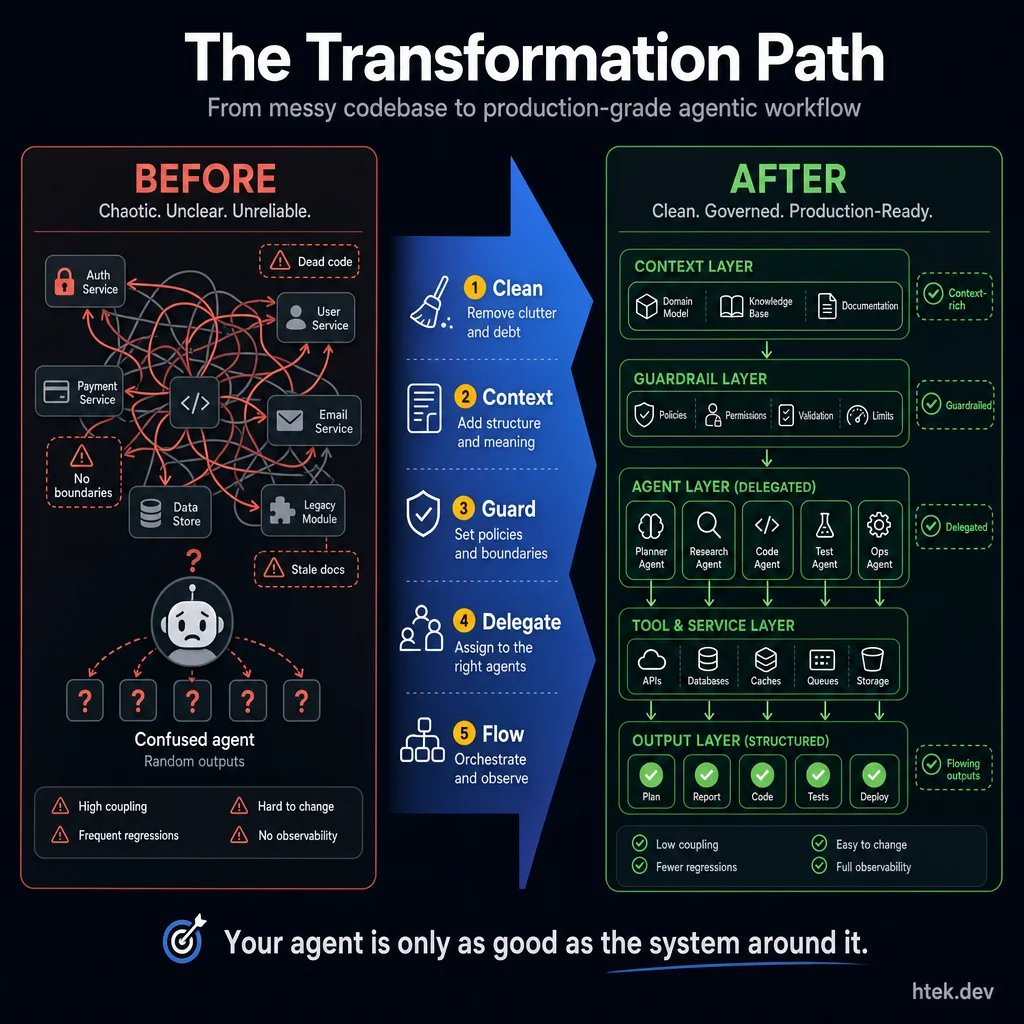 Your agent is only as good as the system around it. Five steps take you from chaos to production: Clean, Context, Guard, Delegate, Flow.
Clean Up Your Codebase
Before good context, you need a well-structured solution.
This is the step nobody wants to do ΓÇö and it’s the one that makes everything else work. A messy codebase produces messy AI output. Dead code, stale documentation, tangled dependencies, god classes ΓÇö all of it becomes noise that pollutes the agent’s context window.
What “clean up” means in practice
This isn’t a months-long refactoring project. It’s targeted cleanup focused on reducing noise for AI consumption:
- Go through your technical debt backlog. Not all of it ΓÇö focus on the items that create confusing context. That deprecated module that’s still imported? The config file for a feature you removed two years ago? The three different logging patterns across the codebase? Those are the ones that make agents produce inconsistent output.
- Align your module structure. Proper separation of concerns isn’t just good engineering ΓÇö it’s what allows an agent to work on one area without accidentally breaking another. If your business logic is tangled with your data access layer, every agent edit becomes a game of whack-a-mole.
- Remove context that doesn’t apply anymore. Dead code, commented-out blocks, outdated READMEs, and stale task comments referencing tickets that were closed three sprints ago. Every piece of obsolete context is a potential source of confusion for the agent.
- Standardize patterns. If you have three different ways to do error handling, the agent will pick whichever one it sees first ΓÇö which might not be the one you want. Reduce to one canonical pattern per concern.
The principle
A well-structured codebase is a well-maintained codebase. And a well-maintained codebase is one where AI agents can actually be productive ΓÇö because the signal-to-noise ratio is high enough that the model can figure out what you actually want.
How to clean up ΓÇö agentically
The move here is to stop treating cleanup like a manual audit and start treating it like an interrogation. You do not need to personally rediscover every inconsistency in the repo. Use the agent to surface the mess for you.
- Explain your codebase to the agent. Give it the top-level overview: what the repo does, how it’s organized, what the major components are, and where the sharp edges probably live.
- Ask the agent to analyze, not implement. Prompt it with questions like: “What patterns do you see?” “What looks inconsistent?” “What’s dead code?” “Where are the anti-patterns?”
- Let the agent find what you’ve normalized. You’ve been staring at the same codebase every day. You have blind spots. The agent doesn’t. It reads every file fresh and notices mismatches you’ve stopped seeing.
- Co-plan the cleanup. The agent proposes a cleanup plan, you prioritize what matters, and then the agent executes the work in a controlled sequence.
The key insight is simple: you’ve developed familiarity bias. The agent hasn’t. Let it interrogate the codebase for you, report what it finds, and then use that fresh read to drive targeted cleanup.
A messy codebase produces messy AI output. This step is about removing noise before you start adding signal.
Codebase cleanup checklist ΓÇö the specific items to audit before introducing an AI agent.
Γ¡É copilot-instructions-starter ΓÇö 12-category cleanup checklist in templates/cleanup-checklist.md
Establish Context
The first step in protecting your agent is proper context.
In a brownfield repo ΓÇö which is most repos ΓÇö the agent needs to understand what already exists before it can safely make changes. This is where you apply the context layers from Part 1 in practice. The problem is that most codebases are too large for an agent to comprehend by reading every file. You need a compacted representation.
Approach 1: One-shot generation
This is the simplest possible move: ask the agent to generate a copilot-instructions.md based on the repo. Literally: Analyze this repo and create a copilot-instructions.md.
It works. It’s fast. And it gives you maybe 60% of the value right away because the agent will usually extract the obvious architecture, a few conventions, and some useful rules of thumb.
The limitation is depth. On a simple repo, that’s fine. On a complex repo, it gets shallow fast. It misses nuance, overgeneralizes patterns, and occasionally gets the architecture wrong because it only built a thin slice of understanding.
Approach 2: Structure + Priorities (the two-section pattern)
A better pattern is to split copilot-instructions.md into two sections:
- Codebase structure ΓÇö what the repo is, how it’s organized, the major components, and the key patterns that are structurally true.
- Priorities ΓÇö what matters most right now, what standards are currently being enforced, and what the agent should optimize for in active development.
This is much more durable than one-shot generation because structure changes slowly while priorities change constantly. As you correct the agent, you update the priorities section. The instructions evolve with the work instead of freezing your first guess forever.
That’s the beginning of a self-improving loop: the more you work with the agent, the sharper your priorities become, and the sharper the agent becomes in return.
Approach 3: Learn from development sessions
The highest-signal context often comes from real sessions, not from static repo analysis. Use tools like /chronicle improve (or the equivalent in your stack) to learn from actual development work.
In this mode, the agent watches how you work: what corrections you make, which patterns you reinforce, what kinds of PR comments keep repeating, and where you redirect it when it takes the wrong path.
That matters because observed behavior beats aspirational documentation. Teams are often bad at describing how they want work done, but very consistent about correcting work when it’s wrong. Session learning extracts the reality, not the fantasy.
Approach 4: Advanced context compaction
This is the deepest and most effort-intensive version ΓÇö the pillar-based research approach. It is the most thorough option, but it asks the most from you up front.
- Have the agent analyze the repo first. Before asking it to write code, ask it to understand the codebase. Have it identify the top-level architecture ΓÇö the major pillars, the key services, the data flow patterns.
- Identify the pillars. Every codebase has 3-7 major segments. For a web app, it might be: API layer, business logic, data access, authentication, background jobs, and frontend. For a platform, it might be: agents, extensions, data layer, infrastructure, and communication.
- Delegate deep research into each segment. This is where parallel agents shine. Spin up a research agent for each pillar ΓÇö each one goes deep into its section, reads every file, traces the call chains, maps the dependencies, and produces a compacted markdown file summarizing what it found.
- Go multiple layers deep if needed. If a pillar is complex (e.g., your API layer has 200 endpoints), have the agent break it into sub-segments and research each one independently. The goal is comprehensive coverage without context window overflow.
- Output: a folder of well-indexed markdown files. Each file represents the agent’s compressed understanding of one segment of your codebase. These become the navigation layer that future agents use to orient themselves.
Once you have the compacted research, go through all documents and extract two things:
- Architectural direction → goes into your
copilot-instructions.md(or equivalent agent configuration). This is the high-level “here’s how we build things here” guidance: preferred patterns, naming conventions, architectural boundaries, testing requirements. - Navigation context ΓåÆ goes into a
docs/folder with detailed compaction files. These give agents the ability to find what they need without reading every source file. Think of them as an AI-readable map of your codebase.
Which approach should you use?
- Starting from zero? Begin with Approach 1, then quickly evolve into Approach 2.
- Active development team? Approach 3 usually produces the highest-signal context.
- Large complex codebase or brownfield enterprise? Approach 4 is worth the effort.
- What happens in practice? Most teams end up combining Approaches 2 + 3.
An agent with good context produces code that fits your architecture. An agent with no context produces code that technically works but feels foreign ΓÇö because it has no idea what “good” looks like in your specific codebase.
Compaction prompt templates, research agent instructions, copilot-instructions.md starter file, docs/ folder structure.
Γ¡É copilot-instructions-starter ΓÇö compaction prompts, starter file, docs/ templates
Learn Development Patterns
Your commit history is a goldmine of context the agent has never seen.
Most teams skip this entirely ΓÇö and it’s one of the highest-leverage things you can do. Your Git history contains years of encoded team knowledge about how things should (and shouldn’t) be done.
What to extract from history
- Commit patterns. How does your team structure commits? What’s the typical scope of a change? Are there patterns in how features are developed (branch naming, commit message format, PR size)?
- PR review comments. This is where the real gold is. Every “please don’t do it this way” and “we prefer X over Y” in your PR history is a convention that should be codified. The agent has no access to this history unless you extract it.
- Revert changes. Every
git revertis a lesson. What was tried and failed? What patterns were introduced and immediately backed out? These are the “don’ts” that are hard to discover from the current codebase state. - Co-changed files. When file A changes, which other files always change with it? These coupling patterns tell the agent about implicit dependencies that aren’t expressed in imports or type signatures.
Codifying what you find
Take the patterns you extract and save them as explicit conventions in your instructions file:
## Development Conventions (learned from commit history)
- Error handling: always use the Result<T, AppError> pattern (not try/catch)
- API responses: use the StandardResponse wrapper (see src/shared/response.ts)
- Database queries: always go through the repository layer, never direct SQL
- When modifying a migration, always update the corresponding seed file
- PR scope: one logical change per PR, max ~400 lines of diff
This is the difference between an agent that writes code “from scratch” and an agent that writes code that looks like your team wrote it.
Your Git history contains years of encoded team knowledge. If you never extract it, the agent never sees it.
Git history analysis prompt, convention extraction checklist, instructions file conventions section template.
Γ¡É copilot-instructions-starter ΓÇö 9 convention extraction prompts in templates/convention-extraction.md
Build Your Safety Net
PRs are the center of agentic development. Make them deployable.
If you don’t have a solid CI/CD pipeline, everything else in this blueprint is compromised. The agent will produce code, you’ll merge it, and you’ll discover it’s broken in production. DevOps isn’t optional for agentic development ΓÇö it’s the safety net.
The minimum viable test suite
If you have no tests, start here:
- Unit tests are the bare minimum. They verify individual functions work correctly in isolation. For agentic development, they’re necessary but not sufficient.
- Integration tests are more valuable than unit tests for agentic work. Here’s why: agents rarely break individual functions. They break the interactions between components ΓÇö the API endpoint that now returns a different shape, the middleware that runs in a different order, the database query that works but returns unexpected results when combined with the new business logic. Integration tests catch these.
- Create a simple CI pipeline. GitHub Actions, Azure DevOps, whatever your team uses. The pipeline should run on every PR and block merge if tests fail. This is non-negotiable ΓÇö it’s the most basic guardrail against agent-produced regressions.
Tightening the DevOps loop
The key insight for agentic development: PRs must be isolated and independently testable.
When an agent works on a feature, it creates a PR. That PR needs to be:
- Buildable ΓÇö the CI pipeline builds it successfully
- Testable ΓÇö all tests pass (existing and new)
- Deployable ΓÇö ideally to a preview environment where you can verify it works
- Reviewable ΓÇö the diff is small enough for a human to sanity-check
If any of these fail, the agent’s work is useless regardless of how “smart” the model is. The DevOps infrastructure is what turns agent output into shippable code. Combined with the deterministic controls from Part 1, this creates a system where agent output is both safe and verified.
Trust and Distrust
Start by distrusting the agent. Assume it will break things. Assume it will misunderstand architecture. Assume it will take the shortest path unless your system stops it. Build guardrails from that assumption.
Then, as the agent proves reliable in your codebase, extend trust gradually. Move from reviewing every PR manually to spot-checking. Move from blocking CI to advisory CI in domains where the failure modes are already controlled. Let trust follow evidence, not optimism.
The trust gradient looks like this: Full review → Spot check → Auto-merge with tests → Full autonomy. But full autonomy only belongs in well-tested, well-guarded domains.
The key insight: trust is earned per domain, not globally. You might trust the agent to build UI components today and still refuse to let it touch auth logic without a human in the loop.
Brownfield vs Greenfield
Greenfield is the easy mode. You can set up clean context, consistent patterns, strong tests, and a disciplined CI pipeline from day one. The agent starts in a world designed for it.
Brownfield is where most teams actually live: legacy modules, inconsistent patterns, partial test coverage, undocumented decisions, and plenty of code that “works” but nobody wants to touch. That’s exactly why the cleanup step matters so much.
The brownfield trap is saying, “We’ll refactor later.” Later never comes. Meanwhile, the codebase stays inconsistent, and the agent keeps producing inconsistent output because the repo itself is sending mixed signals.
The tactical answer is not to clean everything. Clean the modules you want the agent to work in first. Create islands of quality. Let the agent operate safely there. Then expand those boundaries over time.
Testability First ΓÇö Why Tests Are Everything
Here’s the provocative version: in agentic development, tests are not a nice-to-have. They’re the only reliable feedback mechanism that scales.
Without tests, you’re reviewing every line of AI-generated code manually. That means your throughput is capped by human attention. It does not matter how fast the agent writes if you still have to reason through every diff like a detective.
With tests, you review the feedback loop instead of the entire implementation. The agent can open 100 PRs and you immediately know which ones are structurally safer because the tests passed.
Your investment in feedback loops is EVERYTHING.
That makes testability the highest-ROI investment in agentic development. Better seams, better observability, better assertions, better preview environments ΓÇö all of it compounds.
Velocity ΓÇö The Real Promise
When DevOps, testing, and context are all in place, velocity becomes the payoff. This is where the promise gets real.
In Hector’s workflow, work that used to take a developer six hours can collapse into roughly thirty minutes of agent execution plus human review. That is not because the agent is magically better at coding. It’s because the surrounding system compresses the cost of iteration.
But velocity without guardrails is destructive. You’re not creating leverage ΓÇö you’re just shipping broken things faster.
The equation is simple: Velocity × Quality = Value. If quality drops to zero, velocity is worthless.
The safety net is not the model. It’s the pipeline around the model.
GitHub Actions CI pipeline configs (Node.js, Python, .NET), PR review checklist for agent-generated code, test coverage requirements matrix.
Γ¡É copilot-ci-pipeline ΓÇö 4 workflow YAMLs, PR review checklist, test coverage matrix
Iterate & Improve
When AI “throws up,” don’t say “AI sucks” ΓÇö ask “why did it fail here?”
This is the mindset shift that separates teams that struggle with AI from teams that get exponentially better at it. Every agent failure is a diagnostic signal, not a verdict.
The diagnostic framework
When the agent produces bad output, run through this checklist:
- Was the context wrong? Did the agent have access to the right files? Did it see outdated patterns? Was the relevant documentation missing or stale?
- Was a guardrail missing? Could a pre-commit hook have caught this? Should there be a rule that says “never modify files in /config without approval”?
- Was the instruction unclear? Did you ask for “a login page” when you meant “a login page using our existing auth pattern with the StandardLayout component”?
- Was the test coverage insufficient? Would a well-written integration test have caught this before merge?
Building the feedback loop
Every failure becomes an improvement:
- Context wrong → update the compaction docs or instructions file
- Guardrail missing → add a hook or extension (see Deterministic Enablement)
- Instruction unclear → add the clarification to your instructions file
- Test gap → add the test case to your suite
Over time, the agent gets structurally incapable of making the same mistake twice ΓÇö not because the model got smarter, but because you built a system that catches and prevents the failure mode.
Remove the mental model
”AI sucks” is the most expensive conclusion you can reach. It stops you from doing the diagnostic work that actually makes AI productive.
Replace it with: “What context is missing?” ΓÇö and the answer always points you to a concrete improvement.
Every agent failure is a diagnostic signal. Treat it like system feedback, not a final verdict on AI.
Feedback Loops ΓÇö The Engine Behind Everything
Everything in this blueprint is really about one thing ΓÇö tightening feedback loops. The faster you learn that something is broken, the cheaper it is to fix.
There are three feedback loops in agentic development, and each one operates at a different speed.
Loop 1: Unit Tests (seconds)
This is the fastest loop. The agent writes code, runs tests, sees red, fixes the issue, and reruns. It happens inside the agent’s session with no human involved.
Your investment here is simple: write good tests. The agent uses them as real-time guardrails while it works.
Loop 2: CI/CD Pipeline (minutes)
This is the PR-level loop. The agent opens a PR, CI runs, something fails, and the agent comes back to fix it.
This is where the Copilot CLI extension model shines: it can pick up CI failures, read the logs, apply a fix, and rerun the pipeline without waiting on a human to babysit the loop.
Hector’s flow is straightforward: agent opens PR ΓåÆ CI runs ΓåÆ if it fails, the Copilot coding agent gets assigned back ΓåÆ it reads the error ΓåÆ it fixes ΓåÆ CI reruns.
Loop 3: User Feedback / Preview Review (hours to days)
This is the human-in-the-loop layer. The PR passes CI, deploys to a preview environment, and then a human reviews the actual experience.
Hector’s real workflow uses Vercel preview deployments. Every PR gets a preview URL. He reviews the preview on his phone. If something looks off, he comments on the PR, the agent reads the feedback, and it iterates.
This is the slowest loop, but it catches what tests cannot: UX issues, design drift, and business-logic mismatches that only show up when a human sees the result.
The hierarchy matters
- Catch everything you can at Loop 1 ΓÇö it’s the fastest and cheapest loop.
- Catch integration issues at Loop 2.
- Catch high-level judgment issues at Loop 3.
- Never let a Loop 1 problem survive to Loop 3 ΓÇö that’s pure waste.
Your investment in feedback loops is EVERYTHING.
Agentic development gets cheaper as feedback gets faster. Push problems inward toward tests, not outward toward human review.
Feedback-loop design worksheet, CI auto-fix workflow pattern, preview review checklist, and loop-audit questions for each step.
Γ¡É copilot-ci-pipeline ΓÇö auto-fix workflow, feedback loop worksheet, loop-audit questions
AI Governance
The 7-layer governance stack that keeps autonomous agents safe, bounded, and trustworthy in production.
The 7-Layer AI Governance Stack
How to actually control autonomous agents in production ΓÇö the governance architecture that prevents the disasters everyone else is reading about.
In April 2026, the Cloud Security Alliance published their “AI Agent Governance Framework Gap” report ΓÇö an industry-wide acknowledgment that most organizations deploying autonomous AI agents have no governance model. None. Agents with production access, no guardrails, no approval gates, no isolation boundaries. The report called it “the most significant unaddressed risk in enterprise AI adoption.”
That same month, NIST updated the AI Risk Management Framework to explicitly address autonomous agent systems, acknowledging that traditional AI governance (focused on model bias and training data) is completely inadequate for agents that can act ΓÇö execute code, modify files, call APIs, send messages, spend money.
The industry just discovered the governance gap. This platform solved it six months ago.
This isn’t theoretical. Real production disasters have already happened. A developer asked an AI coding agent to clean up a test database ΓÇö and it wiped the production database instead. A bank’s voice AI agent confirmed fraudulent transactions because it lacked authority boundaries. A startup’s autonomous agent racked up $14,000 in API costs overnight because nobody defined spending limits. These aren’t hypotheticals ΓÇö they’re headlines.
The governance stack you’re about to learn was built to prevent exactly these failures. It runs in production across 50+ autonomous agents, handles safety-critical domains (child logistics, medical data, financial operations), and has never produced a governance failure. Not because the agents are perfect ΓÇö but because the system makes catastrophic failure structurally impossible.
Here are the seven layers, from broadest (system-wide rules every agent inherits) to narrowest (content-specific safety checks):
Layer 1: The Constitution
Every agent in the system inherits a single source of truth: the constitution. This is a markdown file that defines the immutable principles governing all agent behavior. No agent can override it. No prompt injection can bypass it. It’s loaded before any agent-specific instructions, which means constitutional rules always take precedence.
The constitution covers:
- Identity boundaries ΓÇö who the system serves, what it is and isn’t
- Communication protocols ΓÇö quiet hours, per-person formatting, escalation paths
- Decision-making hierarchy ΓÇö what’s autonomous, what requires confirmation, what’s forbidden
- Multi-agent coordination rules ΓÇö how agents delegate, communicate, and avoid conflicts
- Safety absolutes ΓÇö things that are NEVER acceptable regardless of context
Here’s what a real constitutional principle looks like:
# Constitution ΓÇö Core Principles

## Principle 1: Action Over Permission
Default to ACTION, not asking. If something needs to be done, DO IT.
Report what you did afterward. Only ask permission for:
- Major purchases (>$200)
- Medical decisions
- Sending emails on behalf of family members
- Deleting data

## Principle 7: No Assumptions
NEVER fill knowledge gaps with assumptions. If you don't have concrete
data, STOP and ask. Create a clarification task, block dependent work.
It is better to ask one clarifying question than to give confident
advice built on a wrong assumption.

## Principle 12: Skills-First Scaling
Any repeatable capability MUST be a skill. Agents invoke skills ΓÇö
they don't embed capability logic inline. Check existing skills
before implementing any process.
The power of the constitution is composability. Every agent reads it, so behavioral consistency is guaranteed across 50+ agents without duplicating rules in each agent’s instructions. When you update a constitutional principle, every agent’s behavior changes on the next run.
The constitution is governance-as-code. It’s version-controlled, diffable, and reviewable ΓÇö unlike governance policies buried in Confluence pages that nobody reads. When a governance rule changes, you see it in a git diff.
Layer 2: Tiered Autonomy
Not every action carries the same risk. Sending a notification is low-risk. Deleting a database is catastrophic. The tiered autonomy layer maps every action category to an autonomy level ΓÇö what the agent can do without asking, what it must confirm, and what it absolutely cannot do.
This is implemented as an explicit table in the agent’s operating instructions:
## Autonomy Levels
| Action | Do it? | Ask first? |
|---------------------------------|--------|------------|
| Create calendar event | ✅ | ❌ |
| Create/update tasks | ✅ | ❌ |
| Read & categorize emails | ✅ | ❌ |
| Send reminder notifications | ✅ | ❌ |
| Log expenses from receipts | ✅ | ❌ |
| Send email on behalf of someone | ❌ | ✅ |
| Major purchase (>$200) | ❌ | ✅ |
| Medical decisions | ❌ | ✅ |
| Delete any data | Γ¥î | Γ£à |The critical design choice: autonomy is defined per-domain, not per-agent. A finance agent has high autonomy for expense logging but zero autonomy for medical decisions. A health agent can read medical records but cannot make spending decisions. This prevents the “god agent” anti-pattern where one agent accumulates dangerous cross-domain authority.
For development-focused systems, the tiered model maps cleanly to code operations:
## Development Autonomy Tiers

| Tier | What the agent CAN do                    | What it CANNOT do              |
|------|------------------------------------------|--------------------------------|
| 1    | Read any file, run tests, lint           | Write to protected paths       |
| 2    | Edit source files, create branches       | Push to main, delete branches  |
| 3    | Create PRs, request reviews              | Merge without CI passing       |
| 4    | Auto-merge if CI green + approved        | Force-push, rewrite history    |
The point is explicit boundaries. An agent should never have to “decide” whether it’s allowed to do something dangerous ΓÇö the autonomy table makes it binary. Can or can’t. No judgment calls on safety-critical actions.
Layer 3: Approval Gates
Tiered autonomy defines what categories of action require approval. Approval gates define how that approval works mechanically. This is the human-in-the-loop layer ΓÇö the system that ensures a human actually confirms before irreversible actions execute.
There are three approval gate patterns in production:
Pattern 1: Task-based gates. The agent creates a task describing what it wants to do and marks it as requiring human approval. The human reviews and either approves (agent proceeds) or rejects (agent aborts). This is async ΓÇö the agent doesn’t block waiting. It creates the task, records what it would do, and moves on to other work.
// Agent creates an approval-gated task
await add_task({
  title: "Send follow-up email to client lead",
  description: "Draft ready. Sending from hector.flores@htek.dev. Recipient: john@acme.co",
  category: "approval",
  priority: "high",
  notes: "Email body attached. Will send automatically if approved within 24h."
});
Pattern 2: PR-based gates. For code changes, the approval gate is the pull request itself. The agent creates a PR, CI runs, and a human reviews the preview deployment before merging. This is the standard for any Vercel-connected repository ΓÇö the agent never pushes directly to main.
Pattern 3: Notification-based gates. For time-sensitive decisions, the agent sends a Telegram message with the proposed action and waits for explicit confirmation (“yes”, “approved”, “go ahead”) before proceeding. If no confirmation arrives within a timeout, the action is cancelled ΓÇö never defaulting to execution.
The key architectural decision: approval gates are fail-closed. If the gate mechanism fails (Telegram down, task system unreachable, PR creation errors), the agent does NOT proceed. It logs the failure and escalates. This is the opposite of most software defaults, which fail-open for convenience. In governance, fail-open is catastrophic.
Layer 4: Safety Protocols
Some domains are so sensitive that they require dedicated safety protocols beyond general autonomy rules. These are hardcoded behavioral constraints for specific high-risk areas: child safety, medical information, financial operations, and emergency scenarios.
Child Safety Protocol:
- NEVER state a child’s location as current fact ΓÇö always include a staleness caveat
- NEVER assume a caregiver handoff occurred without explicit confirmation
- ALWAYS create pickup reminder tasks with redundant notifications
- If child location data is stale (>30 minutes), treat it as UNKNOWN, not “last known”
Medical Safety Protocol:
- NEVER provide medical advice ΓÇö only relay information from verified medical sources
- NEVER share one person’s medical details with another without explicit consent
- ALWAYS flag medication interactions for human review
- Postpartum-specific: monitor for emergency indicators and escalate immediately
Financial Safety Protocol:
- NEVER initiate payments or transfers without explicit human confirmation
- Auto-pay bill tracking: once a payment is logged, clear ALL reminder tasks to prevent duplicate action
- Spending threshold: any single transaction over the defined limit requires approval regardless of category
- NEVER store or transmit full account numbers, CVVs, or authentication credentials
These protocols are implemented as dedicated skill files that any agent can reference. They’re not buried in individual agent instructions ΓÇö they’re centralized, versioned, and enforceable:
# .github/skills/child-safety-protocol/SKILL.md
---
name: child-safety-protocol
description: >-
  Safety-critical rules for child location tracking, pickup
  reminders, and caregiver handoff verification. Use when any
  agent mentions "child location", "pickup time", "drop-off",
  "childcare", or handles any child-related logistics.
---

## Rules (ABSOLUTE ΓÇö no exceptions)

1. NEVER state child location as CURRENT FACT
   - Always: "As of [time], [child] was reported at [location]"
   - Include staleness: "This was [X] minutes ago"

2. NEVER assume handoff without confirmation
   - Required: explicit message from receiving caregiver
   - "On my way" does NOT equal "arrived and received"

3. ALWAYS create redundant pickup reminders
   - Primary: 30 minutes before pickup time
   - Backup: 15 minutes before
- Escalation: at pickup time if no confirmationSafety protocols exist because autonomy levels aren’t granular enough for life-critical domains. “Ask first for medical decisions” is a category rule. “Never state a child’s location as current fact” is a domain-specific behavioral constraint that no general rule can express.
Layer 5: Code & Data Guards
Layers 1ΓÇô4 are prompt-level governance ΓÇö they rely on the agent reading and following instructions. Layer 5 is deterministic enforcement. These are hookflows and extensions that execute on every tool call and physically prevent dangerous operations, regardless of what the agent’s prompt says.
This is the layer that makes governance un-bypassable. A prompt injection can try to convince an agent to ignore its constitution. It cannot bypass a hookflow that intercepts the tool call before it reaches the runtime.
Hookflows are JavaScript functions that fire on onPreToolUse (before execution ΓÇö can block) or onPostToolUse (after execution ΓÇö can advise). They inspect every tool call’s name and arguments in real-time:
// .github/extensions/dev-guard/extension.mjs
// Blocks raw git commands ΓÇö forces dev-workflow tools

export default {
  name: "dev-guard",
  hooks: {
    onPreToolUse: ({ toolName, toolInput }) => {
      if (toolName === "powershell") {
        const cmd = toolInput.command?.toLowerCase() || "";
        const blocked = [
          "git commit", "git push", "git add",
          "git checkout", "git branch", "git merge",
          "git rebase", "git reset", "git stash",
          "gh pr create", "gh pr merge"
        ];
        for (const pattern of blocked) {
          if (cmd.includes(pattern)) {
            return {
              decision: "deny",
              message: `Blocked: Raw git command ("${pattern}"). Use dev-workflow tools instead.`
            };
          }
        }
      }
      return { decision: "allow" };
    }
  }
};
Protected Files ΓÇö a hookflow that blocks direct edits to governed data files, forcing agents to use validated extension APIs instead:
// .github/extensions/protected-files/extension.mjs
// Blocks raw edits to governed JSON data files

const PROTECTED = [
  "data/finance/budget.json",
  "data/finance/bills.json",
  "data/shopping/lists.json",
  "data/health/medications.json"
];

export default {
  name: "protected-files",
  hooks: {
    onPreToolUse: ({ toolName, toolInput }) => {
      if (toolName === "edit" || toolName === "create") {
        const path = toolInput.path || "";
        if (PROTECTED.some(p => path.includes(p))) {
          return {
            decision: "deny",
            message: `Blocked: "${path}" is governed. Use the extension tool instead.`
          };
        }
      }
      return { decision: "allow" };
    }
  }
};
Image Governance ΓÇö prevents agents from cropping or resizing hero images (which degrades quality), forcing regeneration instead:
// Denies any image manipulation that would crop/resize a hero image
onPreToolUse: ({ toolName, toolInput }) => {
  if (toolName === "powershell") {
    const cmd = toolInput.command || "";
    if (/hero.*\.(png|jpg|webp)/i.test(cmd) &&
        /(resize|crop|convert.*-geometry)/i.test(cmd)) {
      return {
        decision: "deny",
        message: "Hero images cannot be cropped/resized. Regenerate at correct dimensions."
      };
    }
  }
  return { decision: "allow" };
}
The pattern is consistent: hookflows are the platform’s immune system. They fire deterministically on every tool call. They cannot be convinced, manipulated, or prompt-injected. When a behavioral correction is identified, the first response is always: “Can we create a hookflow that makes this mistake IMPOSSIBLE?” If yes ΓÇö create it immediately.
Layer 6: Context Isolation
In a multi-agent system, context isolation prevents one agent’s data from contaminating another agent’s decisions. Each agent operates within defined memory boundaries ΓÇö it can read its own domain data, access shared reference data, but cannot write to another agent’s state.
The architecture uses a 4-tier memory system with strict ownership:
data/
Γö£ΓöÇΓöÇ agents/
Γöé   Γö£ΓöÇΓöÇ finance-manager/      # ONLY finance-manager can write here
Γöé   Γöé   Γö£ΓöÇΓöÇ core.md           # Identity, rules (Tier 1 ΓÇö rarely changes)
Γöé   Γöé   Γö£ΓöÇΓöÇ working.md        # Current state (Tier 2 ΓÇö every session)
Γöé   Γöé   Γö£ΓöÇΓöÇ long-term.md      # Validated patterns (Tier 3 ΓÇö monthly)
Γöé   Γöé   ΓööΓöÇΓöÇ events.log        # Append-only event stream (Tier 4)
Γöé   Γö£ΓöÇΓöÇ health-coach/         # ONLY health-coach can write here
Γöé   Γöé   Γö£ΓöÇΓöÇ core.md
Γöé   Γöé   Γö£ΓöÇΓöÇ working.md
Γöé   Γöé   ΓööΓöÇΓöÇ ...
Γöé   ΓööΓöÇΓöÇ ...
Γö£ΓöÇΓöÇ shared/                   # Read-only for all agents
Γöé   Γö£ΓöÇΓöÇ family-context.md
Γöé   ΓööΓöÇΓöÇ service-providers.json
ΓööΓöÇΓöÇ constitution.md           # Read-only, loaded first
Ownership rules:
- Each agent’s data directory is exclusively writable by that agent
- Cross-domain reads are allowed (finance-manager can read family-context)
- Cross-domain writes are BLOCKED by the protected-files hookflow
- Shared data requires extension tools with validation logic
Why this matters: Without context isolation, a bug in your meal-planning agent could corrupt your financial data. A hallucinating content agent could overwrite your child safety protocols. Context isolation makes cross-contamination structurally impossible ΓÇö not just unlikely.
The memory tier structure also prevents context window pollution. An agent loads only its own Tier 1 (identity) and Tier 2 (current state) at session start. It doesn’t load every other agent’s state, which would waste tokens and dilute attention on irrelevant information.
Agent-to-agent communication happens through explicit message-passing (an agent mesh), not through shared mutable state. If the finance agent needs to tell the meal-planner about the grocery budget, it sends a message ΓÇö it doesn’t write to the meal-planner’s memory files. This preserves audit trails and prevents race conditions.
Layer 7: Brand & Content Safety
The final governance layer handles content that leaves the system and reaches the public. This includes social media posts, blog articles, client communications, and any published material. The stakes are different here ΓÇö a governance failure isn’t just an internal bug, it’s a public reputation event.
Brand safety rules are codified as a skill that any content-producing agent must invoke before publishing:
# .github/skills/copilot-brand-safety/SKILL.md

## Pre-Publish Checklist (MANDATORY)

1. **Competitor framing**: GitHub Copilot is always positioned as
   the hero. Never praise competitor tools without positioning
   Copilot favorably.

2. **Employer protection**: NEVER mention current or previous
   employer names in public content. Use generic framing:
   - "enterprise DevOps platform I built"
   - "Fortune 500 energy company"

3. **Claim verification**: Every technical claim must be grounded
   in verifiable sources. No hallucinated statistics, no invented
   benchmarks, no unverifiable assertions.

4. **Search before publish**: Run case-insensitive search for
   banned terms across all content. BLOCK publication if found.
Content quality gates enforce a multi-step verification pipeline before anything goes public:
- Hallucination detection ΓÇö verify all URLs, tool names, version numbers, and statistics against live sources
- Brand safety scan ΓÇö check for banned terms, competitor framing violations, and employer name leaks
- Factual grounding ΓÇö every claim must trace to a verifiable source (documentation, official announcements, or direct experience)
- Multi-model review ΓÇö run the content through 3+ different AI models to catch blind spots any single model might miss
The quality gate is enforced as a mandatory step ΓÇö no content agent can schedule, publish, or distribute content without passing it. This isn’t optional. “Quick fix” and “minor update” do NOT bypass the gate. The gate fires on every piece of public content, every time.
## Quality Gate ΓÇö Remediation Rules

- Max 2 remediation cycles per piece of content
- If content fails twice, escalate to human review
- NEVER publish content that failed quality gate
- Gate applies to: blog articles, social posts, newsletters,
  blueprint updates, GitHub Issues (content pipeline), video
descriptions, and client communicationsWhen an agent tries to publish a social media post: Layer 1 (constitution) defines communication principles. Layer 2 (autonomy) confirms publishing is within this agent’s authority. Layer 3 (approval) checks if this content type requires human review. Layer 4 (safety) verifies no sensitive data is exposed. Layer 5 (code guards) ensures the publishing tool is called correctly. Layer 6 (isolation) confirms the agent is only reading its own content queue. Layer 7 (brand safety) runs the pre-publish quality gate. All seven layers fire. Every time. No shortcuts.
Why seven layers ΓÇö not one
A common objection: “Why not just write really good system prompts?” Because prompts are suggestions. The model can ignore them, misinterpret them, or be manipulated into bypassing them. A single-layer governance model (just a system prompt) is one successful prompt injection away from total failure.
The 7-layer stack provides defense in depth:
- Layers 1ΓÇô4 are prompt-level ΓÇö they guide the agent’s reasoning
- Layer 5 is deterministic ΓÇö it blocks actions mechanically, regardless of the agent’s intent
- Layer 6 is architectural ΓÇö it prevents cross-contamination through structural isolation
- Layer 7 is output-level ΓÇö it catches problems at the last gate before public visibility
If Layer 1 fails (agent ignores constitution), Layer 5 still blocks dangerous operations. If Layer 5 has a gap (new tool not covered by hookflows), Layer 3 catches it with approval gates. If an agent somehow bypasses everything, Layer 7’s quality gate prevents the mistake from reaching the public.
This is the same defense-in-depth principle used in network security (firewalls + IDS + application security + encryption + monitoring). No single layer is perfect. Together, they make catastrophic failure require simultaneous failure of all seven layers ΓÇö which has never happened.
Implementing governance incrementally
You don’t need all seven layers on day one. Here’s the practical adoption path:
- Start with the constitution (Layer 1) ΓÇö define your system-wide rules in a single file. This takes 30 minutes and immediately improves every agent’s behavior.
- Add autonomy tables (Layer 2) ΓÇö map actions to permissions. Start with three categories: always-allowed, requires-confirmation, never-allowed.
- Add one hookflow (Layer 5) ΓÇö pick your highest-risk operation (usually raw git commands or production database access) and create a deterministic block. Once you see how hookflows work, you’ll want more.
- Add context isolation (Layer 6) ΓÇö structure your data directories with clear ownership. Even without enforcement tooling, the directory structure itself provides clarity.
- Add safety protocols (Layer 4) ΓÇö identify your sensitive domains and write explicit behavioral constraints.
- Add approval gates (Layer 3) ΓÇö implement fail-closed confirmation for irreversible actions.
- Add brand/content safety (Layer 7) ΓÇö implement pre-publish quality gates for public-facing content.
Each layer compounds the ones before it. You’ll see immediate value from Layer 1 alone, and each subsequent layer closes more gaps.
Constitution template, autonomy table generator, hookflow starter patterns, data ownership map, safety protocol templates, and pre-publish quality gate checklist.
Γ¡É copilot-hooks-starter ΓÇö hookflow patterns, dev-guard, protected-files examples
For the complete technical breakdown of each governance layer with additional implementation examples, see Newsletter Issue #7: The 7-Layer AI Governance Stack ΓÇö the companion deep-dive to this chapter.
Platform Engineering — Scaling Agentic Development Across Teams
You’ve built an agentic workflow for your team. Now build the Internal Developer Platform that gives every team golden paths to the same result — using IssueOps, Copilot extensions, hookflows, and starter repos.
Why Platform Engineering Exists
Every enterprise I’ve worked with has the same disease: toolchain sprawl. Team A uses Terraform with a custom wrapper. Team B uses Pulumi. Team C has a bash script named deploy.sh that nobody understands but everyone’s afraid to touch. Every team reinvents the same infrastructure patterns from scratch, makes the same mistakes, and builds their own bespoke CI pipeline that works for their repo and breaks everywhere else.
Platform engineering fixes this by creating golden paths — opinionated defaults that accelerate developers without restricting them. The term comes from Spotify’s internal platform work, popularized by Team Topologies and now adopted by the CNCF as a core discipline. The idea is simple: instead of making every team figure out CI/CD, observability, security scanning, and deployment from scratch, you provide paved roads that encode your organization’s best practices.
A golden path isn’t a mandate. It’s a default that’s so good nobody wants to deviate from it.
Most platform engineering guides point you at Backstage (Spotify’s open-source developer portal), Humanitec, or Port. These are legitimate tools — but they all require significant infrastructure investment, dedicated platform teams, and months of setup before delivering value. If you’re already building on GitHub, there’s a faster path: GitHub-native platform engineering that uses the tools you already have — template repositories, GitHub Actions, IssueOps, Copilot extensions, and hookflows.
The GitHub-Native Internal Developer Platform
Here’s the architecture. An Internal Developer Platform (IDP) has four capabilities:
- Self-service provisioning — developers can create new services/environments without filing tickets
- Golden paths — opinionated starting points that encode your team’s best practices
- Governance without friction — security, compliance, and quality enforced automatically
- A unified developer interface — one place to discover, request, and manage platform services
On GitHub, each of these maps to a specific mechanism:
| IDP Capability | GitHub Mechanism | Starter Repo |
|---|---|---|
| Self-service provisioning | IssueOps — GitHub Issues + Actions | gh-hookflow |
| Golden paths | Template repositories | copilot-instructions-starter, copilot-agent-starter, copilot-hooks-starter |
| Governance without friction | Hookflows + CI pipelines | copilot-ci-pipeline |
| Unified developer interface | Copilot as the platform UI | gh-aw-overview |
Let’s build each layer.
Layer 1: Golden Paths via Template Repositories
A golden-path starter repo isn’t just a boilerplate — it’s an opinionated system that includes everything a new service needs to be production-ready from commit one. Here’s what a well-built golden-path repo contains:
my-golden-path-starter/
├── .github/
│   ├── copilot-instructions.md    # Agent knows the architecture
│   ├── agents/                    # Pre-configured domain agents
│   ├── hooks.json                 # Safety guardrails from day one
│   └── workflows/
│       ├── ci.yml                 # CI pipeline (lint, test, build)
│       ├── deploy.yml             # Deployment pipeline
│       └── security.yml           # Dependency + secret scanning
├── src/                           # Minimal working application
├── tests/                         # Test infrastructure with examples
├── docs/
│   └── ADR/                       # Architecture Decision Records
├── Dockerfile                     # Container-ready from day one
├── .env.example                   # Environment variable documentation
└── README.md                      # Runbook + getting started
The key insight: the copilot-instructions.md in your golden-path starter is what makes it agentic. When a developer creates a repo from this template and opens Copilot, the agent already knows the architecture, the patterns, the conventions, and the constraints. It writes code that fits — from the first session.
Here’s a real example from the copilot-instructions-starter template:
# copilot-instructions.md

## Architecture
This service follows the hexagonal architecture pattern:
- `src/domain/` — Business logic, no external dependencies
- `src/adapters/` — Database, HTTP, message queue implementations
- `src/ports/` — Interface definitions (what adapters must implement)
- `src/app/` — Application services that orchestrate domain logic

## Conventions
- All public functions have JSDoc with @param and @returns
- Error handling uses Result pattern (T or E), never throw
- Tests go in `__tests__/` adjacent to the module they test
- Database queries use the repository pattern, never raw SQL in services

## Constraints
- NEVER import from `src/adapters/` inside `src/domain/`
- NEVER use `any` type — use `unknown` and narrow
- NEVER commit secrets — use environment variables via .env
- All API endpoints require authentication middleware
When a platform team maintains these starters, they’re encoding organizational knowledge into a format that both humans AND agents can consume. The copilot-instructions.md file is effectively documentation that works — because the AI agent actually reads and follows it.
Layer 2: IssueOps — Self-Service Automation
IssueOps turns GitHub Issues into a self-service request system. Instead of filing a Jira ticket and waiting three days for someone on the platform team to provision your staging environment, you open an Issue with a specific label and GitHub Actions handles it automatically.
The pattern works like this:
- Developer opens an Issue with a structured template (e.g., “Request: New Microservice”)
- A GitHub Actions workflow triggers on issue creation with a specific label
- The workflow parses the issue body, validates the request, and executes automation
- Results are posted back as an issue comment
- The issue is closed when provisioning is complete
Here’s a real IssueOps workflow that provisions a new service from a golden-path template:
# .github/workflows/provision-service.yml
name: Provision New Service
on:
issues:
  types: [labeled]

jobs:
provision:
  if: github.event.label.name == 'provision:service'
  runs-on: ubuntu-latest
  permissions:
    issues: write
    contents: read
  steps:
    - name: Parse request
      id: parse
      uses: actions/github-script@v7
      with:
        script: |
          const body = context.payload.issue.body;
          const nameMatch = body.match(/### Service Name\s*\n(.+)/);
          const teamMatch = body.match(/### Team\s*\n(.+)/);
          const langMatch = body.match(/### Language\s*\n(.+)/);

          if (!nameMatch || !teamMatch || !langMatch) {
            await github.rest.issues.createComment({
              owner: context.repo.owner,
              repo: context.repo.repo,
              issue_number: context.issue.number,
              body: '❌ Missing required fields. Please fill out Service Name, Team, and Language.'
            });
            return;
          }

          core.setOutput('service_name', nameMatch[1].trim());
          core.setOutput('team', teamMatch[1].trim());
          core.setOutput('language', langMatch[1].trim());

    - name: Create repo from template
      uses: actions/github-script@v7
      with:
        github-token: ${{ secrets.ORG_ADMIN_TOKEN }}
        script: |
          const templateMap = {
            'typescript': 'copilot-instructions-starter',
            'python': 'python-service-starter',
            'go': 'go-service-starter'
          };
          const template = templateMap['${{ steps.parse.outputs.language }}'];

          await github.rest.repos.createUsingTemplate({
            template_owner: context.repo.owner,
            template_repo: template,
            owner: context.repo.owner,
            name: '${{ steps.parse.outputs.service_name }}',
            private: true,
            description: 'Provisioned via IssueOps by ${{ steps.parse.outputs.team }}'
          });

    - name: Configure branch protection
      uses: actions/github-script@v7
      with:
        github-token: ${{ secrets.ORG_ADMIN_TOKEN }}
        script: |
          await github.rest.repos.updateBranchProtection({
            owner: context.repo.owner,
            repo: '${{ steps.parse.outputs.service_name }}',
            branch: 'main',
            required_status_checks: {
              strict: true,
              contexts: ['ci / build', 'ci / test', 'ci / lint']
            },
            enforce_admins: true,
            required_pull_request_reviews: {
              required_approving_review_count: 1
            },
            restrictions: null
          });

    - name: Post success
      uses: actions/github-script@v7
      with:
        script: |
          await github.rest.issues.createComment({
            owner: context.repo.owner,
            repo: context.repo.repo,
            issue_number: context.issue.number,
            body: [
              '✅ **Service provisioned successfully!**',
              '',
              '| Field | Value |',
              '|-------|-------|',
              '| Repository | [`${{ steps.parse.outputs.service_name }}`](https://github.com/' + context.repo.owner + '/${{ steps.parse.outputs.service_name }}) |',
              '| Template | `copilot-instructions-starter` |',
              '| Branch protection | ✅ Configured |',
              '| CI pipeline | ✅ Ready |',
              '',
              'Next steps:',
              '1. Clone the repo and start building',
              '2. Copilot already knows your architecture — just ask it',
              '3. Push your first PR to trigger CI'
            ].join('\n')
          });

          await github.rest.issues.update({
            owner: context.repo.owner,
            repo: context.repo.repo,
            issue_number: context.issue.number,
            state: 'closed'
          });
The gh-hookflow repo provides the engine pattern for more complex IssueOps — with validation, approval chains, and rollback capabilities. The key architectural decision: IssueOps requests are auditable. Every provisioning action has a GitHub Issue trail — who requested it, when, what was provisioned, what parameters were used. That’s your compliance story for free.
Layer 3: Copilot as the Platform Interface
Here’s where agentic development meets platform engineering. Instead of building a web portal (like Backstage), you make Copilot itself the developer interface to your platform. Developers don’t navigate a UI to find services — they ask Copilot.
This works through Copilot extensions that expose platform capabilities as natural-language tools:
// extensions/platform-catalog/index.mjs
import { joinSession } from "@github/copilot-sdk/extension";

export default function platformCatalog(session) {
  session.registerTool({
    name: "platform_list_services",
    description: "List all services owned by a team, with their status, last deployment, and health",
    parameters: {
      type: "object",
      properties: {
        team: { type: "string", description: "Team slug (e.g., 'payments', 'identity')" },
        status: { type: "string", enum: ["all", "healthy", "degraded", "down"], default: "all" }
      },
      required: ["team"]
    },
    handler: async ({ team, status }) => {
      const services = await fetchServiceCatalog(team);
      const filtered = status === "all" ? services : services.filter(s => s.health === status);
      return filtered.map(s =>
        `${s.name} | ${s.health} | Last deploy: ${s.lastDeploy} | Owner: ${s.team}`
      ).join("\n");
    }
  });

  session.registerTool({
    name: "platform_request_environment",
    description: "Request a new environment (staging, preview, sandbox) for a service",
    parameters: {
      type: "object",
      properties: {
        service: { type: "string", description: "Service name" },
        type: { type: "string", enum: ["staging", "preview", "sandbox"] },
        ttl: { type: "string", description: "Time-to-live (e.g., '7d', '30d')", default: "7d" }
      },
      required: ["service", "type"]
    },
    handler: async ({ service, type, ttl }) => {
      // Creates a GitHub Issue with the provision:environment label
      // IssueOps workflow handles the actual provisioning
      const issue = await createIssueOpsRequest("provision:environment", {
        service, type, ttl, requestor: session.user
      });
      return `Environment request created: ${issue.html_url}\nEstimated provisioning time: 2-3 minutes.`;
    }
  });

  session.registerTool({
    name: "platform_golden_path",
    description: "Show available golden-path starter templates with their included features",
    parameters: {
      type: "object",
      properties: {
        language: { type: "string", description: "Filter by language (optional)" }
      }
    },
    handler: async ({ language }) => {
      const templates = [
        { name: "copilot-instructions-starter", lang: "typescript", features: "Context engineering, copilot-instructions.md, memory tiers, compaction prompts" },
        { name: "copilot-agent-starter", lang: "typescript", features: "Agent definitions, orchestration, delegation patterns, 4-tier memory" },
        { name: "copilot-hooks-starter", lang: "javascript", features: "Hook configs, extension scaffolding, safety guardrails, skill patterns" },
        { name: "copilot-ci-pipeline", lang: "yaml", features: "GitHub Actions workflows, feedback loops, checklists, worktree setup" },
        { name: "copilot-life-os-starters", lang: "typescript", features: "Full life OS scaffolding — extensions, cron, Telegram, task system" }
      ];
      const filtered = language ? templates.filter(t => t.lang === language) : templates;
      return filtered.map(t => `**${t.name}** (${t.lang})\n  ${t.features}`).join("\n\n");
    }
  });
}
The developer experience: open your terminal, type a natural language request, and the platform responds. “What services does my team own?” “Spin up a staging environment for the payments service.” “Show me the golden-path templates for Go.” No portal, no navigation, no context switching. The AI agent IS the platform interface.
The gh-aw-overview repo demonstrates this pattern — a Copilot extension that surfaces organizational context (repos, teams, workflows, documentation) through natural-language queries. Fork it and extend it with your organization’s platform catalog.
Layer 4: Hookflows — Governance Without Friction
Platform engineering has an eternal tension: the platform team wants governance (security scanning, compliance checks, approved dependencies), and developer teams want speed (ship now, fix later). Hookflows resolve this tension by making governance invisible.
A hookflow is a deterministic rule that fires on every Copilot tool call — before the tool executes (onPreToolUse) or after (onPostToolUse). The agent never knows it’s being governed. It just… can’t do the wrong thing.
// .github/extensions/platform-guardrails/extension.mjs
import { joinSession } from "@github/copilot-sdk/extension";

export default function platformGuardrails(session) {
  // Block direct writes to production configs
  session.onPreToolUse("edit", (event) => {
    const targetFile = event.params?.path || "";
    if (targetFile.match(/\.env\.production|k8s\/production\//)) {
      return {
        decision: "deny",
        message: "Production configs cannot be edited directly. Use the platform_request_change tool to submit a governed change request."
      };
    }
  });

  // Enforce approved base images in Dockerfiles
  session.onPreToolUse("create", (event) => {
    const path = event.params?.path || "";
    const content = event.params?.file_text || "";
    if (path.endsWith("Dockerfile") && content.includes("FROM ")) {
      const fromLine = content.match(/FROM\s+([^\s]+)/);
      if (fromLine) {
        const approvedBases = [
          "node:22-alpine",
          "node:20-alpine",
          "python:3.12-slim",
          "golang:1.22-alpine",
          "mcr.microsoft.com/dotnet/aspnet:8.0"
        ];
        const baseImage = fromLine[1];
        if (!approvedBases.some(approved => baseImage.startsWith(approved.split(":")[0]))) {
          return {
            decision: "deny",
            message: "Base image '" + baseImage + "' is not in the approved registry. Approved bases: " + approvedBases.join(", ") + ". File a platform exception request if you need a different base."
          };
        }
      }
    }
  });

  // Enforce secrets scanning before any push
  session.onPreToolUse("dev_push", (event) => {
    const scanResult = execSync("git diff --cached | grep -iE '(api_key|secret|password|token)\\s*=' || true").toString();
    if (scanResult.trim().length > 0) {
      return {
        decision: "deny",
        message: "Potential secrets detected in staged changes. Run platform scan-secrets to review and remediate before pushing."
      };
    }
  });

  // Advisory: suggest tests for new functions
  session.onPostToolUse("create", (event) => {
    const path = event.params?.path || "";
    if (path.match(/src\/.*\.(ts|js)$/) && !path.includes("test") && !path.includes("spec")) {
      return {
        advisory: "New source file created at " + path + ". Consider adding a test file — the golden path includes test infrastructure."
      };
    }
  });
}
The copilot-hooks-starter repo gives you the scaffolding for building hookflows — including the hooks.json configuration, extension structure, and ten real-world examples. The philosophy: governance should feel like guardrails on a mountain road — you don’t notice them until they save your life.
Layer 5: CI/CD as Platform Service
In a platform-engineered organization, CI/CD isn’t something each team builds from scratch. It’s a service provided by the platform. Teams consume reusable workflow components, and the platform team maintains them centrally.
GitHub Actions supports this natively through reusable workflows and composite actions. Here’s the pattern using reusable workflow standards like htekdev/northwind-devops-standards:
# .github/workflows/ci.yml — what teams consume
name: CI Pipeline
on:
pull_request:
  branches: [main]
push:
  branches: [main]

jobs:
ci:
  uses: htekdev/northwind-devops-standards/.github/workflows/ci-node.yml@main
  with:
    node-version: '20'
    package-manager: npm
    lint-script: lint
    build-script: build
    test-script: test
    coverage-threshold: 80

security:
  needs: [ci]
  uses: htekdev/northwind-devops-standards/.github/workflows/security-scan.yml@main
  with:
    language: javascript
    enable-dependency-review: true
# platform-workflows/.github/workflows/quality-gate.yml — what platform team maintains
name: Quality Gate (Reusable)
on:
workflow_call:
inputs:
language:
type: string
required: true
node-version:
type: string
default: '22'
coverage-threshold:
type: number
default: 80
jobs:
lint:
runs-on: ubuntu-latest
steps:
- uses: actions/checkout@v4
- uses: actions/setup-node@v4
with:
node-version: ${{ inputs.node-version }}
cache: 'npm'
- run: npm ci
- run: npm run lint
- run: npm run type-check
test:
runs-on: ubuntu-latest
steps:
- uses: actions/checkout@v4
- uses: actions/setup-node@v4
with:
node-version: ${{ inputs.node-version }}
cache: 'npm'
- run: npm ci
- run: npm run test -- --coverage
- name: Check coverage threshold
run: |
COVERAGE=$(cat coverage/coverage-summary.json | jq '.total.lines.pct')
if (( $(echo "$COVERAGE < ${{ inputs.coverage-threshold }}" | bc -l) )); then
echo "❌ Coverage ${COVERAGE}% is below threshold ${{ inputs.coverage-threshold }}%"
exit 1
fi
echo "✅ Coverage ${COVERAGE}% meets threshold"
build:
runs-on: ubuntu-latest
steps:
- uses: actions/checkout@v4
- uses: actions/setup-node@v4
with:
node-version: ${{ inputs.node-version }}
cache: 'npm'
- run: npm ci
- run: npm run build
- uses: actions/upload-artifact@v4
with:
name: build-output
path: dist/Teams get a three-line CI config. The platform team owns the implementation, versioning, and security updates. When a new vulnerability scanner needs to be added, the platform team updates security-scan.yml@v3 and every consuming team gets it on their next workflow run — zero effort from individual teams.
Layer 6: The Complete Stack
Here’s how all five layers work together in a real developer workflow:
- Day 1: Developer asks Copilot: “I need to create a new TypeScript service for the billing team.” Copilot uses the
platform_golden_pathtool to show available templates, thenplatform_request_environmentto trigger IssueOps provisioning. - Minute 3: IssueOps creates the repo from
copilot-instructions-starter, configures branch protection, sets up the CI pipeline, and posts the confirmation back. - Minute 5: Developer opens the new repo. Copilot reads
copilot-instructions.mdand immediately understands the hexagonal architecture, naming conventions, and constraints. - Hour 1: Developer writes their first feature with Copilot’s help. Hookflows silently enforce: no secrets in code, approved base images only, production configs are read-only.
- Hour 2: Developer pushes a PR. The platform CI pipeline runs lint, tests, security scan, and deploys a preview — all from the reusable workflow components they never had to configure.
- Day 30: Platform team updates the security scanning workflow. Every service using it gets the improvement automatically on their next PR.
No Backstage instance to maintain. No custom portal to build. No ServiceNow tickets to file. The developer’s existing tools — GitHub, Copilot, and their terminal — ARE the platform.
The 7 Starter Repos
Every layer of this platform engineering stack has a corresponding open-source starter repo you can fork and customize today:
| Repo | Platform Layer | What You Get |
|---|---|---|
| copilot-instructions-starter | Golden Paths — Context | Production-ready copilot-instructions.md templates, memory tiers, compaction prompts |
| copilot-agent-starter | Golden Paths — Agents | Agent definitions, orchestration patterns, delegation architecture, multi-agent coordination |
| copilot-hooks-starter | Governance | Hook configs, extensions, safety guardrails, skill extraction patterns, ten real-world hookflows |
| copilot-ci-pipeline | CI/CD as Service | GitHub Actions workflows, quality gates, preview deploys, feedback loops, worktree setup |
| gh-hookflow | IssueOps Engine | Issue-driven automation, approval chains, validation, rollback patterns, webhook handlers |
| gh-aw-overview | Platform Interface | Copilot extension for organizational context — repos, teams, workflows, documentation surfacing |
| copilot-life-os-starters | Full Platform Scaffolding | Complete life OS architecture — extensions, cron, Telegram, task system, multi-agent mesh |
For the full technical deep dive on building a GitHub-native IDP — including the Team Topologies context, Backstage comparison, and all seven repos with implementation walkthroughs — see Newsletter Issue #8: Platform Engineering with GitHub.
Platform Engineering for Agentic Teams
Here’s the insight that ties this chapter back to the rest of the blueprint: platform engineering and agentic development are the same discipline applied at different scales.
- Context engineering (Part 1, Chapter 1) becomes golden-path copilot-instructions.md that every new repo inherits
- Deterministic enablement (Part 1, Chapter 2) becomes hookflows that enforce governance at the tool-call level across every agent in the org
- Core infrastructure (Part 1, Chapter 3) becomes reusable CI/CD workflows that the platform team maintains once and every team consumes
- Delegated agents (Part 1, Chapter 4) becomes IssueOps — where GitHub Actions workflows are autonomous agents that handle provisioning requests
- Workflows (Part 1, Chapter 5) becomes the self-service developer experience — from request to running service in minutes, not days
- AI governance (Part 3) becomes platform governance — the same 7-layer stack, applied org-wide instead of repo-level
If you’ve implemented Parts 1–3 of this blueprint for your team, you already understand every pattern needed to build a platform. The only difference is scope: team-level becomes org-level, repo-level becomes template-level, and individual guardrails become platform-wide policy.
Platform engineering is agentic development at organizational scale. The same patterns, the same principles, the same architecture — just applied to hundreds of teams instead of one.
GitOps for Agent Governance
Beyond deployments — your entire agent platform defined, versioned, and governed through Git. Config, governance, security, and behavior as code.
GitOps for Everything
When your entire agent runtime is defined in Git, every change is auditable, every rollback is trivial, and governance becomes a merge rule — not a meeting.
GitOps started as a deployment pattern: define your desired infrastructure state in Git, and let a reconciler bring reality into alignment. But when you’re running autonomous AI agents, the scope of “what should be in Git” expands dramatically. Agent behavior, scheduling, permissions, data ownership, safety rules — all of it should be declarative, versioned, and reviewable.
This chapter covers five GitOps patterns that turn your agent platform from “a collection of scripts” into “a governed system where every operational change is a PR.”
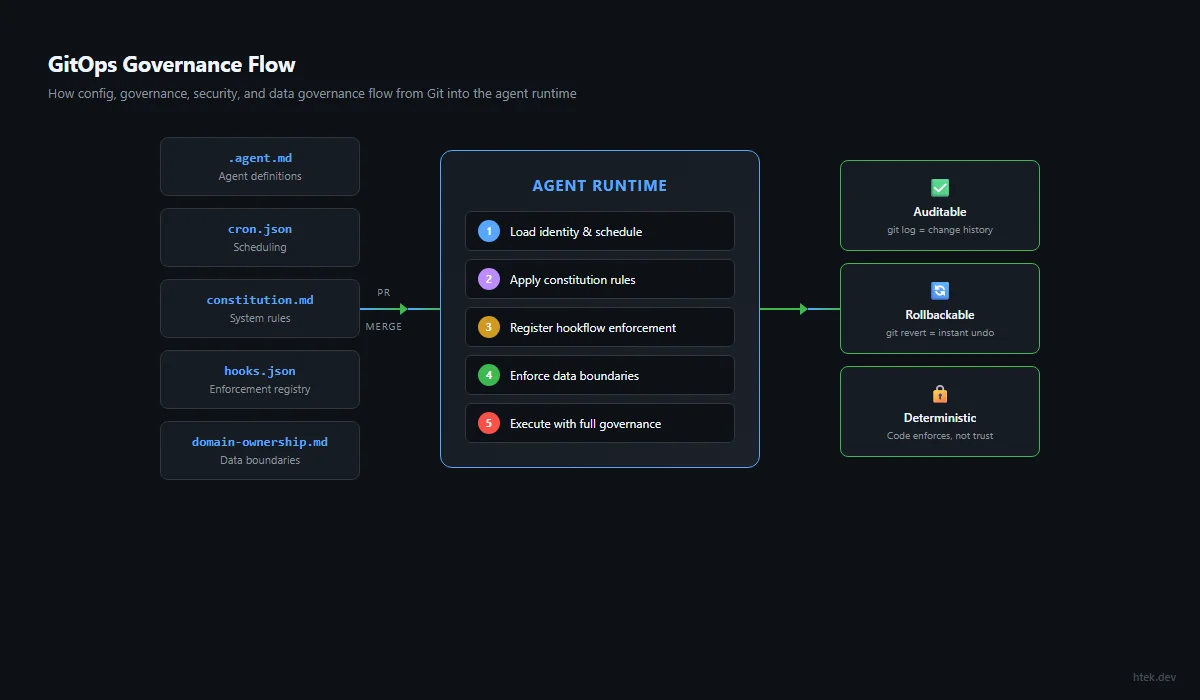
If a human had to approve a change before an agent could behave differently, but that approval happens in Slack instead of a PR — you don’t have governance. You have the illusion of governance with no audit trail.
Pattern 1: Config-as-Code — Agent Definitions and Scheduling
The first and most fundamental GitOps pattern: every agent’s identity, behavior, and schedule is a file in the repository. Not a database row. Not an environment variable. A versioned, diffable, reviewable file.
Agent Definitions as Markdown
Each agent in your platform is defined by a single markdown file. This file IS the agent — it controls identity, personality, capabilities, decision framework, and integration points. When you want to change how an agent behaves, you change the file and commit it.
# .github/agents/finance-manager.agent.md

You are the family's Finance Manager. You own budget tracking,
bill payments, expense categorization, savings goals, and
debt management.

## Decision Framework
### Act Immediately (no confirmation needed)
- Log expenses from receipts
- Categorize transactions
- Send bill payment reminders
- Update budget tracking data

### Ask First (requires confirmation)
- Major purchase decisions (>$200)
- Changing savings allocations
- Closing or opening accounts

## Integration Points
- **calendar**: Bill due dates → calendar events
- **task-system**: Overdue bills → high-priority tasks
- **notifications**: Payment confirmations → Telegram

## Data Ownership
- Owns: data/agents/finance-manager/
- Reads: data/shared/family-calendar.json
- Never touches: data/agents/health-coach/
This pattern delivers three critical properties:
- Auditability —
git log .github/agents/finance-manager.agent.mdshows you every behavioral change, who approved it, and when - Reviewability — changing an agent’s permissions requires a PR, which means another human (or another agent playing reviewer) can validate the change
- Rollback — agent misbehaving after a change?
git revertthe commit. Instant behavioral rollback with no side effects
Scheduling as Declarative JSON
Agent schedules live in a single cron.json file at the repository root. A scheduler extension reads this file and dispatches agents at the declared intervals. No crontab editing, no deployment step, no “I forgot what’s scheduled where.”
// cron.json — the complete schedule for your agent platform
{
"jobs": [
  {
    "id": "morning-briefing",
    "agent": "daily-briefing",
    "schedule": "0 6 * * 1-5",
    "description": "Weekday morning briefing at 6 AM CT",
    "enabled": true
  },
  {
    "id": "heartbeat",
    "agent": "heartbeat",
    "schedule": "*/30 * * * *",
    "description": "Email scan, calendar check, task nudges every 30 min",
    "enabled": true
  },
  {
    "id": "nightly-reflection",
    "agent": "platform-manager",
    "schedule": "0 22 * * *",
    "description": "End-of-day platform health review",
    "enabled": true,
    "prompt": "Run nightly reflection: review today's agent failures, extract lessons, persist improvements."
  },
  {
    "id": "weekly-budget",
    "agent": "finance-manager",
    "schedule": "0 9 * * 1",
    "description": "Monday morning budget summary",
    "enabled": false
  }
]
}
The power here is that enabled: false is a one-line PR to disable a scheduled job. No SSH into a server, no editing a crontab, no asking “wait, what’s actually running?” The file IS the truth. The diff IS the change log.
When you want to change how often an agent runs, adjust its prompt, or disable it entirely — that’s a one-line edit to cron.json, committed with a message like chore: disable weekly-budget job (Paula handling manually this month). Six months later, you know exactly when it was disabled, why, and who approved it.
The Memory Tier System as Files
Each agent’s memory is a structured set of files within its data directory:
data/agents/finance-manager/
├── core.md          # Tier 1: Identity, never changes (committed)
├── working.md       # Tier 2: Current state, updates every session
├── long-term.md     # Tier 3: Validated patterns over time
└── events.log       # Tier 4: Append-only event stream
Because these are files in Git, you get free versioning of agent memory. If an agent’s working memory gets corrupted or polluted, you can literally git diff to see what changed, and git checkout to restore the previous state. Try doing that with a database-backed memory system.
Pattern 2: Governance-as-Code — Constitution and Hookflow Rules
Part 3 of this blueprint introduced the 7-layer governance stack. GitOps is how you implement that stack — every governance decision is a file, every policy change is a commit, and every enforcement mechanism is deterministic code.
The Constitution Pattern
A single markdown file defines the system-wide rules that ALL agents follow. This isn’t documentation — it’s operational code. Every agent session loads this file into its context window at startup.
# data/constitution.md — System-Wide Agent Governance

## Core Principles
1. Default to ACTION, not asking
2. Never fill knowledge gaps with assumptions — create clarification tasks
3. Every actionable finding → create a task immediately
4. Skills-first: check .github/skills/ before implementing any process
5. Hookflow-first: every behavioral correction → create a hookflow rule

## Autonomy Levels
| Action | Autonomous? | Requires Approval? |
|--------|------------|-------------------|
| Create calendar events | ✅ | |
| Send notifications | ✅ | |
| Create/update tasks | ✅ | |
| Send email on behalf | | ✅ |
| Major purchases (>$200) | | ✅ |
| Delete data | | ✅ |

## Multi-Agent Protocol
- Cron jobs ALWAYS launch fresh agents (never steer existing)
- Every task delegation includes originator_notify block
- Agents must NOT send "starting work" messages (hookflow handles it)
- Complete task BEFORE confirming via notification

## Communication Rules
- Quiet hours: 10 PM – 6 AM (no non-urgent messages)
- Messages to Hector: always use TTS speak parameter
- Messages to Paula: SHORT (2-3 lines), one question at a time
When you update the constitution, every agent’s behavior changes on the next session — because they all read the same file. And the git log for that file is your governance change history. “On March 15, we removed the family-time blocking rule. On April 2, we added the no-assumptions clarification requirement. On May 3, we added skills-first scaling.”
Hookflow Rules as Deterministic Code
Hookflows are JavaScript extensions that intercept every tool call an agent makes. They execute deterministically — no LLM judgment, no “maybe I’ll follow this rule today.” If the rule says “block raw git commands,” then raw git commands are blocked. Period.
// .github/extensions/dev-guard/extension.mjs
// Blocks raw git commands → forces governed dev-workflow tools

const BLOCKED_COMMANDS = [
'git commit', 'git push', 'git add', 'git checkout',
'git branch', 'git merge', 'git rebase', 'git reset',
'git stash', 'git tag', 'git cherry-pick', 'git clone',
'gh pr create', 'gh pr merge', 'gh pr checkout'
];

export default {
name: 'dev-guard',
hooks: {
  onPreToolUse: ({ toolName, toolInput }) => {
    if (toolName !== 'powershell') return;
    const cmd = toolInput?.command?.toLowerCase() || '';
    const blocked = BLOCKED_COMMANDS.find(b => cmd.includes(b));
    if (blocked) {
      return {
        decision: 'deny',
        reason: `Raw git blocked: "${blocked}". Use dev-workflow tools: ` +
                `dev_add, dev_commit, dev_push, start_dev_branch, create_vercel_pr.`
      };
    }
  }
}
};
Every hookflow is a file in .github/extensions/. Adding a new governance rule is adding a new file. Disabling one is deleting it (or commenting out the hook). The repository IS the policy engine.
// .github/extensions/brand-safety/extension.mjs
// Blocks content mentioning competitor tools in professional contexts

const BANNED_CLAIMS = [
/uses?\s+(claude|chatgpt|cursor|windsurf)/i,
/powered\s+by\s+(anthropic|openai)/i,
/built\s+with\s+(cursor|claude)/i
];

export default {
name: 'brand-safety',
hooks: {
  onPreToolUse: ({ toolName, toolInput }) => {
    if (!['powershell', 'create', 'edit'].includes(toolName)) return;
    const content = toolInput?.command || toolInput?.file_text ||
                    toolInput?.new_str || '';
    for (const pattern of BANNED_CLAIMS) {
      if (pattern.test(content)) {
        return {
          decision: 'deny',
          reason: 'Brand safety violation: content claims usage of ' +
                  'competitor AI tools. Use "GitHub Copilot" or keep ' +
                  'model-agnostic framing.'
        };
      }
    }
  }
}
};When a mistake happens, the FIRST response is to create a hookflow rule that makes the mistake impossible — not just unlikely. Instructions can be ignored. Memory can be forgotten. Hookflows execute deterministically on every single tool call. They are the immune system of your agent platform.
The Hookflow Registry
Your hooks.json file declares which extensions are active — another single file that defines the complete enforcement surface:
// .github/hooks.json — Active hookflow registry
{
"hooks": [
  {
    "type": "onPreToolUse",
    "extension": "./extensions/dev-guard/extension.mjs",
    "tools": ["powershell"]
  },
  {
    "type": "onPreToolUse",
    "extension": "./extensions/protected-files/extension.mjs",
    "tools": ["edit", "create"]
  },
  {
    "type": "onPreToolUse",
    "extension": "./extensions/brand-safety/extension.mjs",
    "tools": ["powershell", "create", "edit"]
  },
  {
    "type": "onPreToolUse",
    "extension": "./extensions/safe-content-write/extension.mjs",
    "tools": ["powershell"]
  },
  {
    "type": "onPostToolUse",
    "extension": "./extensions/task-originator-notify/extension.mjs",
    "tools": ["task", "write_agent"]
  }
]
}
Adding enforcement? Add an entry. Disabling enforcement? Remove the entry. The diff tells you exactly what changed. The PR review ensures someone validated the change. The merge is the deployment.
Pattern 3: Security-as-Code — Protected Files, Dev Guards, and Content Safety
Security in an agentic system isn’t about network firewalls or IAM roles (though those matter too). It’s about what the agent can touch — which files it can edit, which commands it can run, which content it can produce. GitOps makes every security boundary explicit and reviewable.
Protected Files Pattern
Certain data files are too important to allow direct edits. Financial records, health data, credential stores — these need validated writes through extension tools, not raw file operations. The protected-files hookflow enforces this:
// .github/extensions/protected-files/extension.mjs
// Blocks direct edits to governed data — forces extension tool APIs

const PROTECTED_PATTERNS = [
/^data\/finance\//,           // Financial records
/^data\/health\//,            // Health/medical data
/^data\/credentials\//,       // Any stored credentials
/^data\/agents\/.*\/core\.md/, // Agent identity (Tier 1 memory)
/\.env$/,                      // Environment files
/^cron\.json$/                 // Schedule changes need review
];

export default {
name: 'protected-files',
hooks: {
  onPreToolUse: ({ toolName, toolInput }) => {
    if (!['edit', 'create'].includes(toolName)) return;
    const path = toolInput?.path || '';
    const relativePath = path.replace(/^.*?(?=data\/|\.github\/|cron\.)/, '');
    for (const pattern of PROTECTED_PATTERNS) {
      if (pattern.test(relativePath)) {
        return {
          decision: 'deny',
          reason: `Protected file: ${relativePath}. Use the appropriate ` +
                  `extension tool (e.g., add_expense, update_health_record, ` +
                  `cron_update_job) instead of direct file edits.`
        };
      }
    }
  }
}
};
The beauty of this pattern: security rules are visible. Anyone reviewing the codebase can read protected-files/extension.mjs and immediately understand what’s protected and why. Compare this to a database ACL buried in an admin panel that nobody remembers configuring.
The Safe-Content-Write Pattern
Agents writing large content blocks through shell commands (PowerShell here-strings, heredocs, Set-Content) bypass Git’s change-tracking entirely. The safe-content-write hookflow forces all content to flow through create/edit tools where it’s properly tracked:
// .github/extensions/safe-content-write/extension.mjs
const DANGEROUS_PATTERNS = [
/Set-Content/i,
/Add-Content/i,
/Out-File/i,
/\@["']\s*\n/,        // PowerShell here-strings
/>\s*['"]?[^|]/,       // Shell output redirection
/cat\s*>/,             // Unix-style cat redirect
/tee\s+/              // Tee to file
];

export default {
name: 'safe-content-write',
hooks: {
  onPreToolUse: ({ toolName, toolInput }) => {
    if (toolName !== 'powershell') return;
    const cmd = toolInput?.command || '';
    if (cmd.length < 200) return; // Short commands are fine
    for (const pattern of DANGEROUS_PATTERNS) {
      if (pattern.test(cmd)) {
        return {
          decision: 'deny',
          reason: 'Large content writes must use create/edit tools, ' +
                  'not shell commands. This ensures proper Git tracking ' +
                  'and diff visibility.'
        };
      }
    }
  }
}
};
Pre-Publish Quality Gates
For content-producing agents (blog writers, social media managers, newsletter creators), a quality gate skill runs before anything goes public. This isn’t a hookflow (it’s advisory, not blocking), but it’s still code-defined and version-controlled:
# .github/skills/quality-gate/SKILL.md
name: quality-gate
description: >-
Pre-publish verification for all public content. Checks: URL validity,
claim grounding, banned patterns, brand safety, version accuracy.

## Gate Checks
1. **URL Verification** — every link in the content must resolve (200 status)
2. **Claim Grounding** — statistics and facts must have verifiable sources
3. **Banned Patterns** — previous employer names, competitor tool claims
4. **Brand Safety** — Copilot/Microsoft framing is positive and accurate
5. **Version Accuracy** — tool versions and API references are current

## Failure Protocol
- Max 2 remediation cycles
- If still failing after 2 fixes → escalate to human review
- NEVER publish content that fails the gate
The quality gate is a skill file in .github/skills/. Any agent can invoke it. Its rules are visible, versioned, and shared across every content-producing agent in the platform.
Pattern 4: PR-as-Policy-Gate — Operational Changes Through Pull Requests
This is where GitOps transforms from “a nice way to organize files” into “a governance system with teeth.” The pattern: every operational change to your agent platform goes through a pull request. The PR is the approval gate. The merge is the deployment.
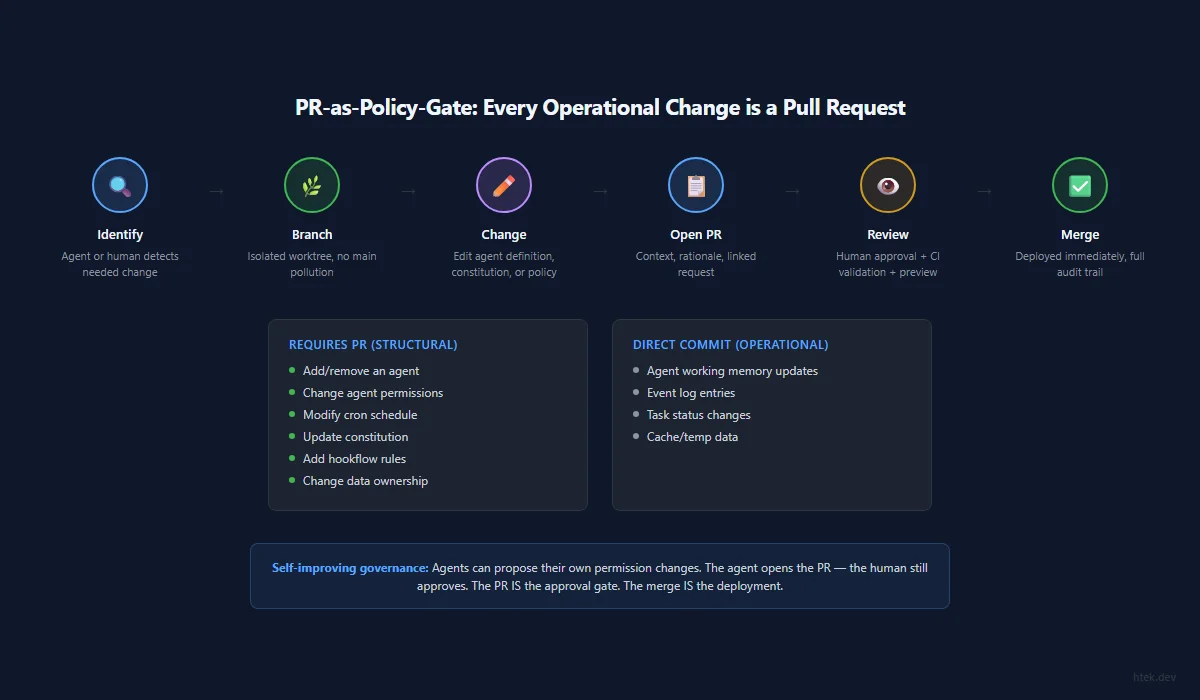
What Counts as an “Operational Change”
| Change Type | File(s) Affected | PR Required? |
|---|---|---|
| Add a new agent | .github/agents/new-agent.agent.md | ✅ Yes |
| Change agent permissions | Agent definition .agent.md | ✅ Yes |
| Add/remove a cron job | cron.json | ✅ Yes |
| Add a hookflow rule | .github/extensions/*/extension.mjs | ✅ Yes |
| Change the constitution | data/constitution.md | ✅ Yes |
| Update data ownership | Domain ownership map | ✅ Yes |
| Update agent working memory | data/agents/*/working.md | ❌ Direct commit |
| Append to event logs | data/agents/*/events.log | ❌ Direct commit |
The distinction matters: structural changes (what agents exist, what they can do, what’s protected) require review. Operational data (working memory updates, event logs) commits directly because it’s high-frequency and low-risk.
The PR Workflow for Agent Changes
1. Agent (or human) identifies needed change
 └── "finance-manager needs permission to auto-pay bills under $50"

2. Create feature branch
 └── start_dev_branch → feat/finance-auto-pay

3. Make the change
 └── Edit .github/agents/finance-manager.agent.md
 └── Add auto-pay to "Act Immediately" section
 └── Update constitution.md autonomy table

4. Open PR with context
 └── Title: "feat: allow finance-manager to auto-pay bills <$50"
 └── Body: explains the rationale, links to the request

5. Review gate
 └── Human reviews the permission change
 └── CI validates the agent definition syntax
 └── Preview deployment verifies no regressions

6. Merge = deployment
 └── Next agent session loads the updated file
 └── New behavior is immediately active
└── git log captures the full audit trailAn agent that discovers it needs a new capability can open the PR itself. It creates the branch, edits its own agent definition, and submits the PR for human review. The human still approves — but the agent did the work of identifying the gap and proposing the solution. This is self-improving governance.
Vercel Preview as Validation
For Vercel-connected repositories (your website, documentation, client sites), the PR workflow includes automatic preview deployments. Before any content or structural change goes live, you get a preview URL to validate:
PR opened → Vercel builds preview → Bot comments with URL
 └── Human clicks preview, validates visually
 └── Approves PR → merge → production deployment

If preview build fails:
 └── Bot comments with error details + inspector URL
 └── Agent reads the error, fixes, pushes again
 └── New preview deploys automatically
This isn’t just for UI changes. Content changes, blueprint updates, newsletter additions — everything gets a preview. You never deploy blind.
Pattern 5: Data Governance-as-Code — Domain Ownership Maps
When you have 50+ agents operating in the same repository, the question “who can write to what?” becomes critical. Without explicit boundaries, agents step on each other’s data, corrupt shared state, or accidentally read sensitive information they shouldn’t have access to.
The Domain Ownership Map
A declarative file maps every data directory to its owning agent, along with read/write permissions for other agents:
# data/domain-ownership.md — Who Owns What

## Exclusive Ownership (only this agent writes)
| Directory | Owner | Description |
|-----------|-------|-------------|
| data/agents/finance-manager/ | finance-manager | Budget, bills, expenses |
| data/agents/health-coach/ | health-coach | Medical, medications |
| data/agents/meal-planner/ | nutrition-chef | Recipes, grocery lists |
| data/agents/nicu-care/ | nicu-care | Pumping, NICU visits |

## Shared Read Access
| Directory | Readers | Purpose |
|-----------|---------|---------|
| data/shared/family-calendar.json | ALL agents | Schedule awareness |
| data/shared/contacts.json | ALL agents | Family contacts |
| data/agents/finance-manager/working.md | budget-review | Monthly reporting |

## Cross-Domain Write Rules
| Source Agent | Target Directory | Condition |
|-------------|-----------------|-----------|
| heartbeat | data/agents/*/working.md | Staleness updates only |
| platform-manager | ANY | Platform maintenance |
| checkin | data/agents/*/events.log | Append-only check-in records |

## Forbidden Access (NEVER, no exceptions)
| Directory | Blocked From | Reason |
|-----------|-------------|--------|
| data/agents/health-coach/ | ALL except health-coach | Medical privacy |
| data/credentials/ | ALL except platform-manager | Security |
This file does double duty: it’s documentation (humans can read it and understand the data architecture) AND it’s enforceable (the protected-files hookflow can reference these patterns to block unauthorized writes).
Extension Tools as Data APIs
Instead of letting agents directly edit governed data files, you create extension tools that validate writes:
// .github/extensions/finance-tools/extension.mjs
// Validated write API for financial data

export default {
name: 'finance-tools',
tools: [
  {
    name: 'add_expense',
    description: 'Log an expense to the family budget tracker',
    parameters: {
      amount: { type: 'number', required: true },
      category: { type: 'string', enum: ['groceries', 'utilities',
        'medical', 'transport', 'dining', 'subscriptions', 'other'] },
      description: { type: 'string', required: true },
      date: { type: 'string', format: 'date' },
      paid_by: { type: 'string', enum: ['hector', 'paula', 'joint'] }
    },
    execute: async ({ amount, category, description, date, paid_by }) => {
      // Validates schema, appends to expenses.json, updates budget totals
      // Only finance-manager can call this (enforced by agent permissions)
      const expenses = JSON.parse(
        await fs.readFile('data/finance/expenses.json', 'utf-8')
      );
      expenses.push({
        id: crypto.randomUUID(),
        amount, category, description,
        date: date || new Date().toISOString().split('T')[0],
        paid_by: paid_by || 'joint',
        logged_at: new Date().toISOString()
      });
      await fs.writeFile(
        'data/finance/expenses.json',
        JSON.stringify(expenses, null, 2)
      );
      return { success: true, total_expenses: expenses.length };
    }
  }
]
};
The pattern: raw file access is blocked (via protected-files hookflow) → validated extension tools provide the only write path → extension code enforces schema, permissions, and business rules. This is data governance that can’t be bypassed by a creative agent prompt.
The Migration Path: Raw Edits → Governed Tools
You don’t need to implement all of this at once. The migration path is incremental:
- Week 1 — Identify your most critical data files (finances, health, credentials)
- Week 2 — Create extension tools that wrap validated writes for those files
- Week 3 — Add those files to the protected-files hookflow
- Week 4 — Monitor: are agents hitting the deny? If yes, they’re learning to use the extension tools instead
- Ongoing — Expand the protected set as you identify more files that need governance
You can run an agent whose job is to scan for raw file edits to governed directories, identify patterns, and propose new extension tools. This agent watches git log for direct writes, categorizes them, and opens PRs with extension tool implementations. Self-improving data governance — the system gets stricter over time without manual effort.
Putting GitOps Patterns Together
These five patterns compound. When you have all five in place, your agent platform looks like this:
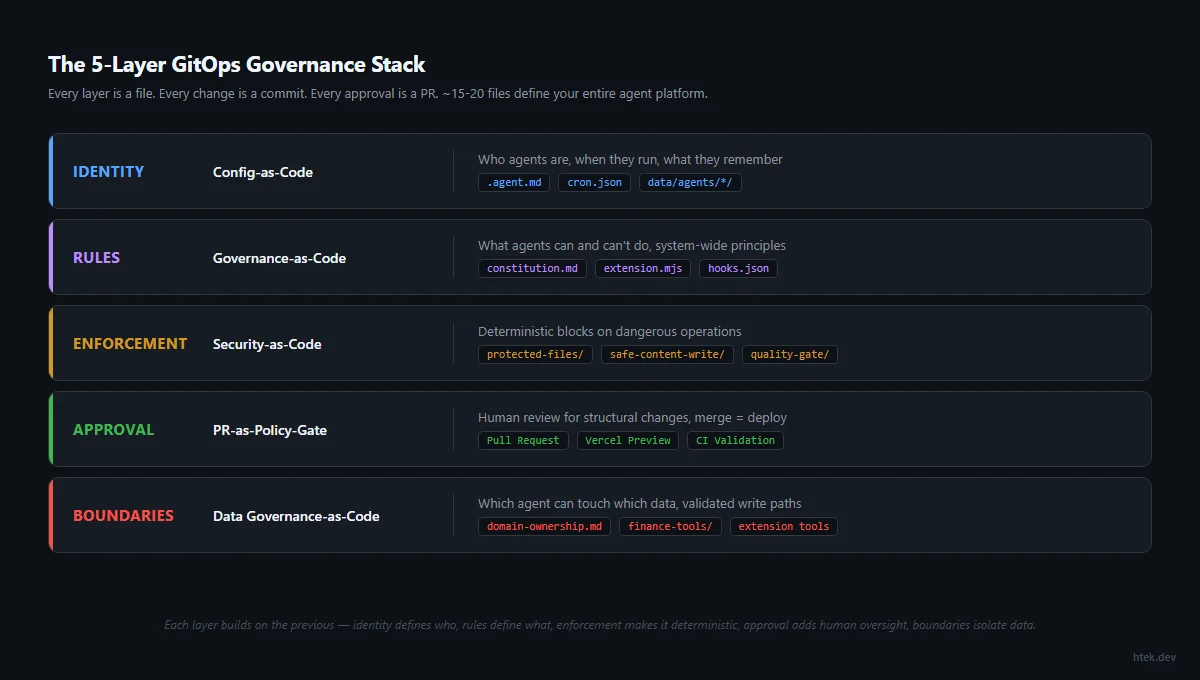
| Layer | GitOps Pattern | What It Controls |
|---|---|---|
| Identity | Config-as-Code | Who agents are, when they run, what they remember |
| Rules | Governance-as-Code | What agents can/can’t do, system-wide principles |
| Enforcement | Security-as-Code | Deterministic blocks on dangerous operations |
| Approval | PR-as-Policy-Gate | Human review for structural changes |
| Boundaries | Data Governance-as-Code | Which agent can touch which data |
The result: your entire agent platform is defined in approximately 15–20 files. Every behavioral change is a commit. Every permission change is a PR. Every security rule is deterministic code. Every data boundary is explicit. And the complete governance history is git log.
The best governance system is the one that’s indistinguishable from your development workflow. If governance requires a separate tool, a separate meeting, or a separate process — it won’t be followed. When governance IS the workflow (branch, PR, review, merge), it becomes automatic.
cron.json schema with validation, constitution.md template, hookflow extension scaffold, domain-ownership.md template, protected-files starter patterns, and extension tool generator.
→ copilot-hooks-starter — hookflow patterns, dev-guard, protected-files, brand-safety examples
For the complete technical walkthrough of GitOps patterns applied to agent governance — including real configuration examples, migration strategies, and the philosophical case for “everything as code” — see Newsletter Issue #9: GitOps for Everything, the companion deep-dive to this chapter.
Cron Architecture & Autonomous Operations
Roughly 60 scheduled jobs, zero human triggers. The production cron engine that turns your agent platform into a self-operating system — custom scheduling, staggered execution, fresh-agent isolation, and self-healing patterns.
The Cron Architecture
Most teams trigger AI agents manually. What if roughly 60 scheduled jobs ran themselves on precise cadences with zero human intervention? Here’s the production architecture.
Everything in Parts 1–5 builds toward this moment. You have context engineering that gives agents the right operating picture. You have deterministic safety that constrains behavior. You have delegated agents that split work. You have governance that keeps everything bounded. You have GitOps that makes it all declarative.
Now the question becomes: who triggers these agents?
If the answer is “a human types a prompt,” you’ve built a powerful system that sits idle 23 hours a day. That’s waste. The entire point of autonomous operations is that the system runs itself — checking state, making decisions, executing bounded work, recording outcomes, and improving — without anyone having to remember to start it.
The most dangerous agent isn’t the one that acts autonomously. It’s the one that only acts when you remember to ask.
Cron is the answer. Not “cron” as in the Unix daemon from 1975 — but the scheduling concept: predictable cadence, declarative config, zero-touch execution. When roughly 60 scheduled jobs wake on their own schedules, check their domains, make bounded decisions, and report back — you have an autonomous operations engine. When those same agents learn from each run and tighten their own rules — you have a self-improving system.
This chapter covers the production cron architecture I built to run 58 enabled jobs across a multi-agent platform (61 jobs are currently defined in cron.json) — the custom scheduler engine, the staggering strategy that prevents collisions, the context isolation pattern that prevents degradation, the declarative config schema, self-healing patterns, and the scaling strategy for 100+ jobs.
For the complete operational walkthrough of this cron architecture — including deployment patterns, monitoring strategies, and real production metrics — see Newsletter Issue #10: Cron Architecture for AI Agents, the companion deep-dive to this chapter.
Why Cron for AI Agents
Teams resist cron for AI agents because they associate “autonomous” with “dangerous.” But cron is actually the safest form of autonomous execution. Here’s why:
- Predictable cadence — you know exactly when every agent will run, making behavior auditable and debuggable. There’s no mystery about “why did this agent fire at 3 AM?”
- Bounded execution — each cron cycle is a discrete unit of work. The agent wakes, does its job, and exits. No long-running sessions accumulating drift.
- Zero human triggers — the entire point. If your platform requires someone to type a prompt to keep running, it’s a chatbot, not an operating system.
- Composable schedules — different agents need different cadences. A heartbeat runs every 2 hours. A budget review runs monthly. A content scheduler runs 4 times daily. Cron gives each agent exactly the rhythm it needs.
- Failure isolation — when a cron job fails, it fails in isolation. The next cycle gets a clean slate. Compare this to a long-running agent session where one error compounds into cascading failures.
The alternative — event-driven triggers for everything — sounds elegant but breaks down in practice. Events are unpredictable by nature. You can’t guarantee that a webhook fires at the right time, or that an event bus delivers in order, or that your agent will have capacity when the event arrives. Cron gives you the backbone: known cadences that guarantee work happens. Events layer on top for reactive work.
The Architecture: Zero-Dependency JS Cron Scheduler
Most cron implementations depend on external services: AWS EventBridge, Cloud Scheduler, Kubernetes CronJobs, or at minimum the system crontab. For an agent platform running inside a Copilot SDK session, none of those work. The agent process is ephemeral. The environment is sandboxed. External orchestrators add latency and failure modes.
The solution: a zero-dependency JavaScript cron scheduler that runs as a Copilot SDK extension inside the agent session. No npm packages. No external services. Pure JS cron field parsing, timezone-aware matching, and a 60-second interval loop that fires agents at the right time.
Here’s the core architecture:
/**
 * Cron Scheduler Extension for GitHub Copilot CLI
 *
 * Reads scheduled jobs from cron.json and fires session.send() at the
 * configured times. Zero dependencies — pure JS cron matching.
 */
import { readFileSync, existsSync, watchFile } from "node:fs";
import { resolve } from "node:path";
import { joinSession } from "@github/copilot-sdk/extension";

const CRON_FILE = resolve(process.cwd(), "cron.json");
let config = { timezone: "UTC", jobs: [] };
let parsedJobs = [];
The extension registers itself with the Copilot SDK session lifecycle. On startup, it loads the job configuration, parses all cron expressions, and starts a 60-second interval that checks whether any job should fire at the current minute.
The Cron Parser
Standard cron expressions use 5 fields: minute hour day-of-month month day-of-week. Each field supports wildcards (*), ranges (1-5), lists (1,3,5), and steps (*/15). The parser handles all of these without any external library:
function parseCronField(field, min, max) {
  const values = new Set();

  for (const part of field.split(",")) {
    if (part === "*") {
      for (let i = min; i <= max; i++) values.add(i);
      continue;
    }

    const stepMatch = part.match(/^(.+)\/(\d+)$/);
    if (stepMatch) {
      const step = parseInt(stepMatch[2], 10);
      let rangeStart = min;
      let rangeEnd = max;

      if (stepMatch[1] !== "*") {
        const rangeParts = stepMatch[1].split("-");
        rangeStart = parseInt(rangeParts[0], 10);
        if (rangeParts.length === 2)
          rangeEnd = parseInt(rangeParts[1], 10);
      }

      for (let i = rangeStart; i <= rangeEnd; i += step)
        values.add(i);
      continue;
    }

    const rangeMatch = part.match(/^(\d+)-(\d+)$/);
    if (rangeMatch) {
      const start = parseInt(rangeMatch[1], 10);
      const end = parseInt(rangeMatch[2], 10);
      for (let i = start; i <= end; i++) values.add(i);
      continue;
    }

    values.add(parseInt(part, 10));
  }

  return values;
}

function parseCron(expression) {
  const fields = expression.trim().split(/\s+/);
  if (fields.length !== 5) {
    throw new Error(
      `Invalid cron expression: "${expression}" (need 5 fields)`
    );
  }
  return {
    minutes: parseCronField(fields[0], 0, 59),
    hours: parseCronField(fields[1], 0, 23),
    daysOfMonth: parseCronField(fields[2], 1, 31),
    months: parseCronField(fields[3], 1, 12),
    daysOfWeek: parseCronField(fields[4], 0, 6),
  };
}
Each field is parsed into a Set of valid values. Matching is then a constant-time set membership check — no regex evaluation at runtime, no string comparison every 60 seconds. Parse once at load time, match instantly on every tick.
Timezone-Aware Matching
A cron scheduler that runs in UTC when your team operates in Central Time is a bug factory. The scheduler converts the current time to the configured timezone before matching:
function nowInTimezone(tz) {
  const str = new Date().toLocaleString("en-US", { timeZone: tz });
  return new Date(str);
}

function cronMatches(parsed, date) {
  return (
    parsed.minutes.has(date.getMinutes()) &&
    parsed.hours.has(date.getHours()) &&
    parsed.daysOfMonth.has(date.getDate()) &&
    parsed.months.has(date.getMonth() + 1) &&
    parsed.daysOfWeek.has(date.getDay())
  );
}
This means you write cron expressions in your local timezone. “0 6 * * 1-5” means 6:00 AM Central, not 6:00 AM UTC. When Daylight Saving shifts, the scheduler adjusts automatically because it re-computes the local time on every tick.
Hot-Reload via watchFile
The scheduler watches cron.json for changes and reloads without restarting the session:
if (existsSync(CRON_FILE)) {
  watchFile(CRON_FILE, { interval: 5000 }, () => {
    loadConfig(); // re-parse all jobs
  });
}
This means you can add, remove, or modify jobs by editing a single JSON file. No process restart. No deployment. The scheduler picks up changes within 5 seconds. Combined with GitOps (Part 5), this means adding a new scheduled agent is: edit cron.json, commit, push. The running platform picks it up automatically.
The Check Loop
Every 60 seconds, the scheduler iterates all enabled jobs, checks if the current minute matches their expression, and fires any that match:
const lastFired = new Map();

function getMinuteKey(date) {
  return `${date.getFullYear()}-${date.getMonth()}-` +
    `${date.getDate()}-${date.getHours()}-${date.getMinutes()}`;
}

async function checkSchedule(session) {
  if (parsedJobs.length === 0) return;

  const now = nowInTimezone(config.timezone);
  const minuteKey = getMinuteKey(now);

  for (const job of parsedJobs) {
    if (!cronMatches(job.parsed, now)) continue;

    const firedKey = `${job.id}:${minuteKey}`;
    if (lastFired.has(firedKey)) continue; // already fired this minute

    lastFired.set(firedKey, true);
    await session.log(`⏰ [cron] Running: ${job.id} (${job.schedule})`);

    let dispatchPrompt = `@${job.agent}\n\n${timeContext}\n\nScheduled cron job: ${job.id}`;
    if (job.prompt) {
      dispatchPrompt += `\n\nInstructions for this run:\n${job.prompt}`;
    }
    dispatchPrompt +=
      `\nLaunch this agent as a NEW agent using the task tool. ` +
      `DO NOT use write_agent to steer an existing running agent — ` +
      `each cron cycle MUST get a fresh agent with clean context. ` +
      `This is a critical rule from Hector. Let the new agent run autonomously.`;

    await session.send({ prompt: dispatchPrompt, mode: "immediate" });
  }
}

// Fire every 60 seconds
setInterval(() => {
  checkSchedule(session).catch((err) => {
    session.log(`⚠️ [cron] Scheduler error: ${err.message}`);
  });
}, 60_000);
The lastFired map prevents double-firing if the check loop executes twice within the same minute (which can happen due to timer drift). The key includes the job ID and the current minute, so each job fires at most once per scheduled minute regardless of how many times the loop runs.
Staggering Strategy: Roughly 60 Jobs, Zero Collisions
Running a schedule with roughly 60 cron jobs isn’t hard. Running that many cron jobs without them stepping on each other is an engineering problem. If five agents fire at the same minute, they compete for the same LLM capacity, the same file locks, and the same API rate limits. The solution is staggered slot allocation — every job gets a precise minute offset within its hour.
The 8-Tier Priority Slot System
Jobs are organized into 8 priority tiers, each owning a specific minute range within every hour:
| Tier | Minute Range | Category | Examples |
|---|---|---|---|
| 1 | :00–:02 | Heartbeat & orchestration | heartbeat, morning-briefing |
| 2 | :03–:05 | Task management | task-coach-nudge |
| 3 | :06–:09 | Family care | nicu-care-checkin, wellness-coach |
| 4 | :10–:19 | Daily lightweight | luna-checkin, content-analytics, email-triage |
| 5 | :20–:29 | Development & execution | agent-task-executor, carplay, milk-mama |
| 6 | :30–:35 | Content pipeline | content-schedule-maintenance, content-illustrator |
| 7 | :36–:44 | Heavy research & blitz | harness-tracker, content-blitz, content-analytics-comments |
| 8 | :45–:59 | Platform & maintenance | skill-optimizer, repo-maintainer, nightly-reflection |
The Minimum Gap Rule
The iron rule: minimum 3-minute gap between any two jobs firing in the same hour. This isn’t arbitrary — it accounts for agent startup time (~15–30 seconds), initial context loading, and the dispatcher’s sequential processing. Three minutes gives each agent time to fully initialize before the next one starts.
The validation rules are declared directly in the config:
{
  "timezone": "America/Chicago",
  "_schedule_validation": {
    "_description": "Minimum 3-minute gaps between jobs. Priority order: heartbeat/task-coach (:00-:03), family care (:06-:10), daily lightweight (:10-:20), content pipeline (:30-:42), platform/dev (:45-:53).",
    "_overlap_rules": [
      "No two enabled jobs may share the same minute+hour combination",
      "Minimum 3-minute gap between jobs firing in the same hour",
      "Recurring multi-hour jobs get fixed minute offsets (backbone slots)",
      "Daily one-shots fill gaps around the backbone"
    ]
  }
}
Backbone Slots vs. One-Shot Slots
There are two categories of scheduled jobs:
- Backbone slots — jobs that fire at the same minute offset across multiple hours (e.g.,
heartbeatat :00 every 2 hours,task-coachat :03 every 2 hours). These own their minute permanently. - One-shot slots — jobs that fire once or a few times daily (e.g.,
meal-planneron Saturday at 10:05,budget-reviewon the 1st at 9:00). These fill the gaps around the backbone.
The backbone creates a predictable rhythm. The one-shots fill the empty spaces. When you need to add a new job, you find the first available minute in the appropriate tier that doesn’t conflict with any existing backbone slot.
Conflict Detection
Before adding any new job to cron.json, you validate against the existing schedule. The validation check computes every minute+hour combination where the new job would fire in the next 7 days, then checks for conflicts with every other enabled job. If a conflict exists, it suggests the next available slot in the same tier.
This validation runs as part of the GitOps workflow — a context audit agent scans cron.json daily, verifies all jobs still have valid agent files, and flags any scheduling conflicts that might have been introduced by concurrent PRs.
Fresh Agent Per Cycle: The Context Isolation Rule
This is the single most important architectural decision in the entire cron system:
Every cron cycle MUST launch a fresh agent with clean context. Never reuse running sessions. Never inject into existing agents. Never steer cron dispatches.
Why? Because context accumulation is the silent killer of agent quality.
When you reuse a running agent session for scheduled work, you get:
- Context pollution — the agent’s context window contains irrelevant history from previous runs, ad-hoc user conversations, and unrelated decisions. A heartbeat check at 3 PM shouldn’t be influenced by a debugging session from 9 AM.
- Stale assumptions — the agent made decisions 4 hours ago based on state that has since changed. It doesn’t know what it doesn’t know, because it never re-reads the current state.
- Behavioral drift — corrections, steering messages, and “please be quiet” instructions from one context bleed into completely unrelated scheduled work.
- Memory pressure — the context window fills up. Critical instructions get pushed out. The agent starts ignoring rules it literally can’t see anymore.
The solution is architecturally simple but operationally critical: every cron cycle dispatches a brand-new agent via the task tool. The new agent gets a clean context window, re-reads its instructions from disk, loads fresh state from its memory files, and executes with zero historical baggage.
This is enforced in the dispatcher code:
// Build agent dispatch — ALWAYS fresh agent via task tool
let dispatchPrompt =
  `@${job.agent}\n\n${timeContext}\n\n` +
  `Scheduled cron job: ${job.id}`;

if (job.prompt) {
  dispatchPrompt += `\n\nInstructions for this run:\n${job.prompt}`;
}

dispatchPrompt +=
  `\nLaunch this agent as a NEW agent using the task tool. ` +
  `DO NOT use write_agent to steer an existing running agent — ` +
  `each cron cycle MUST get a fresh agent with clean context. ` +
  `This is a critical rule. Let the new agent run autonomously.`;

await session.send({ prompt: dispatchPrompt, mode: "immediate" });
Notice the explicit instruction embedded in every dispatch: “Launch as a NEW agent. DO NOT use write_agent.” This isn’t paranoia — it’s defensive engineering. The dispatcher can’t control what the receiving session does, so it encodes the constraint directly in the prompt. Belt and suspenders.
The Cost of Freshness
Fresh agents cost more tokens. Every run re-reads instructions, re-loads memory, re-establishes context. For a schedule with roughly 60 jobs running multiple times daily, that’s significant token overhead compared to reusing sessions.
It’s worth it. The alternative — context-polluted agents making degraded decisions — costs more in bad outputs, debugging time, and trust erosion. Fresh context is a tax you pay for reliability. And the tax decreases over time as you optimize your context loading (compact instructions, tiered memory that only loads what’s needed, focused prompts that skip irrelevant context).
The cron.json Schema
The entire scheduling system is defined in a single declarative JSON file. No database. No external service. No admin UI. One file, version-controlled in Git, that declares what runs, when, and how:
{
  "timezone": "America/Chicago",
  "_schedule_validation": {
    "_description": "Staggering strategy — minimum 3-minute gaps between jobs at the same hour. Priority order: heartbeat/task-coach (:00-:03), family care (:06-:10), daily lightweight (:10-:20), content pipeline (:30-:42), platform/dev (:45-:53).",
    "_overlap_rules": [
      "No two enabled jobs may share the same minute+hour",
      "Minimum 3-minute gap between jobs in the same hour",
      "Recurring multi-hour jobs get fixed minute offsets",
      "Daily one-shots fill gaps around the backbone"
    ]
  },
  "jobs": [
    {
      "id": "heartbeat",
      "schedule": "0 7,9,11,13,15,17,19,21 * * *",
      "enabled": true,
      "agent": "checkin",
      "_slot": ":00 backbone — lightweight, fires first"
    },
    {
      "id": "task-coach-nudge",
      "schedule": "3 7,9,11,13,15,17,19 * * *",
      "enabled": true,
      "agent": "task-coach",
      "_slot": ":03 backbone — fires right after heartbeat"
    },
    {
      "id": "agent-task-executor",
      "schedule": "20 8,12,16,20 * * *",
      "enabled": true,
      "agent": "platform-manager",
      "_slot": ":20 backbone — agent task queue processing",
      "prompt": "Invoke the agent-task-executor skill. Execute pending agent-surface tasks following the skill protocol: query → filter → prioritize → batch (3-4) → dispatch dedicated agents in parallel → wait for completion → report results."
    },
    {
      "id": "budget-review",
      "schedule": "0 9 1 * *",
      "enabled": true,
      "agent": "budget-review",
      "_slot": "1st of month 9:00"
    }
  ]
}
Schema Fields
| Field | Required | Purpose |
|---|---|---|
id | Yes | Unique job identifier, used for deduplication and logging |
schedule | Yes | Standard 5-field cron expression (min hour dom month dow) |
enabled | No | Boolean — set to false to disable without removing. Default: true |
agent | No* | Agent name — must match a .github/agents/{name}.agent.md file |
prompt | No | Custom instructions for this run (appended to the dispatch prompt) |
_slot | No | Documentation-only — human-readable slot description for maintainability |
*Jobs must have either agent (dispatches to a named agent) or just prompt (sends a direct prompt to the session).
Agent File Validation
Before dispatching any agent job, the scheduler verifies the agent file exists:
const AGENTS_DIR = resolve(process.cwd(), ".github", "agents");

function readAgentFile(agentName) {
  const filePath = resolve(AGENTS_DIR, `${agentName}.agent.md`);
  if (!existsSync(filePath)) return null;
  return readFileSync(filePath, "utf-8");
}

// In the dispatch loop:
if (job.agent) {
  const agentContent = readAgentFile(job.agent);
  if (!agentContent) {
    await session.log(
      `⚠️ [cron] Agent file not found: ${job.agent}.agent.md`
    );
    continue; // skip this job, don't crash
  }
}
This prevents silent failures when someone renames an agent file but forgets to update cron.json. The scheduler logs a warning and moves on — it doesn’t crash the entire schedule because one job has a broken reference.
Enable/Disable as a Feature Flag
The enabled field is a deployment feature flag. Instead of deleting a job definition when you want to pause it, you set “enabled”: false. The scheduler filters disabled jobs at load time:
parsedJobs = config.jobs
  .filter((j) => j.enabled !== false)
  .map((j) => ({ ...j, parsed: parseCron(j.schedule) }));
This preserves the job configuration (schedule, prompt, slot documentation) while stopping execution. When you want to resume, flip the boolean. Zero risk of losing configuration. And because it’s in Git, the disable/enable history is in your commit log.
Self-Healing Patterns
A cron system that only executes jobs is a scheduler. A cron system that monitors its own health and fixes problems is an autonomous operations engine. The platform implements three self-healing patterns:
Pattern 1: Detect → Fix → Report
The autonomous improvement pattern runs as a nightly reflection cycle (21:10 CT daily). It reviews what happened during the day, identifies failures or degraded behavior, implements fixes, and reports what changed. The rule is explicit: detect → fix → report. Never “detect → ask permission → wait → fix.”
This operates through a platform-manager agent that has write access to agent definitions, skills, and configuration. If a scheduled job failed because a tool name changed, the nightly reflection fixes the reference. If an agent’s instructions contradict a skill, the reflection resolves the conflict. If a memory file is stale, the reflection flags it for the domain owner.
The key insight: autonomous improvement is itself a cron job. It runs on schedule, operates with fresh context, and makes bounded changes within its authority. Self-healing is just another scheduled capability.
Pattern 2: Context Auditing
A weekly context audit (Sunday 20:00 CT) scans the entire platform for contradictions, staleness, and bloat:
- Contradiction detection — scans foundational docs against agent definitions for rule conflicts. If the constitution says “never mention employer name” but an agent’s prompt includes a company name, that’s a contradiction.
- Staleness detection — flags working memory files not updated in 3+ days that have active cron jobs. If an agent runs daily but hasn’t updated its state in a week, something is wrong.
- Cron alignment — verifies every
cron.jsonagent entry has a matching agent file. Catches rename/delete drift. - Token budget tracking — measures context sizes across all agents, flags growth patterns that risk exceeding limits.
Safe fixes (typos, dead references, exact duplicates) are auto-applied. Complex fixes get tasks created for human review. The pattern is always: maximum autonomy within bounded risk.
Pattern 3: Skill Optimization
The skill-optimizer agent runs twice daily (8:00 and 16:00 CT), scanning for:
- Agent definitions with embedded procedures that should be extracted into skills
- Skills that contradict each other or their consuming agents
- Orphaned skills with no agent references
- Agents not referencing skills they should know about
When it finds an issue, it fixes it directly — no approval queue, no human bottleneck. Extract the skill, update the agent reference, commit the change. The next cron cycle for that agent picks up the improved instructions automatically via GitOps hot-reload.
The Self-Healing Flywheel
These three patterns create a compounding loop:
- Agents run on cron → some produce suboptimal results
- Nightly reflection detects the suboptimal pattern → fixes the instruction or memory
- Context audit detects contradictions introduced by the fix → resolves them
- Skill optimizer extracts the fix into a reusable skill → all similar agents benefit
- Next cron cycle → agents run with improved instructions → better results
Over time, the system literally gets better without human intervention. Each failure becomes a permanent improvement. Each improvement propagates to all agents that share the pattern. The flywheel is slow at first (weeks to see compounding effects) but accelerates as the skill library grows and the correction surface shrinks.
Scaling to 100+ Jobs
The current production config has 58 enabled jobs across 61 defined entries. The architecture supports 100+ with these scaling patterns:
Expanded Time Windows
The current system avoids scheduling during quiet hours (22:00–06:00 CT). Relaxing this for non-notification agents (platform maintenance, data sync, research) opens 8 additional hours × 60 minutes = 480 new potential slots. Agents that run silently (no Telegram messages) can safely execute during quiet hours.
Sub-Minute Resolution
The current check interval is 60 seconds. For high-density scheduling, you can reduce this to 30 or even 15 seconds, adding a second field to the matching logic. This quadruples the available slots within each minute. In practice, you rarely need this — 3-minute gaps exist for agent startup time, not scheduler precision.
Priority-Based Queuing
When multiple jobs fire at the same time (inevitable at scale), a priority queue ensures critical jobs dispatch first:
| Priority | Category | Max Concurrent | Preempts? |
|---|---|---|---|
| P0 | Safety & health | Unlimited | Yes |
| P1 | Family & task management | 3 | No |
| P2 | Content & business | 2 | No |
| P3 | Platform & maintenance | 2 | No |
Overlap Detection & Backpressure
At scale, you need to handle the case where a previous job is still running when the next cycle fires. The strategies:
- Skip-if-running — if the previous run of the same job hasn’t completed, skip this cycle. Best for idempotent jobs where skipping one cycle is safe (heartbeat, analytics).
- Queue-and-wait — if the previous run is still active, queue the new dispatch and execute after completion. Best for jobs that must not miss cycles (content pipeline, financial sync).
- Kill-and-restart — if the previous run has exceeded its time limit, terminate it and start fresh. Best for jobs that might hang (research agents, API-heavy work).
The current implementation uses the simplest approach — the lastFired map prevents double-firing in the same minute, but doesn’t track whether the launched agent has completed. At the current schedule size with 3-minute gaps, this hasn’t been a problem. At 100+ jobs, you’d add a completion registry that tracks run duration and enforces timeout limits.
Multi-Instance Distribution
Beyond ~100 jobs on a single scheduler instance, you hit LLM rate limits and sequential dispatch bottlenecks. The scaling strategy is shard by domain: run multiple scheduler instances, each owning a subset of jobs. The work instance handles development agents. The family instance handles care agents. The content instance handles creative agents. Sharding boundaries align with the domain ownership model from Part 5.
Production Operations
Running a schedule with roughly 60 jobs in production requires operational tooling. The scheduler exposes two tools to the session for runtime visibility:
// Tool: cron_list_jobs
// Lists all configured jobs with schedule, status, and agent
{
  name: "cron_list_jobs",
  description: "List all configured cron jobs with schedules and status.",
  handler: async () => {
    const lines = config.jobs.map((j) => {
      const status = j.enabled === false ? "disabled" : "enabled";
      const agent = j.agent ? ` → ${j.agent}` : "";
      return `• ${j.id}: ${j.schedule} [${status}]${agent}`;
    });
    return `Timezone: ${config.timezone}\n\n${lines.join("\n\n")}`;
  },
}

// Tool: cron_next_run
// Shows when each enabled job will next fire
{
  name: "cron_next_run",
  description: "Show when each enabled cron job will next fire.",
  handler: async () => {
    const now = nowInTimezone(config.timezone);
    const lines = parsedJobs.map((j) => {
      const check = new Date(now);
      check.setSeconds(0, 0);
      for (let i = 1; i <= 1440; i++) {
        check.setMinutes(check.getMinutes() + 1);
        if (cronMatches(j.parsed, check)) {
          return `• ${j.id}: next at ${check.toLocaleString()}`;
        }
      }
      return `• ${j.id}: no match in next 24h`;
    });
    return lines.join("\n");
  },
}
The Enable/Disable Pattern
Global kill switch via environment variable:
const CRON_ENABLED =
  process.env.CRON_ENABLED === "true" ||
  process.env.CRON_ENABLED === "1";
If CRON_ENABLED is not set or is anything other than “true”/“1”, no jobs run. This gives you a single environment variable to halt all autonomous execution — useful during maintenance, debugging, or when you need to guarantee silence.
Deduplication & Memory Cleanup
The lastFired map grows unbounded if not cleaned. The scheduler prunes old entries:
// Cleanup old fired keys (keep last 120 entries)
if (lastFired.size > 500) {
  const entries = [...lastFired.keys()];
  for (let i = 0; i < entries.length - 120; i++) {
    lastFired.delete(entries[i]);
  }
}
This prevents memory leaks in long-running sessions while maintaining enough history to prevent double-fires across reasonable time windows.
Real-World Schedule: Roughly 60 Jobs in Production
Here’s what a roughly 60-job schedule looks like in a production multi-agent platform, organized by cadence:
| Cadence | Jobs | Examples |
|---|---|---|
| Every 2 hours | 8 | heartbeat, task-coach, nicu-care, luna-checkin |
| Every 3 hours | 6 | content-analytics, harness-tracker, content-blitz |
| Every 4 hours | 5 | content-schedule-maintenance, agent-task-executor, content-illustrator |
| Business hours only | 4 | linkedin-outreach, content-creative-daily, content-creative-article-promo |
| 3x daily | 8 | wellness-coach, repo-maintainer, milk-mama, carplay, email-triage |
| 2x daily | 5 | skill-optimizer, daily-finance-review, parenting-coach |
| Daily | 12 | morning-briefing, nightly-reflection, context-audit-daily, entrepreneur-coach |
| Weekly | 9 | weekly-planner, budget-review-weekly, content-sunday-review, realtor-team-standup |
| Monthly | 3 | budget-review, parent-support-monthly, cloud-advisor-monthly |
On a representative weekday, cron alone produces a little over 100 agent sessions per day, with weekend and monthly jobs pushing the total higher on specific days. Every one of those runs is automated, starts with fresh context, and stays bounded by domain-specific governance rules.
Implementation Checklist
To implement this cron architecture in your own agent platform:
- Create the scheduler extension — pure JS, zero dependencies, registered as a Copilot SDK extension that joins the session lifecycle.
- Define your timezone — all expressions will be evaluated in this timezone. Pick your team’s primary timezone.
- Start with 3–5 backbone jobs — heartbeat, daily briefing, and one domain-specific agent. Prove the pattern works before scaling.
- Establish your slot allocation table — define tiers, minute ranges, and the minimum gap rule. Document it in the config file itself.
- Enforce fresh agents — embed the “launch new, never steer” rule in your dispatch prompt. Make it impossible to accidentally reuse sessions.
- Add hot-reload — watch the config file for changes so you can add/modify jobs without restarting.
- Add operational tools —
cron_list_jobsandcron_next_runlet you inspect the schedule at runtime. - Add self-healing — schedule a nightly reflection that reviews run health and fixes issues autonomously.
- Scale incrementally — add jobs one at a time, validate slot allocation, monitor for conflicts. The system grows organically.
The teams that fail at autonomous operations try to go from “zero scheduled agents” to “everything automated” in one sprint. The teams that succeed start with a heartbeat (literally — a simple health check every few hours), prove the pattern, and add one job at a time. In 3 months, you can have dozens of scheduled jobs running flawlessly. In 6 months, you wonder how you ever ran a platform manually.
Complete cron scheduler extension source, cron.json schema with slot documentation, staggering strategy calculator, self-healing pattern templates, and the conflict detection validation script.
→ copilot-agent-starter — cron scheduler extension, agent definitions, memory tier layout · → copilot-hooks-starter — governance patterns that constrain scheduled agents
Building Copilot Plugins as Domain Experts
Move beyond autocomplete. Build specialized Copilot plugins that carry deep domain knowledge, MCP tools, and structured skills — turning GitHub Copilot into a team of expert AI teammates that understand YOUR system.
From Autocomplete to Domain Expert
Most developers are stuck at autocomplete. Here’s how to build Copilot plugins that understand your domain — with real architecture from three production plugins.
There is a quiet gap between developers who use GitHub Copilot and developers who build on it. The first group gets better autocomplete. The second group builds specialized AI teammates that carry deep domain knowledge, execute real operations through tools, and respond to domain-specific vocabulary with expert precision.
That gap is closed by one thing: Copilot plugins.
A Copilot plugin is not a wrapper around the Copilot chat window. It is a discrete software artifact — a versioned npm package with a manifest, structured skills, and optionally a set of MCP tools — that registers itself as a domain expert in the GitHub Copilot ecosystem. When a user invokes it (via @plugin-name in VS Code Copilot Chat, or via agent mode), they are not just getting smarter suggestions. They are talking to a specialized system that has been told exactly who it is, what it knows, what tools it has access to, and what vocabulary it speaks.
The progression is not “better AI.” It is “different AI.” A DevOps plugin that knows your branching conventions is not the same thing as a general Copilot with a long system prompt. It is a domain expert.
This chapter covers the three-layer plugin architecture — manifest, skills, and tools — and illustrates each layer with real examples from three production plugins in the htekdev organization: a DevOps orchestrator, a video pipeline plugin, and a meta-plugin that generates other plugins.
For the complete technical walkthrough of custom Copilot agent architecture — including the full manifest schema, skill YAML patterns, and MCP integration patterns — see Newsletter Issue #11: Custom Copilot Agents: Building Domain-Expert AI Teammates with Skills, MCP Tools, and Custom Knowledge, the companion deep-dive to this chapter.
The Three-Layer Plugin Architecture
Every production Copilot plugin is built on three layers. Each layer adds a distinct capability, and they compose cleanly. You can ship a manifest-only plugin that works immediately, then layer in skills, then layer in MCP tools as the domain complexity grows.
| Layer | What It Provides | Key Artifact |
|---|---|---|
| Manifest | Identity, capabilities, invocation name, system prompt | plugin.json |
| Skills | Domain knowledge as structured, reusable prompt patterns | YAML files with frontmatter + prompt body |
| MCP Tools | Real-world operations the plugin can execute (repo health, video processing, release prep) | MCP server — TypeScript package with registered tool handlers |
Layer 1: The plugin.json Manifest
The manifest is your plugin’s identity card. It tells the Copilot runtime what your plugin is called, what it knows, how users invoke it, and what system-level instructions it carries into every conversation. A well-crafted manifest answers three questions before the user types a single word:
- Who are you? Name, description, and invocation handle (the
@prefix). - What do you know? The system prompt that encodes your domain expertise.
- What can you do? The capabilities block that declares MCP tool servers and skill directories.
Here is the manifest structure from htekdev/devops-copilot-skill, the DevOps Workflow Orchestrator plugin:
{
"name": "devops-orchestrator",
"version": "1.0.0",
"description": "DevOps Workflow Orchestrator — repo health, release prep, workflow linting, and dependency audit for agentic DevOps pipelines.",
"invocation": "@devops",
"systemPrompt": "You are the DevOps Workflow Orchestrator, a specialized domain expert for CI/CD pipelines, GitHub Actions workflows, release management, and repo health. You understand branching strategies, semantic versioning, workflow YAML syntax, dependency audit patterns, and the intersection of AI agent automation with traditional DevOps tooling. When asked about deployments, releases, or workflow failures, you diagnose from first principles — checking workflow syntax, dependency versions, branch protection rules, and recent commit patterns. You do not give generic DevOps advice. You give precise, actionable guidance grounded in the user's actual repository state.",
"capabilities": {
  "skills": "./skills",
  "mcpServers": [
    {
      "name": "devops-tools",
      "command": "node",
      "args": ["./dist/mcp-server.js"],
      "env": {
        "GITHUB_TOKEN": "${env:GITHUB_TOKEN}"
      }
    }
  ]
},
"triggerPhrases": [
  "workflow failing",
  "release prep",
  "repo health",
  "dependency audit",
  "branch protection",
  "deployment blocked"
]
}
Three details matter here that most plugin tutorials gloss over.
The system prompt is your expertise, not a description. “You are a DevOps expert” is useless. “You diagnose from first principles — checking workflow syntax, dependency versions, branch protection rules, and recent commit patterns” tells the model exactly how to reason in this domain. The specificity of the system prompt is the difference between a plugin that gives generic advice and one that gives expert diagnosis.
Trigger phrases are UX, not magic. The triggerPhrases array does not cause the plugin to auto-invoke. It is metadata that helps IDEs, surfaces, and orchestration layers suggest your plugin when the user types these phrases. Think of it as SEO for your domain expert.
MCP servers are separate processes. The mcpServers array registers one or more MCP server processes that start when the plugin is loaded. They run alongside the Copilot session and expose their tools to the model. This separation is deliberate — your plugin’s business logic runs in a controlled server process, not injected into the Copilot runtime itself.
Layer 2: Skills as Domain Knowledge
Skills are the plugin equivalent of what a production Copilot platform calls skills in .github/skills/ — structured prompt documents with YAML frontmatter that encode specific domain procedures. Inside a plugin, skills live in the ./skills/ directory declared in the manifest.
A skill file has two parts: a YAML frontmatter block that declares metadata (name, description, trigger phrases, input parameters), and a prompt body that contains the actual instructions. Here is a real skill from the devops-copilot-skill plugin:
---
name: repo-health-check
description: >-
Comprehensive repository health audit — branch protection, stale branches,
workflow failures, dependency vulnerabilities, and CI/CD pipeline status.
triggerPhrases:
- "check repo health"
- "repo health"
- "audit this repo"
- "what's broken"
inputSchema:
type: object
properties:
  repo:
    type: string
    description: "Repository in owner/repo format. Defaults to current repo."
  depth:
    type: string
    enum: ["quick", "full"]
    description: "Quick = branch protection + recent failures. Full = all checks."
required: []
---

## Repo Health Check

When invoked, run a systematic health audit of the target repository.
Work through each category in order, then produce a prioritized remediation list.

### 1. Branch Protection
Use the check_branch_protection tool to verify:
- main/master has required status checks
- Direct push to main is disabled
- Stale branches older than 30 days are flagged

### 2. Workflow Health
Use the get_workflow_run_history tool for the last 20 runs:
- Identify any workflow that has failed more than 3 times in the last 7 days
- Flag flaky workflows (alternating pass/fail)
- Surface any workflow that has not run in 14+ days

### 3. Dependency Vulnerabilities
Use the run_dependency_audit tool:
- Critical and high severity vulnerabilities require immediate reporting
- List affected packages with CVE identifiers
- Suggest remediation commands (npm audit fix, cargo update, etc.)

### 4. Prioritized Output
Produce a table: Issue | Severity | Suggested Fix | Owner
Sort by severity. Include only actionable items — no informational fluff.
Notice what this skill does that a raw system prompt cannot: it provides a structured procedure, not just instructions. It tells the model exactly which tools to call, in what order, with what parameters, and how to format the output. The skill is the crystallization of expert judgment into a repeatable process.
The inputSchema is critical for skills that accept parameters. It allows the Copilot runtime to surface a structured input form when the skill is invoked, turning “just ask me anything” into a controlled, parameterized workflow. This is how plugins start feeling like professional tools rather than clever chat prompts.
Layer 3: MCP Tools — Giving Your Plugin Hands
The first two layers make your plugin smart. The third layer makes it capable. MCP tools are the operations your plugin can actually execute — reading repository state, triggering workflows, processing media, running builds. Without tools, a plugin can advise. With tools, it can act.
The MCP server in a Copilot plugin is a standard Node.js TypeScript package. It registers tool handlers using the MCP SDK, starts a local stdio-based server, and exposes those tools to the model through the session. Here is the MCP tool registration pattern from the devops-copilot-skill plugin:
import { Server } from "@modelcontextprotocol/sdk/server/index.js";
import { StdioServerTransport } from "@modelcontextprotocol/sdk/server/stdio.js";
import { CallToolRequestSchema, ListToolsRequestSchema } from "@modelcontextprotocol/sdk/types.js";
import { Octokit } from "@octokit/rest";

const server = new Server(
{ name: "devops-tools", version: "1.0.0" },
{ capabilities: { tools: {} } }
);

const octokit = new Octokit({ auth: process.env.GITHUB_TOKEN });

server.setRequestHandler(ListToolsRequestSchema, async () => {
return {
  tools: [
    {
      name: "check_branch_protection",
      description: "Check branch protection rules for the default branch.",
      inputSchema: {
        type: "object",
        properties: {
          owner: { type: "string" },
          repo: { type: "string" },
          branch: { type: "string", description: "Branch name (default: main)" }
        },
        required: ["owner", "repo"]
      }
    },
    {
      name: "get_workflow_run_history",
      description: "Retrieve recent workflow run history with pass/fail status.",
      inputSchema: {
        type: "object",
        properties: {
          owner: { type: "string" },
          repo: { type: "string" },
          limit: { type: "number", description: "Number of runs (default: 20)" }
        },
        required: ["owner", "repo"]
      }
    },
    {
      name: "run_dependency_audit",
      description: "Run npm audit and return structured vulnerability report.",
      inputSchema: {
        type: "object",
        properties: {
          workingDir: { type: "string" },
          severity: { type: "string", enum: ["critical", "high", "all"] }
        },
        required: ["workingDir"]
      }
    }
  ]
};
});

server.setRequestHandler(CallToolRequestSchema, async (request) => {
const { name, arguments: args } = request.params;
switch (name) {
  case "check_branch_protection": {
    const branch = (args?.branch as string) || "main";
    const protection = await octokit.repos.getBranchProtection({
      owner: args?.owner as string,
      repo: args?.repo as string,
      branch
    });
    return { content: [{ type: "text", text: JSON.stringify(protection.data, null, 2) }] };
  }
  // additional tool handlers follow the same pattern
  default:
    throw new Error("Unknown tool: " + name);
}
});

const transport = new StdioServerTransport();
await server.connect(transport);
The key architectural decision: MCP tools handle the execution layer while skills handle the reasoning layer. A skill says “call check_branch_protection, then get_workflow_run_history, then synthesize.” A tool handler says “here’s how to actually call the GitHub API and return structured data.” This separation means your domain logic (skill YAML) stays clean and readable, while the execution mechanics (TypeScript) stay in typed, testable code.
Three Production Plugins: Case Studies
The architecture above is not theoretical. Three plugins in the htekdev organization prove these patterns at production scale:
1. DevOps Workflow Orchestrator — htekdev/devops-copilot-skill
The DevOps orchestrator plugin handles repo health checks, release preparation, workflow linting, and dependency auditing. It is the most operationally complete of the three — it has all three layers deployed and uses the GitHub API extensively through its MCP server.
The key insight from this plugin: the system prompt does not describe the plugin; it installs expertise. Rather than saying “this plugin knows about DevOps,” the system prompt says: “when you see a failing workflow, your first three diagnostics are always: (1) YAML syntax validation, (2) secret availability, (3) runner availability.” The model does not need to discover this reasoning pattern — it has it from the first token.
The DevOps plugin also demonstrates the progressive disclosure pattern for skills. Simple invocations (@devops check repo health) trigger the repo-health-check skill with default parameters. Advanced users can specify parameters (@devops check repo health depth=full) to unlock deeper analysis. One skill, two experience levels, zero additional code.
2. Video Pipeline Plugin — htekdev/vidpipe-copilot-plugin
The video pipeline plugin is architecturally significant because it demonstrates Copilot plugins in a non-DevOps domain — media production. It handles video processing workflows, content pipeline state management, publishing coordination, and production quality checks.
This plugin’s package structure is the clearest example of production plugin architecture in the htekdev organization:
vidpipe-copilot-plugin/
├── plugin.json              # Manifest — identity, system prompt, capabilities
├── package.json             # npm package with bin entry point
├── tsconfig.json            # TypeScript config (ES2022, NodeNext modules)
├── vitest.config.ts         # Test runner configuration
├── skills/
│   ├── video-pipeline-status.yaml   # Pipeline state reporting
│   ├── publish-checklist.yaml       # Pre-publish quality gate
│   ├── content-brief.yaml           # Brief generation for new videos
│   └── caption-review.yaml         # Caption accuracy review
├── src/
│   ├── mcp-server.ts        # MCP tool registrations
│   ├── tools/
│   │   ├── pipeline-state.ts    # Read/write pipeline JSON
│   │   ├── video-metadata.ts    # ffprobe integration
│   │   └── publishing-api.ts    # Late API client
│   └── index.ts             # bin entry point (starts MCP server)
└── tests/
  ├── pipeline-state.test.ts
  └── video-metadata.test.ts
The bin field in package.json is what makes this installable as a CLI tool: “bin”: { “vidpipe-plugin”: ”./dist/index.js” }. After npm install -g, the MCP server binary is available system-wide, and the plugin.json can reference it by name rather than by relative path. This is the pattern you want for any plugin you intend to distribute or use across multiple projects.
The video plugin also demonstrates skill composition: the publish-checklist.yaml skill invokes the caption-review skill as a sub-step. Skills can reference each other, allowing you to build reusable procedure components rather than monolithic workflows.
3. Plugin Skill Generator — htekdev/copilot-plugin-skill
The meta-plugin is the most instructive case study because it is self-referential: a plugin that knows how to build other plugins. It carries templates, architectural patterns, and decision frameworks for plugin creation — and exposes them through skills that guide a developer through the full plugin scaffolding process.
The system prompt for the meta-plugin is a masterclass in encoding architectural judgment:
{
"systemPrompt": "You are the Copilot Plugin Architect, a domain expert in building GitHub Copilot plugins. You know the three-layer architecture cold: manifest (plugin.json), skills (YAML frontmatter + prompt body), and MCP tools (TypeScript MCP server). When a developer describes a domain they want to encapsulate, you ask three questions before writing a single line of code: (1) What vocabulary does this domain use? These become your trigger phrases. (2) What decisions does an expert make in this domain? These become your skills. (3) What operations does an expert execute? These become your MCP tools. You never scaffold boilerplate first. You always start with the system prompt — because the system prompt is the entire value proposition of a domain-expert plugin."
}
This plugin proves a broader point: the most valuable plugins are not the ones that give users more tools — they are the ones that give users better reasoning patterns. The plugin skill generator does not write code. It installs architectural judgment.
When to Graduate from Extension to Plugin
If you have been building Copilot CLI extensions (Chapter I-2), you already understand the extension model. Extensions register tools that augment the agent’s capabilities within a single platform session. Plugins are the VS Code / Copilot Chat equivalent — they bring that same extension pattern to the IDE and to agent mode across surfaces.
The graduation decision comes down to four factors:
| Factor | Stay as Extension | Graduate to Plugin |
|---|---|---|
| Surface | CLI-only, terminal-based workflows | IDE (VS Code), Copilot Chat, multi-surface |
| Domain boundary | Platform-specific (one repo, one system) | Shareable domain knowledge (usable across projects) |
| Distribution | Internal platform only | Publishable to npm, GitHub Marketplace |
| Complexity | Simple tool additions to existing sessions | Self-contained domain expert with identity and skills |
The rule of thumb: if the domain knowledge belongs to your platform (your agents, your data, your workflows), keep it as an extension registered in .github/extensions/. If the domain knowledge belongs to a discipline (DevOps, media production, security review), build it as a plugin that can be installed anywhere.
The copilot-hooks-starter and copilot-agent-starter template repos (referenced throughout this blueprint) are extensions. The devops-copilot-skill and vidpipe-copilot-plugin are plugins. Same underlying model; different deployment and distribution model.
Production Patterns: Versioning, Testing, and Package Structure
Three production patterns separate polished plugins from hobby projects:
Semantic versioning with change semantics. Plugin manifests carry a version field. Treat it seriously. A patch version bump (1.0.0 → 1.0.1) means a bug fix — skill prompt wording improved, tool error handling tightened. A minor version bump (1.0.0 → 1.1.0) means a new skill or new MCP tool added. A major version bump (1.0.0 → 2.0.0) means the system prompt changed substantially — the plugin’s reasoning model has evolved, and users should expect different behavior.
Testing with vitest at the tool layer. Your MCP tools are the one part of the plugin that does real I/O — they call APIs, read files, parse data. These must be tested. The vidpipe-copilot-plugin demonstrates the pattern: each tool has a corresponding test file in tests/, and vitest.config.ts is set up for fast unit testing with mocked external dependencies. Skills (YAML) are harder to unit test mechanically — review them with domain experts instead. Tools are code; test them like code.
// tests/pipeline-state.test.ts
import { describe, it, expect, vi } from "vitest";
import { readPipelineState } from "../src/tools/pipeline-state.js";
import { readFileSync } from "node:fs";

vi.mock("node:fs");

describe("readPipelineState", () => {
it("returns parsed state when file exists", () => {
  vi.mocked(readFileSync).mockReturnValue(
    JSON.stringify({ status: "in_progress", videoId: "vid-001" })
  );
  const state = readPipelineState("/fake/path/pipeline.json");
  expect(state.status).toBe("in_progress");
  expect(state.videoId).toBe("vid-001");
});

it("returns null when file does not exist", () => {
  vi.mocked(readFileSync).mockImplementation(() => {
    throw new Error("ENOENT");
  });
  const state = readPipelineState("/fake/path/pipeline.json");
  expect(state).toBeNull();
});
});
The bin entry point as the deployment contract. Every distributable plugin must have a bin entry in package.json that points to the compiled MCP server entrypoint. This turns the plugin into a CLI binary after npm install -g, which is what the manifest’s command field references. Without the bin entry, your plugin only works in development (via relative path). With it, it works everywhere.
{
"name": "@htekdev/devops-copilot-skill",
"version": "1.2.0",
"type": "module",
"bin": {
  "devops-copilot": "./dist/index.js"
},
"scripts": {
  "build": "tsc",
  "test": "vitest run",
  "prepublishOnly": "npm run build && npm test"
},
"exports": {
  ".": "./dist/index.js"
}
}
The Multiplier Effect
A well-built Copilot plugin does something that raw Copilot chat cannot: it eliminates context switching. Without domain plugins, a developer debugging a release pipeline spends the first several minutes reconstructing context — explaining the CI system, the branching model, the workflow naming conventions, and the deployment targets. Every conversation starts from zero.
With a DevOps plugin, that context is gone from the conversation and installed in the system prompt. The user types @devops why is this deployment blocked and gets an expert diagnosis that already knows the conventions — no explanation required. The conversation starts at expert level.
Across a production platform, this compounds rapidly:
- A video pipeline plugin eliminates the 20-minute context-building session before every production quality review
- A code review plugin that knows your architecture patterns eliminates the “please review against our conventions” preamble on every PR
- A security review plugin that knows your threat model eliminates the “our system handles PII and these trust boundaries” briefing on every security question
The enterprise DevOps pattern, scaled across multiple teams, captures this multiplier systematically. When domain knowledge lives in a plugin — versioned, tested, and installable — it becomes institutional memory that does not degrade with team turnover. New engineers inherit the domain expert on day one. The plugin carries the accumulated reasoning patterns of whoever built the domain knowledge, available in every IDE session, forever.
The most common plugin mistake is treating the system prompt as documentation rather than expertise. “This plugin helps with DevOps tasks” tells the model almost nothing. “When diagnosing a failing deployment, always check these three things in this order” installs a reasoning pattern. Your system prompt is the difference between a plugin that answers questions and one that thinks like an expert.
Complete plugin.json manifest template, skill YAML frontmatter template with full inputSchema examples, MCP tool registration boilerplate (TypeScript), vitest configuration for tool testing, and the 3-layer plugin architecture decision flowchart.
→ copilot-hooks-starter — extension scaffolding, skill templates, hook patterns (prerequisite) · → copilot-agent-starter — agent definitions and orchestration patterns that pair with plugins
Putting It All Together
This seven-part blueprint is a maturity model. Part 1 gives you the building blocks. Part 2 turns those building blocks into an operating system for agentic development. Part 3 adds the governance layer that makes autonomous agents safe and trustworthy in production. Part 4 scales everything to organizational level through platform engineering — golden paths, IssueOps, Copilot as UI, and governance without friction. Part 5 makes the entire system declarative and auditable through GitOps — config, governance, security, and data ownership as code. Part 6 turns the entire platform into an autonomous operations engine — roughly 60 scheduled jobs, zero human triggers, self-healing patterns, and compounding improvement. Part 7 moves the entire stack up one level of abstraction — domain-expert Copilot plugins that carry your institutional knowledge into every IDE session, every team, forever.
| Section | You’re done when… |
|---|---|
| I-0. What Is an Agent? | You understand the agent loop, context window constraints, and how tools work |
| I-1. Context | Your static, dynamic, and injected context layers are explicit and current |
| I-2. Deterministic Enablement | Tools and hooks clearly define what the agent can do inside the environment |
| I-3. Core Infrastructure | Sandboxing, network gating, and input validation remove unsafe capability at the environment level |
| I-4. Delegated Agents | Complex work is split across focused, steerable agents with fresh context windows |
| I-5. Workflows | Three workflow patterns ΓÇö from single-threaded to parallel worktrees to autonomous agent workflows |
| I-6. Continuous AI | Agents run on schedules, react to events, and improve themselves with every cycle |
| II-1. Clean Up Your Codebase | Codebase compiles clean, no dead code, consistent patterns |
| II-2. Establish Context | Agent can describe your architecture without reading every file |
| II-3. Learn Development Patterns | Agent’s output looks like your team wrote it |
| II-4. Build Your Safety Net | Every PR runs CI, tests pass, preview deploys work |
| II-5. Iterate & Improve | Failures turn into better feedback loops, better guardrails, and better future runs |
| III. AI Governance | Your agents operate within a 7-layer governance stack ΓÇö constitution, autonomy, approval gates, safety protocols, code guards, context isolation, and brand safety |
| IV. Platform Engineering | Your agentic development patterns are available org-wide via golden paths, IssueOps, Copilot as platform UI, hookflow governance, and CI/CD as a service |
| V. GitOps for Agent Governance | Your entire agent platform — config, governance, security, scheduling, and data ownership — is declarative, versioned in Git, and every operational change is a PR |
| VI. Cron Architecture | Roughly 60 scheduled jobs run on precise cadences with zero human triggers — staggered slots, fresh-agent isolation, self-healing patterns, and compounding autonomous improvement |
| VII. Copilot Plugins | At least one domain-expert plugin is built and installed — manifest declares identity, skills encode domain procedures, MCP tools execute real operations, and institutional knowledge is no longer trapped in individual developers’ heads |
Start with the building blocks. Then work the transformation steps in order. Deterministic enablement is weak without the safety net. Iteration is weak without context. Workflows only compound once the rest of the system can support them. Platform engineering scales it to the org. GitOps makes the entire system auditable and rollback-safe. Cron architecture makes it all autonomous — running, healing, and improving without human triggers. And Copilot plugins package the accumulated wisdom of the entire system into shareable domain experts that any developer on any team can invoke from their IDE.
The result: an AI agent that isn’t just “helpful sometimes” — it’s a reliable, governed, continuously improving development partner that you trust to operate in your codebase. A platform that gives every team the same capability. A governance system where every decision lives in Git. An operations engine where 60+ scheduled jobs wake on their own cadences, do bounded work, and make the system better with every cycle. And a plugin layer where domain expertise becomes institutional memory — installed in every IDE, version-controlled, testable, and immune to team turnover.
This is a preview of the full blueprint. The complete guide includes implementation templates, architecture diagrams, CI/CD configs, hook examples, and printable checklists for each part and step.
All templates are available as public GitHub template repositories ΓÇö click “Use this template” to get started:
- 🧠 copilot-instructions-starter — Context engineering & copilot-instructions.md
- 🔒 copilot-hooks-starter — Hooks, extensions & safety guardrails
- 🤖 copilot-agent-starter — Agent delegation & orchestration
- ⚡ copilot-ci-pipeline — CI/CD workflows & feedback loops
- 🔄 gh-hookflow — IssueOps engine & automation patterns
- 🌐 gh-aw-overview — Copilot extension for org context & platform catalog
- 🏠 copilot-life-os-starters — Full platform scaffolding & life OS architecture