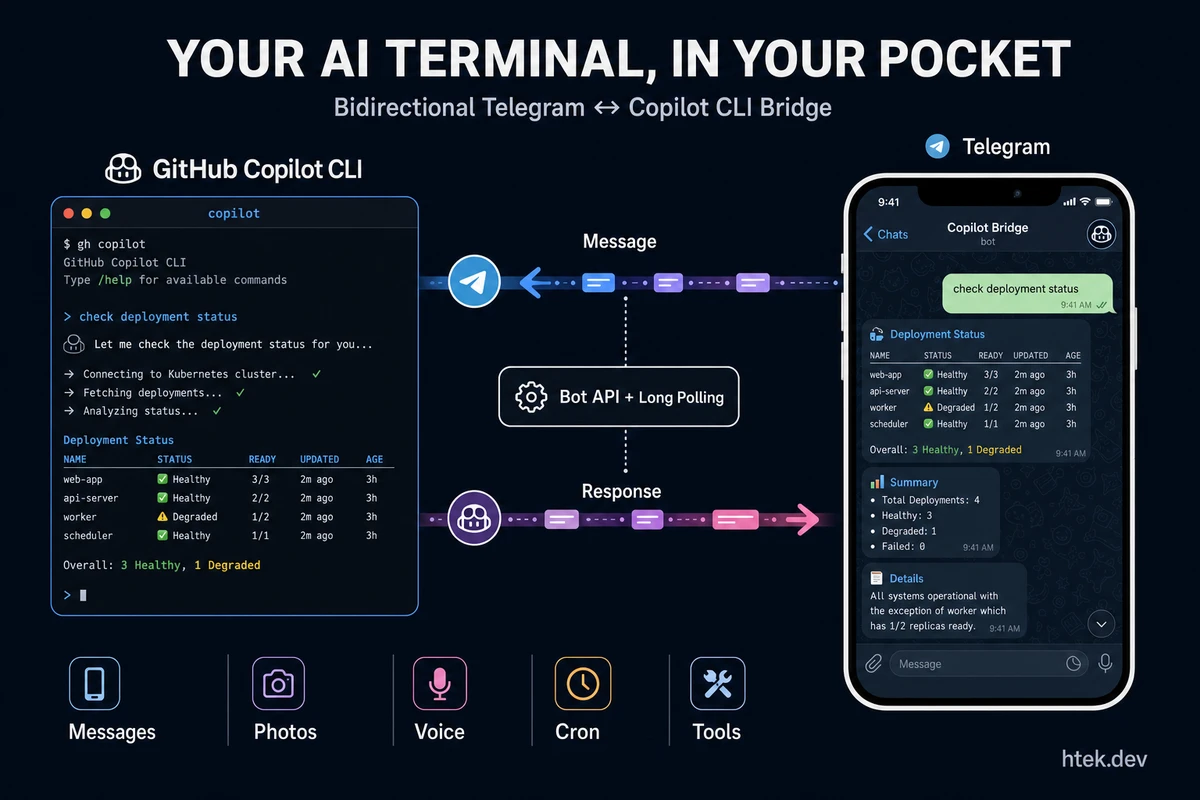
Why Would You Want This?
Picture this: you’re walking the dog, waiting at the dentist, or three beers deep at a barbecue — and you need to check on a deployment, ask your agent to look something up, or kick off a data pipeline. You pull out your phone, open Telegram, type a message, and your GitHub Copilot CLI session on your desktop responds. The answer comes back right there in the chat.
That’s what we’re building. A Telegram bridge extension that turns your Copilot CLI session into a bidirectional chat — every message you send in Telegram becomes a prompt in the CLI, and every assistant response gets forwarded back. No VPN, no SSH, no remote desktop. Just Telegram.
 Everything your pocket terminal can do — one extension file, five powerful capabilities.
By the end of this guide, you’ll have:
- 📱 Bidirectional messaging — Telegram ↔ Copilot CLI
- 📸 Photo support — send images from Telegram for vision analysis
- 🎤 Voice notes — transcribed via OpenAI Whisper and forwarded as text prompts
- ⏰ Cron jobs — scheduled tasks that run automatically (daily briefings, heartbeat checks)
- 🛠️ Custom tools —
telegram_send_message,telegram_send_photo,telegram_get_status
All of this runs as a Copilot CLI extension — no external servers, no Docker, no cloud functions. Just a single .mjs file in your repo.
Prerequisites
Before we start, make sure you have:
- GitHub Copilot CLI installed and working (the
copilotbinary) - Node.js 18+ (the extension uses
fetch,AbortController, and ES modules) - A Telegram account (obviously)
- ~15 minutes of your time
Optional for voice note transcription:
- An OpenAI API key with access to the Whisper model
Step 1: Create a Telegram Bot
Every Telegram bot starts with @BotFather. Open it in Telegram and run through the flow:
- Send
/newbot - Pick a display name (e.g., “Copilot CLI Bridge”)
- Pick a username — must end in
bot(e.g.,my_copilot_cli_bot) - BotFather replies with your bot token — something like
7123456789:AAH...
Save that token. You’ll need it in Step 3.
💡 Tip: Also send
/setdescriptionto give your bot a description. And/setuserpicif you want it to look professional. I use the GitHub Copilot logo.
Now open a chat with your new bot and send /start. This establishes the chat and gets it ready to receive messages.
Step 2: Build the Extension
Create the extension directory and file:
.github/
  extensions/
    telegram-bridge/
      extension.mjs
This is a single file. Let me walk through each section.
2a. Imports and Configuration
import { readFileSync, existsSync } from "node:fs";
import { resolve, basename } from "node:path";
import { joinSession } from "@github/copilot-sdk/extension";

// Read config from .env file
const ENV_FILE = resolve(process.cwd(), ".env");
let TELEGRAM_TOKEN = process.env.TELEGRAM_BOT_TOKEN || "";
let TELEGRAM_CHAT_ID = process.env.TELEGRAM_CHAT_ID || "";

function parseEnvFile(filePath) {
  if (!existsSync(filePath)) return;
  const content = readFileSync(filePath, "utf-8");
  for (const line of content.split("\n")) {
    const trimmed = line.trim();
    if (!trimmed || trimmed.startsWith("#")) continue;
    const eqIndex = trimmed.indexOf("=");
    if (eqIndex === -1) continue;
    const key = trimmed.slice(0, eqIndex).trim();
    let value = trimmed.slice(eqIndex + 1).trim();
    // Strip quotes
    if (
      (value.startsWith('"') && value.endsWith('"')) ||
      (value.startsWith("'") && value.endsWith("'"))
    ) {
      value = value.slice(1, -1);
    }
    if (key === "TELEGRAM_BOT_TOKEN" && !TELEGRAM_TOKEN) TELEGRAM_TOKEN = value;
    if (key === "TELEGRAM_CHAT_ID" && !TELEGRAM_CHAT_ID) TELEGRAM_CHAT_ID = value;
  }
}

parseEnvFile(ENV_FILE);
The extension reads TELEGRAM_BOT_TOKEN from either environment variables or a .env file in your project root. TELEGRAM_CHAT_ID is optional — if set, it locks the bot to a single chat for security.
2b. Telegram API Helpers
const API_BASE = `https://api.telegram.org/bot${TELEGRAM_TOKEN}`;

async function telegramApi(method, body = {}) {
  const res = await fetch(`${API_BASE}/${method}`, {
    method: "POST",
    headers: { "Content-Type": "application/json" },
    body: JSON.stringify(body),
  });
  const data = await res.json();
  if (!data.ok) throw new Error(`Telegram API error: ${data.description}`);
  return data.result;
}
This is the core of the Telegram integration. The Bot API is HTTP-based and dead simple — POST to https://api.telegram.org/bot<token>/<method> with a JSON body. No SDK needed.
2c. Message Sending With Chunking
Telegram has a 4096-character limit per message. Long assistant responses will blow right past that. Here’s the sender that handles chunking and HTML formatting:
const TELEGRAM_MAX_LENGTH = 4096;
async function sendTelegramMessage(chatId, text) {
if (!text || text.trim().length === 0) return;
// Detect if the text already contains HTML tags
const isHtml = /<(?:b|i|u|s|a|code|pre|em|strong)\b[^>]*>/i.test(text);
const chunks = [];
for (let i = 0; i < text.length; i += TELEGRAM_MAX_LENGTH) {
chunks.push(text.slice(i, i + TELEGRAM_MAX_LENGTH));
}
for (const chunk of chunks) {
try {
if (isHtml) {
await telegramApi("sendMessage", {
chat_id: chatId,
text: sanitizeTelegramHtml(chunk),
parse_mode: "HTML",
});
} else {
await telegramApi("sendMessage", {
chat_id: chatId,
text: markdownToTelegramHtml(chunk),
parse_mode: "HTML",
});
}
} catch {
// Fallback to plain text if formatting fails
const plain = chunk
.replace(/<[^>]+>/g, "")
.replace(/&/g, "&")
.replace(/</g, "<")
.replace(/>/g, ">");
await telegramApi("sendMessage", { chat_id: chatId, text: plain });
}
// Rate limit between chunks
if (chunks.length > 1) await sleep(150);
}
}The fallback is key. Telegram’s HTML parser is strict — if a tag isn’t closed properly, the entire message fails. By catching errors and retrying with plain text, we never lose a message.
Here are the formatting helpers:
// Telegram only supports: b, strong, i, em, u, ins, s, strike, del, a, code, pre
function sanitizeTelegramHtml(html) {
return html
.replace(
/<\/?(?!b|strong|i|em|u|ins|s|strike|del|a|code|pre|\/)[a-z][^>]*>/gi,
""
)
.replace(/&amp;/g, "&");
}
// Convert markdown-ish text to Telegram-safe HTML
function markdownToTelegramHtml(text) {
return text
.replace(/&/g, "&")
.replace(/</g, "<")
.replace(/>/g, ">")
.replace(/\*\*(.+?)\*\*/g, "<b>$1</b>")
.replace(/__(.+?)__/g, "<b>$1</b>")
.replace(/(?<!\w)\*([^*]+?)\*(?!\w)/g, "<i>$1</i>")
.replace(/(?<!\w)_([^_]+?)_(?!\w)/g, "<i>$1</i>")
.replace(/`([^`]+?)`/g, "<code>$1</code>")
.replace(/\[([^\]]+)\]\(([^)]+)\)/g, '<a href="$2">$1</a>');
}
function sleep(ms) {
return new Promise((r) => setTimeout(r, ms));
}2d. Long Polling Loop
This is the heart of the extension. Long polling is Telegram’s recommended way to receive messages without a webhook server:
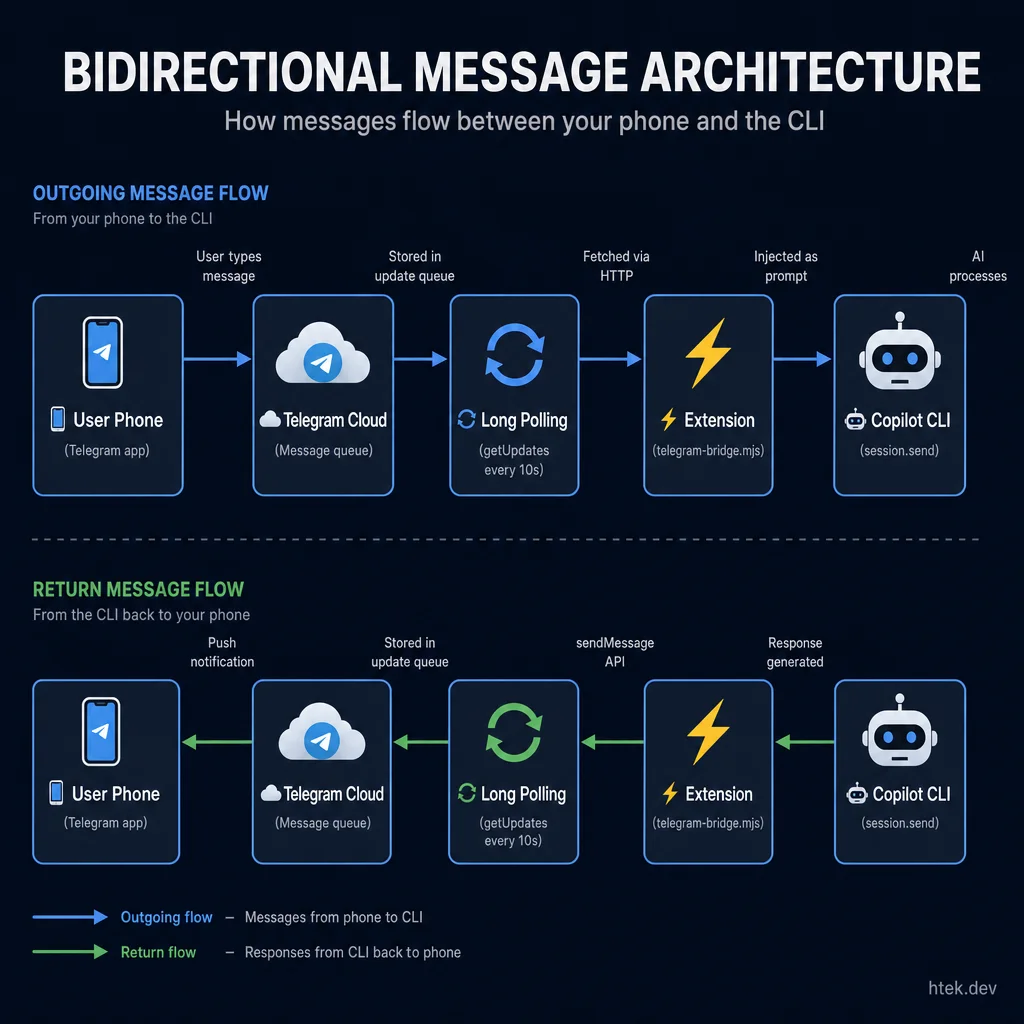 The full round-trip: your message travels through Telegram’s cloud, gets fetched by the extension via long polling, injected as a prompt, and the response flows back.
let running = false;
let pollOffset = 0;
let activeChatId = TELEGRAM_CHAT_ID || null;

async function skipOldUpdates() {
  try {
    const result = await telegramApi("getUpdates", {
      offset: -1,
      limit: 1,
      timeout: 0,
    });
    if (result.length > 0) {
      pollOffset = result[0].update_id + 1;
    }
  } catch {
    /* start from 0 */
  }
}

async function pollLoop(session) {
  running = true;
  await sleep(2000); // Let any previous instance release
  await skipOldUpdates();

  try {
    const me = await telegramApi("getMe");
    await session.log(
      `🤖 Telegram bot connected: @${me.username} (${me.first_name})`
    );
  } catch (err) {
    await session.log(`⚠️ Could not verify bot: ${err.message}`, {
      level: "warning",
    });
  }

  await session.log("📡 Telegram long polling started");

  while (running) {
    try {
      const res = await fetch(`${API_BASE}/getUpdates`, {
        method: "POST",
        headers: { "Content-Type": "application/json" },
        body: JSON.stringify({
          offset: pollOffset,
          timeout: 10,
          allowed_updates: ["message"],
        }),
      });
      const data = await res.json();
      if (!data.ok) {
        await sleep(5000);
        continue;
      }

      for (const update of data.result) {
        pollOffset = update.update_id + 1;
        if (!update.message) continue;

        const msg = update.message;
        const chatId = String(msg.chat.id);
        const from = msg.from?.first_name || msg.from?.username || "Unknown";

        // Security: restrict to configured chat
        if (TELEGRAM_CHAT_ID && chatId !== TELEGRAM_CHAT_ID) {
          await sendTelegramMessage(
            chatId,
            "⛔ Unauthorized. This bot is locked to a specific chat."
          );
          continue;
        }

        activeChatId = chatId;

        // Handle /start, /status, /help commands
        if (msg.text === "/start") {
          await sendTelegramMessage(
            chatId,
            `✅ Connected! Your chat ID is: ${chatId}\n\n` +
              `Send any message to forward it to your Copilot CLI session.`
          );
          continue;
        }

        if (msg.text === "/status") {
          await sendTelegramMessage(
            chatId,
            `📡 Bridge active\n• Chat: ${chatId}\n• Polling: ${running}`
          );
          continue;
        }

        // Forward text to session
        if (msg.text) {
          await session.log(`💬 [Telegram] ${from}: ${msg.text.slice(0, 80)}`);
          session
            .send({
              prompt: `[Telegram from ${from}]: ${msg.text}`,
              mode: "immediate",
            })
            .catch(() => {});
          continue;
        }
      }
    } catch (err) {
      if (err.name === "AbortError") break;
      await session.log(`⚠️ Poll error: ${err.message}`, {
        level: "warning",
      });
      await sleep(3000);
    }
  }
}
A few design decisions worth calling out:
skipOldUpdates()— On startup, we skip any messages that arrived while the bot was offline. Without this, you’d get a flood of old messages replayed.mode: "immediate"— This tells the session to handle the prompt right now, even if it’s in the middle of something. The alternative is"enqueue", which queues it for later.timeout: 10ingetUpdates— Telegram holds the connection open for 10 seconds, then returns empty if no messages arrived. This is long polling: low latency, low CPU, no webhook infrastructure needed.
Step 3: Configure Your Environment
Create a .env file in your project root:
TELEGRAM_BOT_TOKEN=7123456789:AAH_your_token_hereThat’s the minimum. Optionally, lock the bot to your chat:
TELEGRAM_BOT_TOKEN=7123456789:AAH_your_token_here
TELEGRAM_CHAT_ID=123456789
💡 How to get your chat ID: Send
/startto your bot, then check the Telegram API response — it contains yourchat.id. Or just start the extension and look at the logs when you send a message.
Important: Add .env to your .gitignore:
echo ".env" >> .gitignoreStep 4: Register Tools
The extension exposes three tools to the Copilot CLI session. These go in the joinSession() call:
const session = await joinSession({
  hooks: {
    onSessionStart: async () => {
      if (!TELEGRAM_TOKEN) {
        return {
          additionalContext:
            "[telegram-bridge] Not active — set TELEGRAM_BOT_TOKEN in .env.",
        };
      }
      return {
        additionalContext:
          "[telegram-bridge] Telegram bridge is ACTIVE. " +
          "Incoming messages appear as prompts. " +
          "Responses are auto-forwarded to Telegram.",
      };
    },
  },

  tools: [
    {
      name: "telegram_send_message",
      description:
        "Send an explicit message to the connected Telegram chat.",
      parameters: {
        type: "object",
        properties: {
          message: {
            type: "string",
            description: "The message text to send to Telegram",
          },
          chat_id: {
            type: "string",
            description: "Optional: specific chat ID. Defaults to active chat.",
          },
        },
        required: ["message"],
      },
      handler: async (args) => {
        const targetChat = args.chat_id || activeChatId;
        if (!targetChat)
          return "No active Telegram chat. Message the bot first.";
        await sendTelegramMessage(targetChat, args.message);
        return `Message sent to chat ${targetChat}`;
      },
    },

    {
      name: "telegram_send_photo",
      description:
        "Send a photo to the connected Telegram chat. " +
        "Accepts a local file path or URL.",
      parameters: {
        type: "object",
        properties: {
          photo: {
            type: "string",
            description: "Path to local image or URL",
          },
          caption: {
            type: "string",
            description: "Optional caption (max 1024 chars)",
          },
          chat_id: {
            type: "string",
            description: "Optional: specific chat ID",
          },
        },
        required: ["photo"],
      },
      handler: async (args) => {
        const targetChat = args.chat_id || activeChatId;
        if (!targetChat) return "No active Telegram chat.";

        const isUrl =
          args.photo.startsWith("http://") || args.photo.startsWith("https://");
        if (isUrl) {
          const body = { chat_id: targetChat, photo: args.photo };
          if (args.caption) body.caption = args.caption;
          await telegramApi("sendPhoto", body);
        } else {
          const fileData = readFileSync(args.photo);
          const formData = new FormData();
          formData.append("chat_id", targetChat);
          formData.append("photo", new Blob([fileData]), basename(args.photo));
          if (args.caption) formData.append("caption", args.caption);
          const res = await fetch(`${API_BASE}/sendPhoto`, {
            method: "POST",
            body: formData,
          });
          const data = await res.json();
          if (!data.ok) throw new Error(data.description);
        }
        return `Photo sent to chat ${targetChat}`;
      },
    },

    {
      name: "telegram_get_status",
      description: "Check the Telegram bridge connection status.",
      parameters: { type: "object", properties: {} },
      handler: async () =>
        JSON.stringify(
          {
            configured: !!TELEGRAM_TOKEN,
            polling: running,
            activeChatId: activeChatId || "none",
          },
          null,
          2
        ),
    },
  ],
});
These tools let the agent proactively send content to Telegram — status updates, generated reports, photos, anything. Without them, the only messages going to Telegram would be auto-forwarded assistant responses.
Step 5: Auto-Forward Responses
This is the magic that makes it feel like a real chat. After joinSession(), subscribe to the session’s event stream:
session.on("assistant.message", async (event) => {
  if (!activeChatId || !TELEGRAM_TOKEN || !running) return;

  const content = event.data.content;
  if (!content || content.trim().length === 0) return;

  try {
    const chunks = [];
    for (let i = 0; i < content.length; i += TELEGRAM_MAX_LENGTH) {
      chunks.push(content.slice(i, i + TELEGRAM_MAX_LENGTH));
    }
    for (const chunk of chunks) {
      try {
        await telegramApi("sendMessage", {
          chat_id: activeChatId,
          text: chunk,
          parse_mode: "Markdown",
        });
      } catch {
        // Fallback to plain text
        await telegramApi("sendMessage", {
          chat_id: activeChatId,
          text: chunk,
        });
      }
      if (chunks.length > 1) await sleep(150);
    }
  } catch (err) {
    await session.log(`⚠️ Forward failed: ${err.message}`, {
      level: "warning",
    });
  }
});
Every time the assistant finishes a response, it gets forwarded to Telegram. We use parse_mode: "Markdown" for auto-forwarded messages because assistant responses usually contain markdown. If parsing fails (unclosed backticks, weird formatting), the fallback sends plain text.
Start Polling on Load
Finally, kick off the polling loop:
if (TELEGRAM_TOKEN) {
  pollLoop(session).catch(async (err) => {
    await session.log(`❌ Polling crashed: ${err.message}`, {
      level: "error",
    });
  });
} else {
  await session.log(
    "⚠️ TELEGRAM_BOT_TOKEN not found — bridge disabled",
    { level: "warning" }
  );
}
Step 6: Test It
-
Start a Copilot CLI session in your project directory:
copilot -
Look for the startup logs:
🤖 Telegram bot connected: @my_copilot_cli_bot (Copilot CLI Bridge) 📡 Telegram long polling started — waiting for messages -
Open Telegram and send your bot a message:
What time is it? -
You should see:
- In the CLI:
💬 [Telegram] Hector: What time is it? - In Telegram: the assistant’s response appears
- In the CLI:
-
Test the tools — ask the CLI directly:
Send a message to Telegram saying "Hello from the CLI!" -
The agent will call
telegram_send_messageand you’ll see it in Telegram.
That’s it. You now have a bidirectional Telegram ↔ Copilot CLI bridge.
Bonus: Voice Notes With Whisper
Want to send voice notes from Telegram and have them transcribed into text prompts? Add this to the polling loop’s message handler, right after the text message handler:
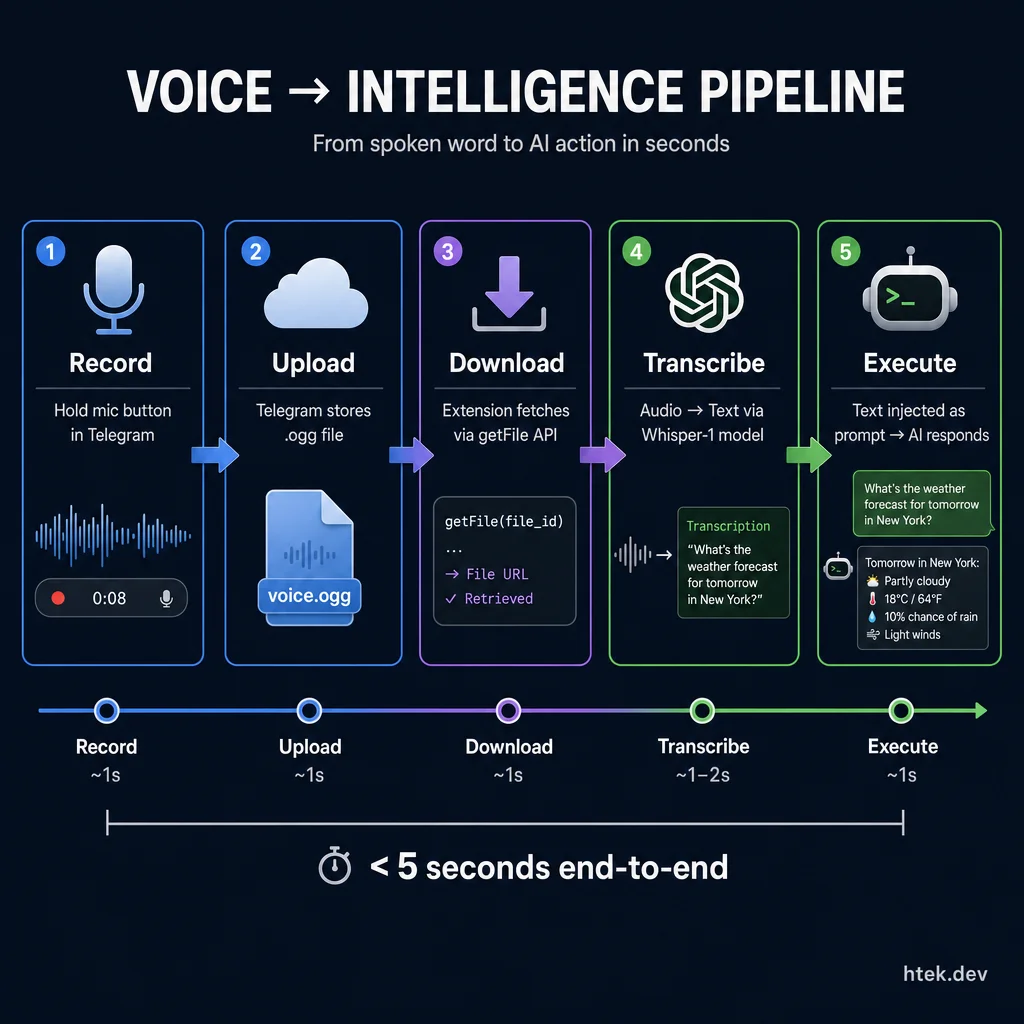 From spoken word to AI action in seconds — the voice pipeline handles recording, file transfer, transcription, and prompt injection automatically.
// Handle voice notes
if (msg.voice || msg.audio) {
  const voiceObj = msg.voice || msg.audio;
  await session.log(`🎤 [Telegram] ${from}: voice (${voiceObj.duration}s)`);

  setTimeout(async () => {
    try {
      const openaiKey = process.env.OPENAI_API_KEY;
      if (!openaiKey) {
        await sendTelegramMessage(chatId, "⚠️ No OpenAI key for transcription.");
        return;
      }

      // Download voice file from Telegram
      const fileInfo = await telegramApi("getFile", {
        file_id: voiceObj.file_id,
      });
      const fileUrl =
        `https://api.telegram.org/file/bot${TELEGRAM_TOKEN}/${fileInfo.file_path}`;
      const audioRes = await fetch(fileUrl);
      const audioBuffer = Buffer.from(await audioRes.arrayBuffer());

      // Build multipart form for Whisper API
      const boundary = "----WhisperBoundary" + Date.now();
      const ext = (fileInfo.file_path || "voice.ogg").split(".").pop();
      const filename = `voice.${ext}`;
      const mimeMap = {
        ogg: "audio/ogg",
        oga: "audio/ogg",
        mp3: "audio/mpeg",
        m4a: "audio/mp4",
        wav: "audio/wav",
      };
      const mime = mimeMap[ext] || "audio/ogg";

      const parts = [
        `--${boundary}\r\nContent-Disposition: form-data; name="file"; filename="${filename}"\r\nContent-Type: ${mime}\r\n\r\n`,
        audioBuffer,
        `\r\n--${boundary}\r\nContent-Disposition: form-data; name="model"\r\n\r\nwhisper-1\r\n--${boundary}--\r\n`,
      ];
      const bodyBuffer = Buffer.concat([
        Buffer.from(parts[0]),
        parts[1],
        Buffer.from(parts[2]),
      ]);

      const whisperRes = await fetch(
        "https://api.openai.com/v1/audio/transcriptions",
        {
          method: "POST",
          headers: {
            Authorization: `Bearer ${openaiKey}`,
            "Content-Type": `multipart/form-data; boundary=${boundary}`,
          },
          body: bodyBuffer,
        }
      );

      if (!whisperRes.ok) throw new Error(`Whisper ${whisperRes.status}`);
      const result = await whisperRes.json();
      const transcript = result.text || "(empty)";

      await session.log(`🎤 Transcribed: ${transcript.slice(0, 100)}...`);
      await session.send({
        prompt: `[Telegram from ${from}]: ${transcript}`,
        mode: "immediate",
      });
    } catch (err) {
      await sendTelegramMessage(
        chatId,
        `⚠️ Transcription failed: ${err.message.slice(0, 100)}`
      );
    }
  }, 0);
  continue;
}
Add OPENAI_API_KEY to your .env:
OPENAI_API_KEY=sk-...Now you can hold down the mic button in Telegram, speak your prompt, and it gets transcribed and fed to the CLI session as text. I use this constantly when I’m on the move.
Bonus: Add Cron Jobs
Once you have Telegram working, the natural next question is: “Can the agent do things on a schedule?” Yes. Let’s build a cron scheduler extension.
The Cron Scheduler Extension
Create .github/extensions/cron-scheduler/extension.mjs:
import { readFileSync, existsSync, watchFile } from "node:fs";
import { resolve } from "node:path";
import { joinSession } from "@github/copilot-sdk/extension";

// ---- Cron parser (5-field: min hour dom month dow) ----
function parseCronField(field, min, max) {
  const values = new Set();
  for (const part of field.split(",")) {
    if (part === "*") {
      for (let i = min; i <= max; i++) values.add(i);
      continue;
    }
    const stepMatch = part.match(/^(.+)\/(\d+)$/);
    if (stepMatch) {
      const step = parseInt(stepMatch[2], 10);
      let start = min, end = max;
      if (stepMatch[1] !== "*") {
        const r = stepMatch[1].split("-");
        start = parseInt(r[0], 10);
        if (r.length === 2) end = parseInt(r[1], 10);
      }
      for (let i = start; i <= end; i += step) values.add(i);
      continue;
    }
    const rangeMatch = part.match(/^(\d+)-(\d+)$/);
    if (rangeMatch) {
      for (let i = parseInt(rangeMatch[1]); i <= parseInt(rangeMatch[2]); i++)
        values.add(i);
      continue;
    }
    values.add(parseInt(part, 10));
  }
  return values;
}

function parseCron(expr) {
  const f = expr.trim().split(/\s+/);
  if (f.length !== 5) throw new Error(`Invalid cron: "${expr}"`);
  return {
    minutes: parseCronField(f[0], 0, 59),
    hours: parseCronField(f[1], 0, 23),
    daysOfMonth: parseCronField(f[2], 1, 31),
    months: parseCronField(f[3], 1, 12),
    daysOfWeek: parseCronField(f[4], 0, 6),
  };
}

function cronMatches(parsed, date) {
  return (
    parsed.minutes.has(date.getMinutes()) &&
    parsed.hours.has(date.getHours()) &&
    parsed.daysOfMonth.has(date.getDate()) &&
    parsed.months.has(date.getMonth() + 1) &&
    parsed.daysOfWeek.has(date.getDay())
  );
}

function nowInTimezone(tz) {
  return new Date(new Date().toLocaleString("en-US", { timeZone: tz }));
}

// ---- Config ----
const CRON_FILE = resolve(process.cwd(), "cron.json");
const CRON_ENABLED =
  process.env.CRON_ENABLED === "true" || process.env.CRON_ENABLED === "1";
let config = { timezone: "UTC", jobs: [] };
let parsedJobs = [];

function loadConfig() {
  if (!CRON_ENABLED || !existsSync(CRON_FILE)) return;
  try {
    config = JSON.parse(readFileSync(CRON_FILE, "utf-8"));
    config.timezone = config.timezone || "UTC";
    parsedJobs = (config.jobs || [])
      .filter((j) => j.enabled !== false)
      .map((j) => ({ ...j, parsed: parseCron(j.schedule) }));
  } catch {
    parsedJobs = [];
  }
}

loadConfig();
if (existsSync(CRON_FILE)) {
  watchFile(CRON_FILE, { interval: 5000 }, () => loadConfig());
}

// ---- Scheduler ----
const lastFired = new Map();
function minuteKey(d) {
  return `${d.getFullYear()}-${d.getMonth()}-${d.getDate()}-${d.getHours()}-${d.getMinutes()}`;
}

async function checkSchedule(session) {
  if (parsedJobs.length === 0) return;
  const now = nowInTimezone(config.timezone);
  const mk = minuteKey(now);

  for (const job of parsedJobs) {
    if (!cronMatches(job.parsed, now)) continue;
    const key = `${job.id}:${mk}`;
    if (lastFired.has(key)) continue;
    lastFired.set(key, true);

    await session.log(`⏰ [cron] Running: ${job.id}`);
    await session.send({
      prompt: `[Scheduled Task: ${job.id}] ${job.prompt}`,
      mode: "enqueue",
    });
  }
}

// ---- Session ----
const session = await joinSession({
  hooks: {
    onSessionStart: async () => ({
      additionalContext: CRON_ENABLED
        ? `[cron] ${parsedJobs.length} job(s) active (${config.timezone})`
        : "[cron] Disabled — set CRON_ENABLED=true",
    }),
  },
  tools: [
    {
      name: "cron_list_jobs",
      description: "List all configured cron jobs.",
      parameters: { type: "object", properties: {} },
      handler: async () => {
        loadConfig();
        if (config.jobs.length === 0) return "No cron jobs configured.";
        return config.jobs
          .map((j) => `• ${j.id}: ${j.schedule} [${j.enabled === false ? "off" : "on"}]`)
          .join("\n");
      },
    },
  ],
});

// Start scheduler loop
if (CRON_ENABLED && parsedJobs.length > 0) {
  setInterval(() => checkSchedule(session).catch(() => {}), 60_000);
  checkSchedule(session).catch(() => {});
  await session.log(`⏰ Cron active: ${parsedJobs.length} job(s)`);
}
The cron.json File
Create cron.json in your project root:
{
  "timezone": "America/Chicago",
  "jobs": [
    {
      "id": "daily-briefing",
      "schedule": "0 6 * * 1-5",
      "enabled": true,
      "prompt": "Give me a morning briefing: check my calendar for today, any urgent emails, and top priorities."
    },
    {
      "id": "heartbeat",
      "schedule": "*/20 6-22 * * 1-5",
      "enabled": true,
      "prompt": "Quick scan: any new emails or Teams messages in the last 20 minutes that need attention?"
    }
  ]
}
The cron syntax is standard 5-field: minute hour day-of-month month day-of-week.
| Schedule | Meaning |
|---|---|
0 6 * * 1-5 | 6:00 AM, Monday–Friday |
*/20 6-22 * * 1-5 | Every 20 min, 6 AM–10 PM, weekdays |
0 9,17 * * * | 9 AM and 5 PM, every day |
30 8 1 * * | 8:30 AM on the 1st of each month |
Enable the scheduler in your .env:
CRON_ENABLED=trueAgent-Based Cron Jobs
For complex recurring tasks, you can point a cron job at an agent file instead of an inline prompt. Agent files live in .github/agents/ and contain detailed instructions:
{
  "timezone": "America/Chicago",
  "jobs": [
    {
      "id": "heartbeat",
      "schedule": "*/20 6-22 * * 1-5",
      "enabled": true,
      "agent": "heartbeat"
    }
  ]
}
When the agent field is present instead of prompt, the scheduler reads .github/agents/heartbeat.agent.md and launches a background agent with those instructions. Here’s a simplified example:
---
name: heartbeat
description: "Scan recent activity and take action"
tools:
  - telegram_send_message
  - list_actions
  - add_action
---

# Heartbeat Agent

You are an autonomous assistant running a scheduled check.

## Phase 1: Scan Inbound Activity
- Check emails received in the last 20 minutes
- Check Teams messages received in the last 20 minutes
- If nothing new: stay silent, return "No activity."

## Phase 2: Act
- For each message, classify: needs response? needs action item?
- Auto-reply to simple acknowledgments
- Escalate complex decisions to Telegram

## Phase 3: Housekeeping
- Create action items for follow-ups
- Update existing items if a message resolves one
This is powerful. Your Copilot CLI session becomes an autonomous assistant that checks your communications, takes routine actions, and escalates to your phone via Telegram when it needs your judgment.
What’s Next?
Once you have the bridge and cron running, the possibilities open up:
- Watch lists — Track specific threads or customers and get notified when they reply
- Auto-reply rules — Let the agent handle routine messages with predefined response templates
- Custom agents — Build specialized agents (daily report, code reviewer, data pipeline) and schedule them via cron
- Photo analysis — Send screenshots from your phone and ask the agent to analyze them (the extension already supports photo forwarding via vision)
- Multi-device — Add the same bot to a Telegram group so your team can interact with the agent
The full production version of this extension (with typing indicators, conflict handling, photo uploads, and the standalone bridge mode toggle) is about 750 lines. What I’ve shown here is the core — everything you need to get started. Once it’s working, you’ll find yourself reaching for your phone to talk to your CLI more than you’d expect.
The code runs locally on your machine. Your messages go through Telegram’s servers (encrypted in transit), but the agent, the tools, and all your data stay on your box. No cloud functions, no middleware, no third-party agent platforms. Just Telegram’s Bot API, the Copilot CLI extension SDK, and a .env file.
That’s the whole thing. Go build it.